System and Security: Creating a work partition on MS Windows.
A disk drive (physical disk) may be divided into several parts, called partitions, that on the disk form physically separated storage areas. This doesn't help anything, if the disk crashes, but, in the case, where the filesystem on one partition becomes corrupted, data on other partitions will not be affected. Thus, separating your data and work files from the operating system and application files, by putting them into a separate partition, may be really useful. On Linux systems, this is sometimes done automatically during installation, beside /boot (for the operating system start-up), a third partition being created for /home (all user related files).
The way, how the operating system sees a partition, depends on the OS used. Linux is very flexible, with the possibility to mount a given directory at any place within the tree-like file structure. Thus, /home appears as a subdirectory of / (the filesystem root), independently if it has been created at this location or actually is a separate partition. Similarly, a partition (and by that, a file directory) may span over two or more physical disks, without that the user has to worry about the physical reality. On MS Windows systems, things are different. Each partition appears in the filesystem as a different disk, identified by a drive letter (the drive letter of the partition, where the Windows operating system is located, normally being C:). There are possibilities in MS Windows to mount a partition at a given location within the filesystem, but this isn't usually done. Creating a separate partition for data, on the other side, is rather common. In the past, I stored the major part of my data files in a separate data partition, actually I use the special Windows locations Documents, Photos, Music, Videos. On the other side, I always create a separate partition for work data, i.e. data, that is of temporary usage only, or that has to be changed in order to be as I want it to be; for example: the Wiki Internet pages, where I extract the data for my animal database, the animal pictures, that mostly have to be cut or resized, science related webpages, that I need, when writing a related Free Pascal application... I also create the download directory for my web browser in this partition. Advantages: Temporary data is stored apart from programs and the data, I really work with, the work files may be excluded from an image of the system (with the possibility to include them, if you want so), file fragmentation due to repeated file creation and deletion does not affect the data on the C: drive... This tutorial describes, how to alter your actual disk structure in order to create such a work partition. Please, note that disk partitioning requires some computer knowledge and skills, thus this tutorial may not be adequate for computer newbies!
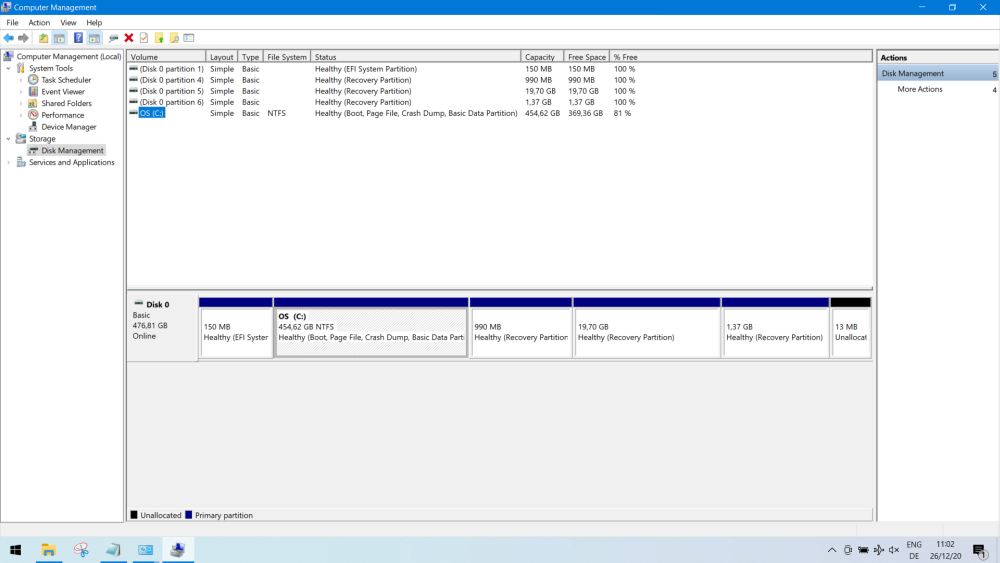
Disk related tasks may be done in Windows Disk Management. To open it in Windows 10, right-click the Start icon and choose the corresponding entry in the pop-up list. On older Windows systems, you find it in Control Panel > Administrative Tools > Computer Management > Disk Management, but I think, that for those, you'll need a third party partitioning tool, as partition resizing is not part of older versions Windows features. The screenshot below shows the physical disk drive of my new DELL laptop. You see that, beside the C: partition, there are several others. These are used by the system (having no drive letters, they do not appear in File Explorer and are not accessible to users): The EFI System partition contains the files, necessary to boot the computer and start Windows; the Recovery partitions contain programs for system recovery, repair, diagnostic, etc (including a command line Windows system, that may be started with Advanced Startup in Settings > Update & Security > Recovery and (normally) also by holding pressed a particular keyboard key, when the computer is turned on), as well as the original files, used to install (or reset) the Windows operating system (Note: Old operating systems do not support EFI boot and don't include all these tools, that might be "life savers", if your Windows crashes).
 |
As all space on the disk is actually part of an existing partition, we have to create free space by shrinking the Windows partition. Two important remarks about this: First, if shrinking the Windows partition goes wrong (what is normally not the case, but it may happen), you will no more be able to start Windows. Thus: Before making modifications to the system partition, create an image of your hard drive! And second, if your C: drive contains lots of data, shrinking the partition may take a really long time. To shrink C:, right-click the partition and choose Shrink Volume (If you wonder, why the C: partition name has changed on this screenshot, it's simply because I changed the volume label).
![Windows Disk Management: Shrinking the C: volume [I] Windows Disk Management: Shrinking the C: volume [I]](../screenshots/workpartition2.jpg) |
The Shrink Volume window opens and here you can define the new size of your C: partition. In fact, the value to be entered is the amount of space to shrink (that can't be greater than the maximum value indicated, when the window pops up). In my case, wanting a C: partition of 350GB, the shrink amount to be entered is 465533 (actual size of C: in MB) - 350×1024 (wanted C: size in MB) = 107133.
![Windows Disk Management: Shrinking the C: volume [II] Windows Disk Management: Shrinking the C: volume [II]](../screenshots/workpartition3.jpg) |
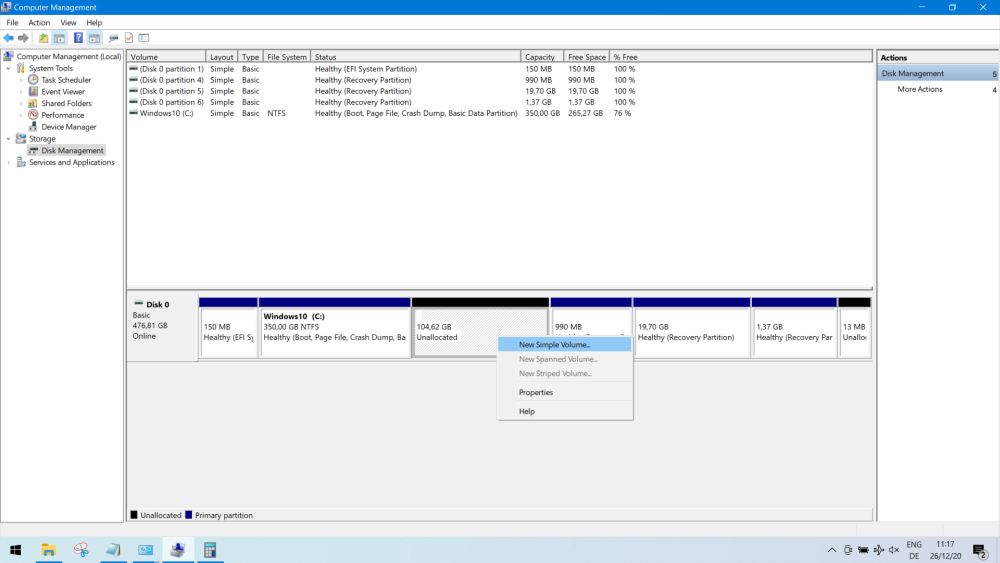
As my laptop is new, with nothing on the disk, but the Windows installation files, the shrinking process took just 2 or 3 seconds. On the screenshot below, you can see the new disk structure: C: has been shrunk to 350GB and there is a 104.62GB area labeled as "Unallocated". This is disk space being really free (not part of any partition), and it's in unallocated space (and only there), where you can create new partitions. To create the new partition, right-click the "Unallocated" area and choose New Simple Volume.
 |
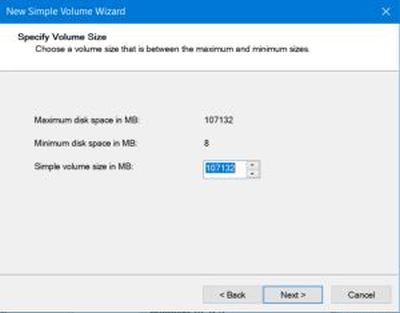
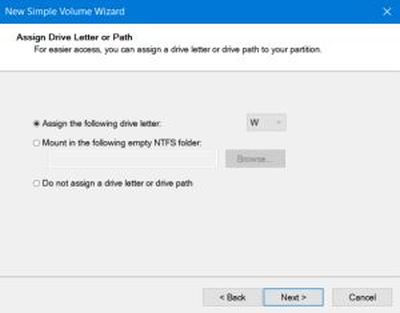
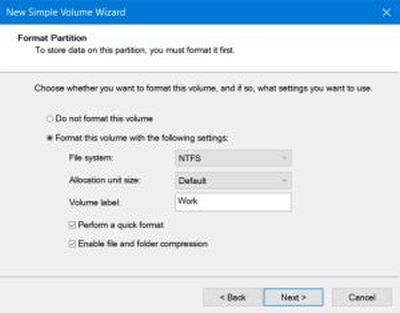
The Simple Volume Wizard is started. As volume size, I let the default value, i.e. the entirety of the unallocated space. As drive letter, I chose W (for Work); you may choose a drive letter as you want, among those available, of course. You should always use the NTFS filesystem and let the default allocation unit size. The volume label is mostly for user convenience, so be free to choose the name, that you prefer (my choice was "Work"). "Perform a quick format" is in most cases enough (especially in my case, where the whole disk was NTFS formatted and there wasn't any data there). I did check the Enable file and folder compression box; this increases the number of files, that you can store on this partition and, except for the C: drive, where file compression may cause problems for some applications to run properly, there is no reason not to profit from this simple way to increase disk storage capacity.
|
|
|
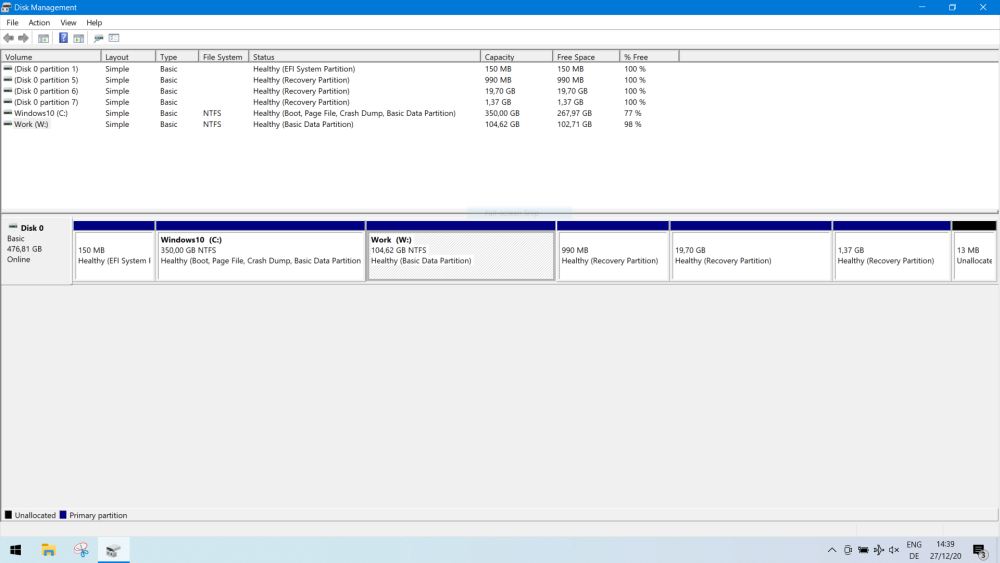
That's it! The screenshot below shows my hard drive, as it actually is, with, beside the EFI and recovery partitions, drive C: (containing the Windows 10 operating system, the applications and their data, as well as my personal data, mostly located in some Windows library), and drive W: (for Internet downloads, work and other temporary files).
 |
If you find this text helpful, please, support me and this website by signing my guestbook.