Using IBM DB2 databases with Lazarus/Free Pascal.
| Well known by mainframe programmers, DB2, the relational database system developed by IBM, is also available for PC. The Db2 Community Edition may be downloaded and used free of charge. To download the database software from the IBM Db2 Download Center, you'll have to create an IBM account. Login in with this account will also allow you to download further software, such as Data Management Console, Visual Studio Code Extensions, and drivers. The RDBMS used in this tutorial is DB2 v11.5.8, running on Windows 10. The sample application has been build with Lazarus v2.2.6 (fpc 3.3.3), x64 on Windows 10. I suppose that this application will also work correctly with other versions of DB2, and that it can also be build with other versions of Lazarus, including Lazarus on Linux (no chance for Mac users: there is no DB2 for macOS available). | ||
| There isn't (at least not for now) any Free Pascal driver for IBM DB2 available, thus we'll have to use ODBC, an interface that makes it possible for applications to access data from a variety of database management systems, and to build our application using a TODBCConnection component, included by default with the Lazarus installation. | ||
| The tutorial shows, how to implement a simple Lazarus application, reading and displaying the number of records in the "employee" table of the "sample" database (after having installed the DB2 server software, you can create this database using First Steps). It is supposed that you are familiar with Lazarus and Free Pascal. The tutorial details are limited to the DB2 specific aspects. Some explanations (such those concerning the ODBC configuration) apply as such to MS Windows only. Click the following link to download the Lazarus/Free Pascal source code of the sample application. | ||
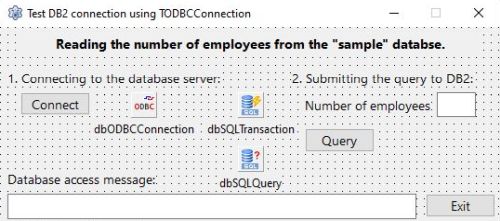
| Create a Lazarus application project with the form shown on the screenshot below. The three database-related components are available in the SQLdb menu of the Lazarus IDE. | ||
|
||
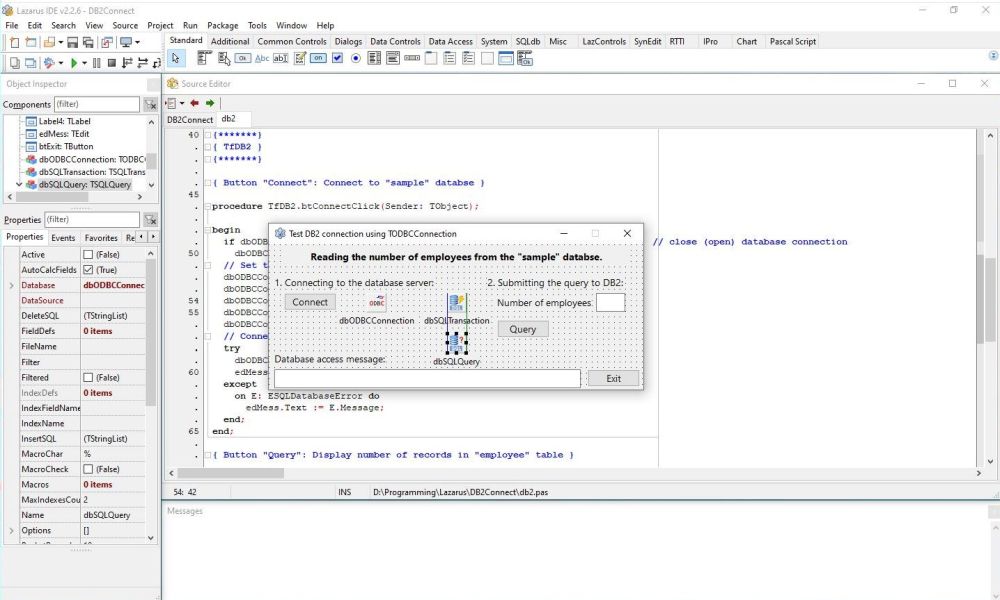
| To use a database with a TODBCConnection, the following components are needed: TODBCConnection, TSQLTransaction and TSQLQuery. Set the "Database" property of the TSQLTransaction object to the name of the TODBCConnection object (I named it "dbODBCConnection") and the "Transaction" property of the TSQLQuery object to the name of the transaction ("dbSQLTransaction"). The "Database" property of this object should be automatically set to "dbODBCConnection". The screenshot below shows the application source opened in Lazarus. With the TSQLQuery component selected on the form, its properties are shown in Object Inspector. You can see on the screenshot that the "Database" property has been set to "dbODBCConnection", (the name of my TODBCConnection object). | ||
|
||
| Setting up ODBC. | ||
| Before having a look at the source code of my "DB2Connect" application, lets configure ODBC to be used to connect to the DB2 "sample" database. ODBC (Open Database Connectivity) is a technology that allows one to connect to a whole variety of databases using a single API, the ODBC API. There are ODBC implementations for various platforms and there are drivers for most Database Management Systems available. Official ODBC documentation can be found at the MSDN ODBC site. | ||
To use ODBC with a given database distribution, we'll need:
|
||
| MS Windows includes the ODBC Data Source Administrator, a built in ODBC Driver Manager, which allows DSNs to be set up, and other configuration. You can find it in Control Panel > Administrative Tools. There are two ODBC Driver Managers available: one for 32bit and one for 64bit data sources. | ||
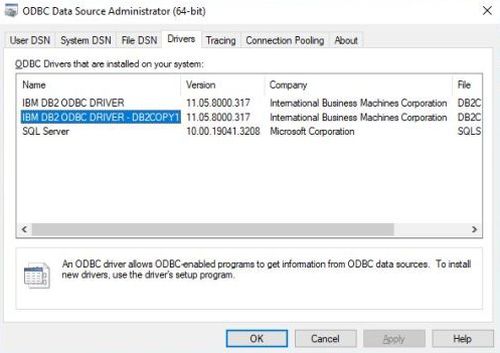
| Open ODBC Data Sources (64bit) and choose the Drivers tab. You see on the screenshot below that on my system there are 3 ODBC drivers installed: one of them is for Microsoft SQLServer (no idea, why it is there), the other two are for DB2. If it's normal to have 2 DB2 drivers here, I don't know. One was installed as part of the DB2 server installation; maybe the other was installed with one of the other IBM products that I use, or that I installed and later-on uninstalled again. Anyway, the driver called IBM DB2 ODBC DRIVER - DB2COPY1 seems the correct choice to me. First, "DB2COPY1" is the name of the DB2 server copy on my system (default name used with "typical" installation of the server). Second, using this driver works fine with Lazarus. | ||
|
||
| The parameters for connecting to an ODBC data source are described in a connection string. This is a string of the form: NAME=VALUE;NAME=VALUE... | ||
An ODBC driver manager provides alternative ways to make DSN shortcuts for a set of parameters:
|
||
| By setting up a DSN, the connection details can be verified to work within the manager dialog, and then the named DSN is all that is needed to use the connection later. The connection details are therefore decoupled from the applications, as only the DSN name is used – the DSN acting as a go-between. | ||
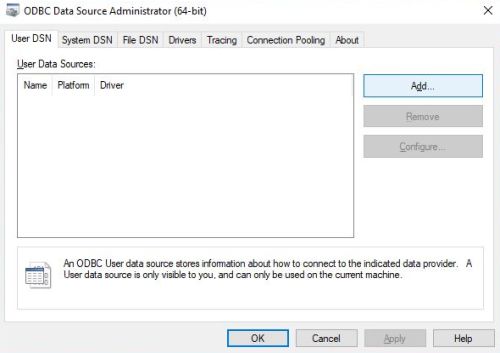
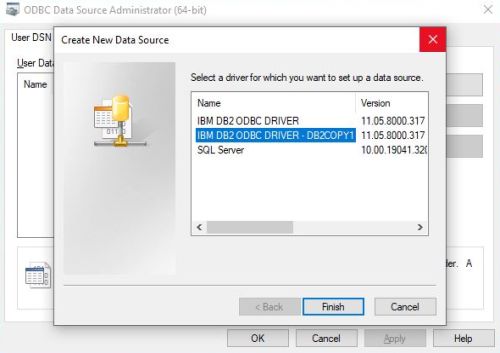
| To set up a user DSN for the DB2 "sample" database on localhost (as for Firebird, and as a difference with MySQL/MariaDB, you must create a DSN for each database that you want to access using ODBC), in ODBC Data Source Administrator, choose the User DSN tab and click the Add... button (screenshot on the left). In the opening Create new data source window, select IBM DB2 ODBC DRIVER - DB2COPY1 (screenshot on the right). | ||
|
||
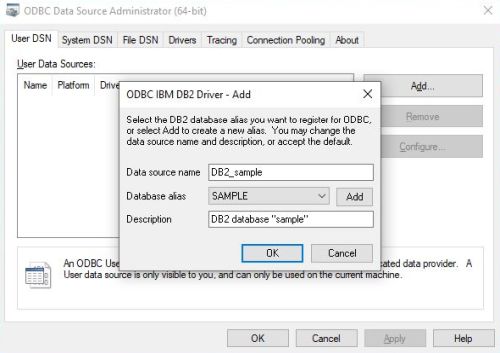
| After having pushed the Finish button, the ODBC IBM ODBC Driver – Add window opens. Two mandatory and one optional values to input: First, we have to enter a data source name (I chose "DB2_sample"); it is this name that we'll have to use when referencing the data source. Second, we have to select the database for which this DSN should be; from the drop-down list, we have to choose "SAMPLE" (if you didn't create any custom databases, it's the only item in the list). Optionally, we can also add a description for the DSN. | ||
|
||
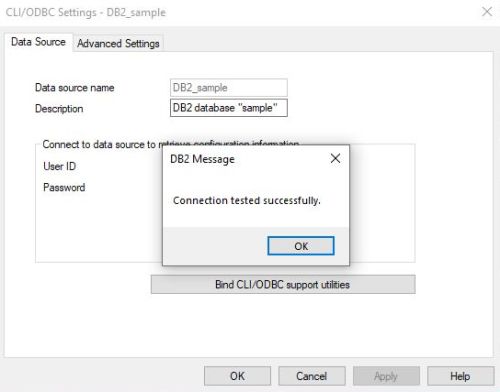
| The new DSN is now listed in the User DSN tab, and we can use the Configure button to set further properties. I let all as is, but used the opportunity to test the connection to the "sample" database using ODBC. To do so, enter user name and password, and push the Connect button. If all is ok, the message "Connection tested successfully" will pop up. | ||
|
||
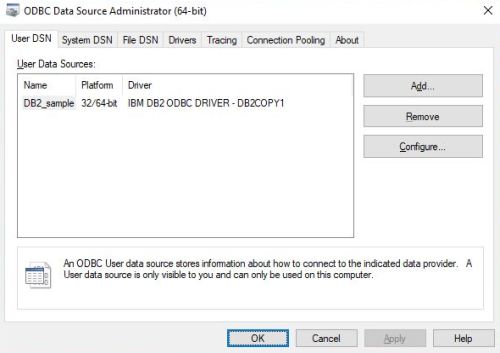
| The screenshot below shows the new DSN in the User DSN tab. Push OK to terminate ODBC setup for the DB2 "sample" database. | ||
|
||
| Connecting to DB2 using ODBC. | ||
| As I said above, the purpose of the sample Free Pascal application is to read the number of records in the "employee" table of the "sample" database. The aim is to show how to connect to a DB2 database. If you want to develop a "real life" application and need help about how to perform "real" SELECTs, INSERTs, UPDATEs and DELETEs in DB2, you might want to have a look at my Using MySQL databases with Lazarus/Free Pascal tutorial. Working with DB2 is essentially the same as described in those documents. | ||
| Connecting to the database is coded within the TfDB2.btConnectClick method ("fDB2" being the name of my form, "btConnect" the name of the button labeled "Connect"). The procedure is executed when the "Connect" button is pushed by the user. Here is the code: | ||
|
{ Button "Connect": Connect to "sample" databse } procedure TfDB2.btConnectClick(Sender: TObject); begin if dbODBCConnection.Connected then // close (open) database connection dbODBCConnection.Close; // Set the connection parameters dbODBCConnection.DatabaseName := 'DB2_sample'; dbODBCConnection.UserName := 'Allu'; dbODBCConnection.Password := 'AlluUser0'; dbODBCConnection.Params.Add('DATABASE=sample'); dbODBCConnection.Params.Add('AUTOCOMMIT=1'); // Connect to the "sample" database try dbODBCConnection.Open; edMess.Text := 'Connection to DB2 database "sample" = OK!'; except on E: ESQLDatabaseError do edMess.Text := E.Message; end; end; |
||
| Before actually trying to connect (catching the exception in the case where something goes wrong), we have to set the connection parameters. The important point here is that DatabaseName has to be set to the name of the DSN, not to the name of the database that we want to access! Doing so, the connection parameters defined in the DSN settings (in particular the host name and port) will be used when we'll connect. Additional parameters can be added within the code. We do this, for example for the user name and password (note that you'll have to use your own values here). The corresponding statements in fact set the connection string keys UserName and Password to the values specified here. You can find some details about connection strings in my Connecting to a MySQL database using Lazarus/Free Pascal tutorial. Parameters, for which there is no key defined, may be added using the Params key, that actually is of type TStrings. We can use this multiple strings key to set the database name and AUTOCOMMIT=1 in order to automatically commit the SQL statements that we execute (as in DB2 the DSN is database specific, maybe that it's not mandatory to set DATABASE=sample here). | ||
| Disconnecting from the database is coded within the TfDB2.btExitClick method ("fDB2" being the name of my form, "btExit" the name of the button labeled "Exit"). The procedure is executed when the "Exit" button is pushed by the user. Here is the code: | ||
|
{ Button "Exit": Disconnect from databse and exit application } procedure TfDB2.btExitClick(Sender: TObject); begin if dbODBCConnection.Connected then dbODBCConnection.Close; Close; end; |
||
| Reading and displaying the number of employees is coded within the TfDB2.btQueryClick method ("fDB2" being the name of my form, "btQuery" the name of the button labeled "Query"). The procedure is executed when the "Query" button is pushed by the user. Here is the code: | ||
|
{ Button "Query": Display number of records in "employee" table } procedure TfDB2.btQueryClick(Sender: TObject); var Count: Integer; begin if dbODBCConnection.Connected then begin // Query the database dbSQLQuery.SQL.Text := 'SELECT count(*) FROM Admin.employee'; try dbSQLQuery.Open; if dbSQLQuery.EOF then Count := 0 else Count := dbSQLQuery.Fields[0].AsInteger; dbSQLQuery.Close; // Display the query result edEmployees.Text := IntToStr(Count); except on E: ESQLDatabaseError do edMess.Text := E.Message; end; end; end; |
||
| The procedure executes the SQL statement SELECT count(*) FROM Admin.employee. If all goes well, the result (number of records in the "employee" table) is displayed, otherwise the DB2 error message is displayed. If you compare this code with the one in the sample application of my MySQL tutorial, you can see that it's, yes we can say so, just the same... | ||
| One point to clarify: What's this "Admin.", prefixing the table name "employee" about? When you create a table in DB2, the table is created within the schema of the user who creates it. On Windows, this normally is the Windows user who ran the installation of the DB2 server, so the user you usually login into your Windows workstation. In my case, this user is called "Admin", thus all table references have to be of the form "Admin.<table-name>". | ||
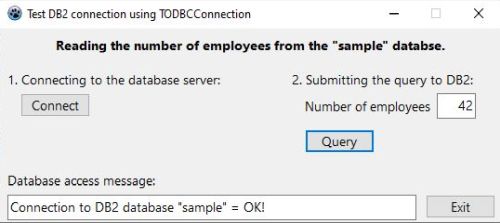
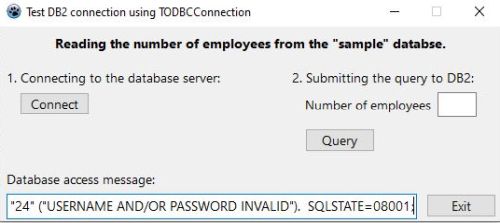
| To terminate the tutorial, here are two screenshots of the application execution: On the screenshot on the left, the connection was successful and the number of employees has been read and is displayed; on the screenshot on the right, the connection failed because the password (I changed the source code) is invalid. | ||
|
If you find this text helpful, please, support me and this website by signing my guestbook.
