Developing FreeBASIC applications on Windows 10.
"FreeBASIC is a free BASIC compiler for Windows (32-bit and 64-bit), 32 bit protected-mode DOS (COFF executables, like DJGPP), and Linux (x86, x86_64, and ARM). It began as an attempt to create a code-compatible, free alternative to Microsoft QuickBASIC, but has quickly grown into a powerful development tool, already including support for libraries such as Allegro, SDL, OpenGL, and many others with its default installation. Aside from having a syntax mostly compatible with QuickBASIC, FreeBASIC introduces several new features to the aged language, including pointers to variables and functions, and unsigned data types."
The paragraph above is how FreeBASIC is described in the FreeBASIC FAQ. This makes FreeBASIC a more than interesting development tool for all those, who long years ago worked or played with QuickBASIC and want to review the command line programs, that they wrote in the past, on Windows 10 or 11, as well as for those, who know the QuickBASIC programming language and search for a possibility to use this knowledge to create GUI applications for the latest versions of MS Windows. This tutorial is about the installation and usage of FreeBASIC 1.10 on Windows 10 (actually the light-version Windows 10 Potato); the tutorial should apply to Windows 11, probably also to Windows 8 (?).
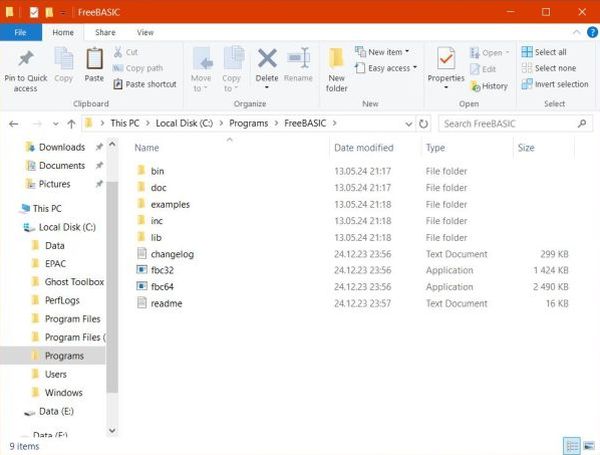
I downloaded the combined 32-bit and 64-bit FreeBASIC standalone package from Sourceforge (file: FreeBASIC-1.10.1-winlibs-gcc-9.3.0.zip) and unpacked the download-archive to C:\Programs\FreeBASIC. The screenshot shows the "installation" directory, where you find two executables: fpc32.exe (the 32-bit compiler), and fpc64.exe (the 64-bit compiler).
|
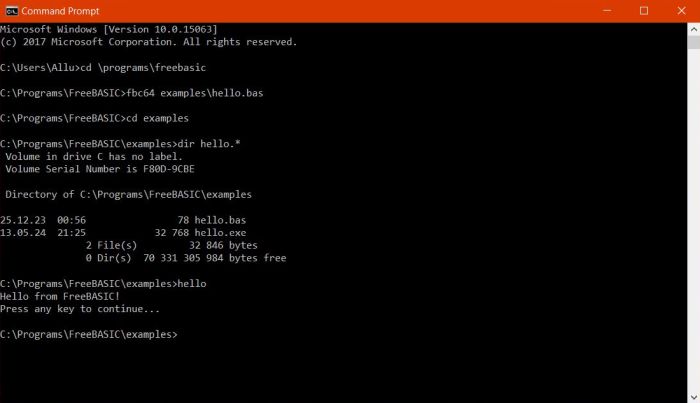
A quick test: The examples subdirectory contains a source file called hello.bas (cf. below for the code). To build it, open Command Prompt and set the FreeBASIC installation directory (in my case: C:\Programs\FreeBASIC) as current (if you want to run the compilers from another directory, you'll have to add the directory with the compilers to your PATH environment variable). Here is the code of hello.bas:
print "Hello from FreeBASIC!"
print "Press any key to continue..."
sleep
Note: The instruction Sleep pauses the execution until the user hits a key on the keyboard...
You can build (compile + link) this program for a 64-bit target, running the command
fbc64 examples\hello.bas
The screenshot shows the build (no output, if all is ok) of hello.bas and the execution of the build result hello.exe.
|
Using CSED_FB as FreeBASIC IDE.
The FreeBASIC installation files do not include an IDE, so we have to find and install one ourselves. I guess that FBIDE and FBEdit are the most commonly used. Here is an alternative: CSED_FB, simple, but including everything that you need to create, build and run 32-bit and 64-bit command line programs and GUI applications. You can download it from FreeBASIC-Portal.de. The download is a RAR archive (if you don't succeed to open it, download 7-Zip, the "best file archiver ever"), that I unpacked to C:\Programs\Csed_Fb. The application is called CSED_FB.exe and you can create a shortcut to launch it on your desktop, or in the Windows Start menu.
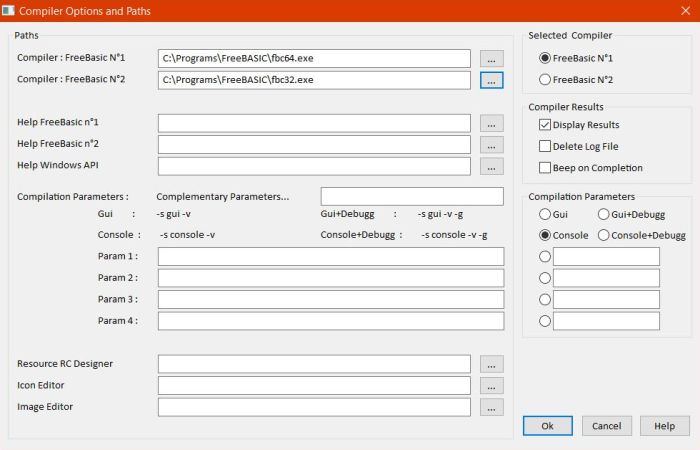
The nice thing with CSED_FB is that we can specify two compilers. From the menu, choose Options > Compiler Options and Paths. Use the "browse" function (the three dots) for compiler #1 to find the 64-bit compiler (fbc64.exe), and the "browse" function for compiler #2 to find the 32-bit compiler (fbc32.exe). In this window, you can also select (by checking the corresponding radio button) if you want to build a command line program, or a GUI application. If you want, you can also check the Display compiler results option.
|
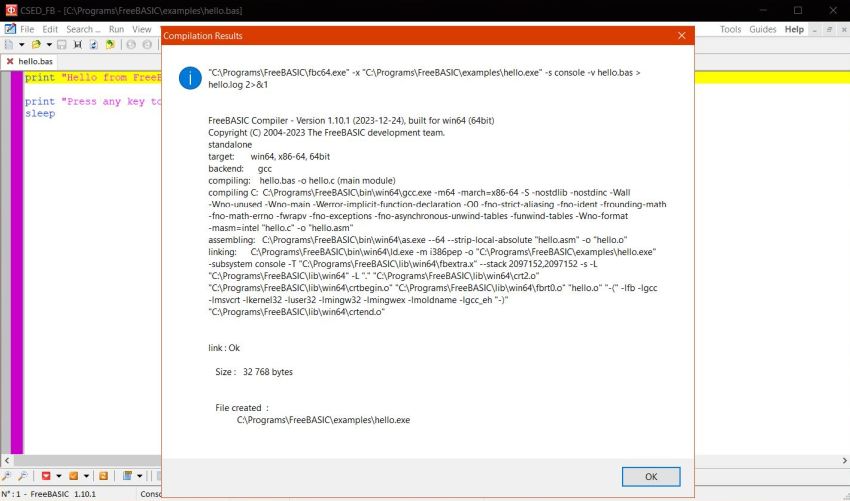
CSED_FB has of course syntax highlighting for BASIC. You can either use the menus, or the icons in the menu bar to check syntax, to compile (i.e. to build) the source, or to run the executable created. The screenshot below shows the build of our command line program from above. The window with the detailed compiler output is due to the Display compiler results option set. You can see that the build is for a 64-bit target (as I used compiler #1).
|
Is it all wrong when I pretend that the "force" of a programming language depends on the libraries available? Anyway, there are lots of them
for FreeBASIC, some included with the installation files, others that have be installed manually. One of the libraries included is the graphics library
fbgfx. To use its functions, you'll have to indicate its usage in your calling program. This is done by the directive
#include "fbgfx.bi"
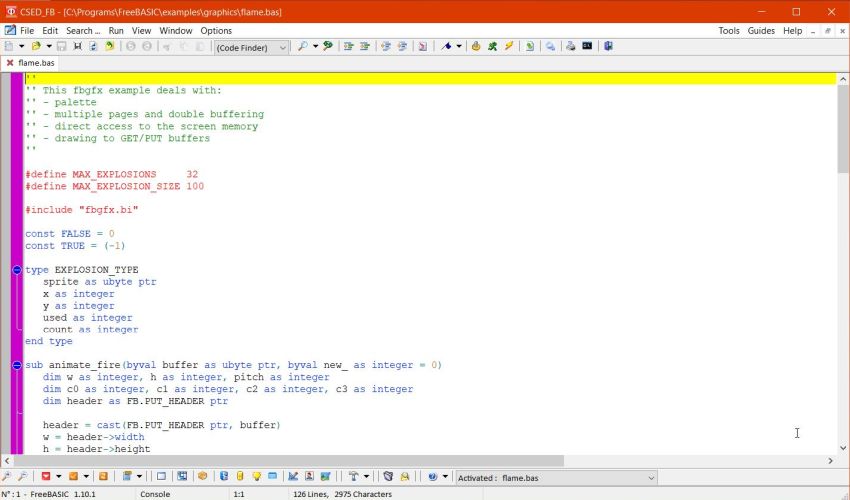
The screenshot below shows the source code of flame.bas, a graphics example included with the FreeBASIC installation files, opened in CSED_FB.
|
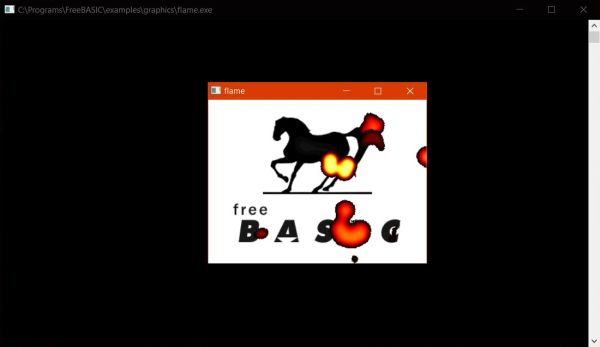
"Graphics program" is not the same as GUI application. The program flame.bas is well a command line program, so this setting has to be selected in the IDE options for the build. The screenshot shows the execution of the program in Windows Command Prompt.
|
Note: This program runs well on my Windows 10 Potato VMware virtual machine, where I built it, but on my regular windows 10 (on my laptop), only the flames are visible, i.e. the horse and the text are somehow missing. Could the issue be due to the different graphic cards, or to different screen resolutions? No idea!
Installing the FBMath library.
One of the libraries, that is not included with the FreeBASIC installation files, is FBMath, an advanced mathematics library, beta status only, and possibly discontinued (last update 2020), but including a whole bunch of math related functions, that should be more than interesting for those, who develop serious math or physics programs using FreeBASIC. And, the actual version (FBMath 0.55 may be downloaded from Sourceforge) seems to work well on my FreeBASIC 1.10.1.
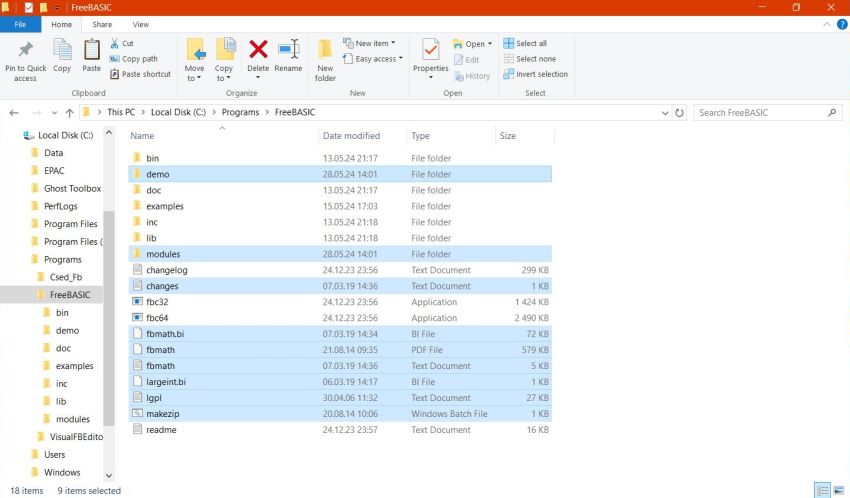
The download is a ZIP archive that you have to unpack in your FreeBASIC installation directory (in my case: C:\Programs\FreeBASIC). The screenshot shows this directory with the FBMath files added.
|
The modules and the demo programs may be built using the batch file compil.bat, located in the modules resp. the demo subdirectory. However, you'll have first to edit the scripts. In fact, the compiler executable is called fbc.exe in the batch files, whereas its name on our system is fbc32.exe (I didn't try out if FBMath may be used with 64-bit programs). Also, I think that the path to the FreeBASIC installation directory is not correct (maybe, that the correct way to proceed would have been to place the FBMath files in a FBMath subdirectory of the FreeBASIC install folder?).
Here are the changes that I made to the compil.bat files:
| Original code | Correct code | |
| set FBas="..\.." | set FBas=C:\Programs\FreeBASIC | |
| set Cmdlin=%FBas%\fbc.exe -c -w pedantic "%%~fa" | set Cmdlin=%FBas%\fbc32.exe -c -w pedantic "%%~fa |
To run the build of the modules script, launch Command Prompt, set C:\Programs\FreeBASIC\modules as current directory, and run the command
compil.bat
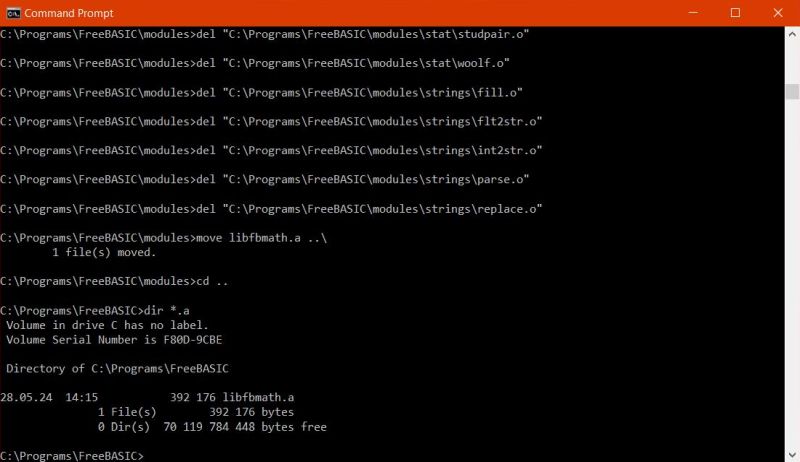
The screenshot shows the final part of the build, with the creation of the library libfbmath.a.
|
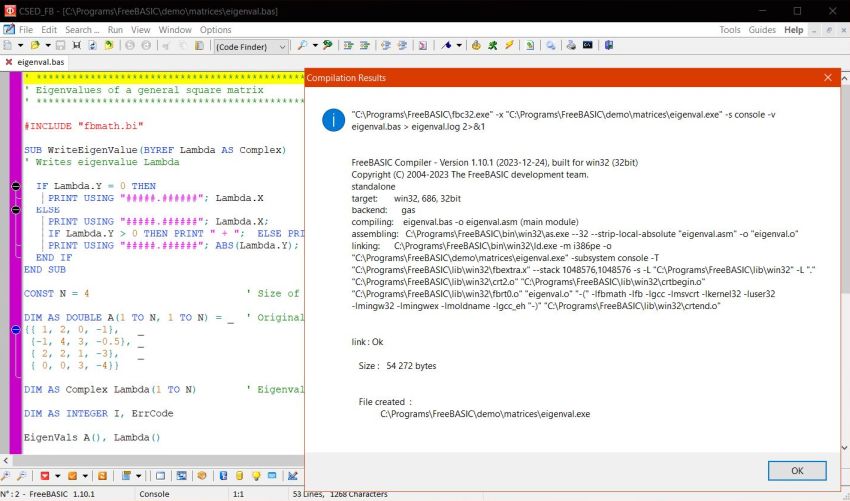
After having also run the (changed) compil.bat script in the demo directory (this also copies the include files, etc), lets try out a nice
little Mandelbrot program. Load the file mandel.bas (from the demo\complex subdirectory) into CSED_FB. Change the compiler options, selecting
compiler #2 (fbc32.exe), be sure that the application is set to build a command line program. The screenshot below shows the source code in
CSED_FB and the window with the results of the compilation. Note, that to use FBMath, you have to add the following directive to your source code:
#include "fbmath.bi"
|
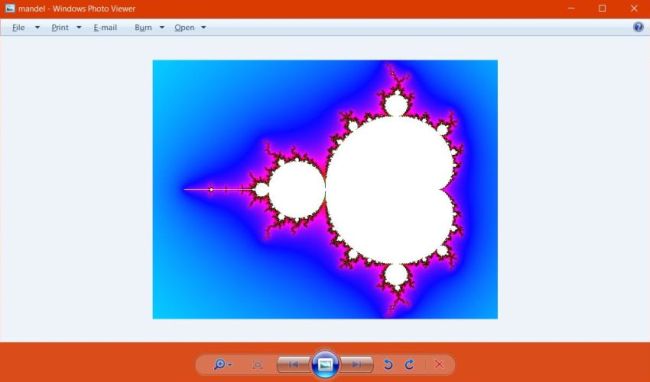
The program actually creates a bitmap file (mandel.bmp), as shown on the screenshot below (file opened in Windows Photo Viewer).
|
Accessing the Windows API to create GUI applications.
An Application Programming Interface (API) is an interface that allows the application programmer to access the functions of some other software. The Windows API thus allows access to the functions of the Windows operating system: A possibility to create GUI applications with so to say any programming language (including Assembly; just if you wondered...).
To make the functions of the Windows API accessible to your FreeBASIC program, add the following directive to your source code: #include "windows.bi"
The probably simplest GUI program, that you can create, is the display of a message box. Lets try it out, by writing a simple "Hello World" desktop application Hello2.bas. Here is the code:
#include "windows.bi"
Dim As String Mess
Mess = "Hello World!" & Chr(13, 10) & "From Freebasic..."
MessageBox(0, Mess, "Hello", MB_ICONINFORMATION Or MB_OK)
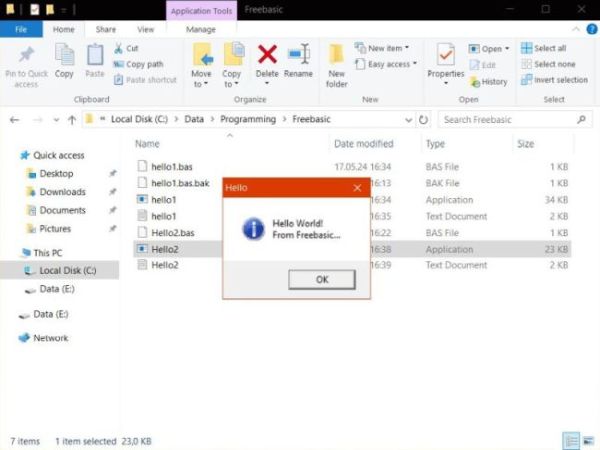
We can build this program in CSED_FB, after having chosen the 64-bit compiler and set the option to build a GUI application. The screenshot shows the execution of the binary created, launched by double-clicking it in Windows File Explorer.
|
Here is the code of a somewhat longer example. The code below creates a window, that you can move and resize, and when clicking with the mouse in it, displays a message box. The program has been written in 2008 by Raph Ael, and is actually published at freebasic-portal.de. I've just removed the (German) comments and changed the German texts to English.
#Include "windows.bi"
Declare Function WinMain(hThisInstance As HINSTANCE, hPrevInstance As HINSTANCE, szCommand As String, howToShow As Integer) As Integer
End WinMain(GetModuleHandle(NULL), NULL, Command(), SW_NORMAL)
Function WndProc(hWnd As HWND, msg As UINT, wParam As WPARAM, lParam As LPARAM) As LRESULT
Select Case msg
Case WM_CREATE
Return 0
Case WM_LBUTTONDOWN
MessageBox(hWnd, "Hello FreeBASIC World!", "WinAPI", MB_OK Or MB_ICONINFORMATION)
Return 0
Case WM_DESTROY
PostQuitMessage(0)
Return 0
Case Else
Return DefWindowProc(hWnd, msg, wParam, lParam)
End Select
End Function
Function WinMain(hThisInstance As HINSTANCE, hPrevInstance As HINSTANCE, szCommand As String, howToShow As Integer) As Integer
Dim wMsg As MSG
Dim wCls As WNDCLASS
Dim hWnd As HWND
With wCls
.style = CS_HREDRAW Or CS_VREDRAW
.lpfnWndProc = @WndProc
.cbClsExtra = 0
.cbWndExtra = 0
.hInstance = hThisInstance
.hIcon = LoadIcon(NULL, IDI_APPLICATION)
.hCursor = LoadCursor(NULL, IDC_ARROW)
.hbrBackground = GetStockObject(WHITE_BRUSH)
.lpszMenuName = NULL
.lpszClassName = @"WinAPITest"
End With
If RegisterClass(@wCls) = FALSE Then
MessageBox(NULL, "Error when registering Window class!", "Test WinAPI", MB_OK Or MB_ICONERROR)
Return 1
EndIf
hWnd = CreateWindowEx(0, @"WinAPITest", "Test WinAPI", WS_OVERLAPPEDWINDOW, CW_USEDEFAULT, CW_USEDEFAULT, 200, 100, NULL, NULL, hThisInstance, NULL)
ShowWindow(hWnd, howToShow)
UpdateWindow(hWnd)
While GetMessage(@wMsg, NULL, 0, 0) <> FALSE
TranslateMessage(@wMsg)
DispatchMessage(@wMsg)
Wend
Return wMsg.wParam
End Function
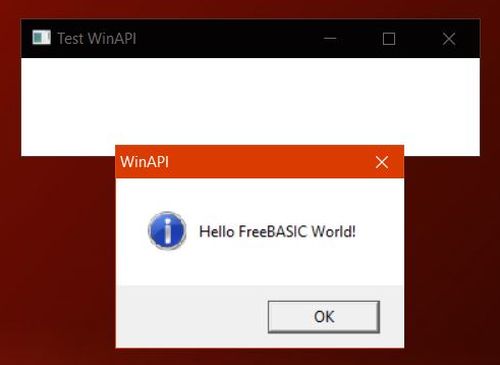
After having compiled the application (the same way as for Hello2.bas), we can run it from File Explorer (it also runs well on another Windows 64-bit computer, where FreeBASIC isn't installed). The screenshot shows the window created (I actually moved and resized it) and the message box, that showed up when I clicked into the window.
|
This is all nice, but also complicated and time consuming. Even if we can create an application by copying/pasting code from other applications, it's difficult to manually create a GUI application; also, an at least basic, probably intermediate, knowledge of programming the Windows API is required. Do you know Free Pascal? Then you very probably also know Lazarus, a so called Rapid applications development tool for Free Pascal. This is lots more than just an IDE; in fact, it allows to create the GUI components (menus, labels and text boxes, push buttons...) by drag & drop and arrangement of these components on a form (that will become the application window in the executable). The code behind all this will be automatically generated by Lazarus. In the next section, we'll learn about a Rapid applications development tool for FreeBASIC.
Designing GUI applications with VisualFBEditor.
VisualFBEditor is a free IDE, or more precisely a free RAD tool, for FreeBASIC. It features project support, debugger, visual designer, and more. VisualFBEditor is based on the library MyFbFramework. You can find a description of this framework in the MyFbFramework Wiki at the github website.
You can download VisualFBEditor from github (I actually use VisualFBEditor 1.3.5, that works well with FreeBASIC 1.10.1 on my Windows 10). The download is a ZIP archive, that I unpacked to C:\Programs\VisualFBEditor. There are two executables: VisualFBEditor64 and VisualFBEditor32; it's the first one that I use. For your own convenience, you can create shortcuts on the desktop or in the Windows Start menu.
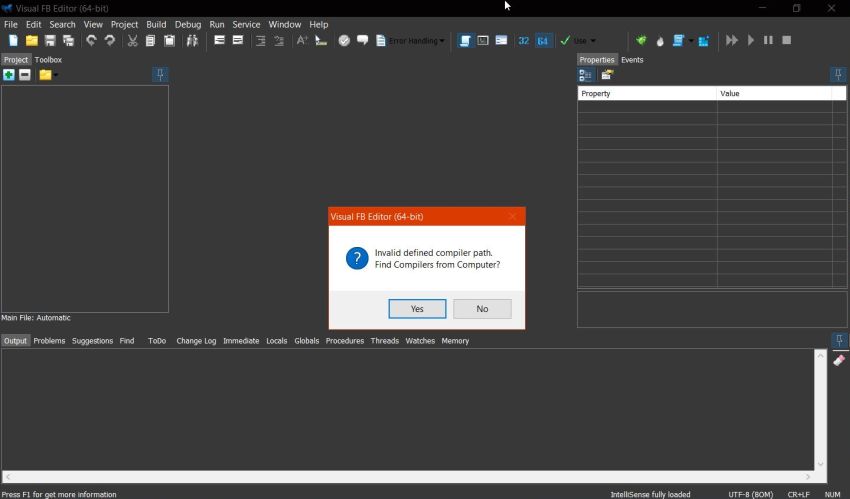
When you start the IDE for the first time, a message box pops up warning you of an invalid defined compiler path. You are also asked you if you want to search for the FreeBASIC compiler.
|
If you push the Yes button (in order to search for compilers), the Options window opens with the (non-existing) default compilers displayed, and the IDE searching the computer for the actually installed compilers. In my case, it found four of them (screenshot on the left). I deleted two of these, keeping C:\Programs\FreeBASIC\fbc64.exe as 64-bit compiler and C:\Programs\FreeBASIC\fbc32.exe as 32-bit compiler (screenshot on the right). Note, that you can easily switch between them, by clicking one of the two icon bar icons: "64", resp. "32".
![FreeBASIC on Windows 10: VisualFBEditor - Compiler configuration [1] FreeBASIC on Windows 10: VisualFBEditor - Compiler configuration [1]](../screenshots/fbc14a.jpg)
|
![FreeBASIC on Windows 10: VisualFBEditor - Compiler configuration [2] FreeBASIC on Windows 10: VisualFBEditor - Compiler configuration [2]](../screenshots/fbc14b.jpg)
|
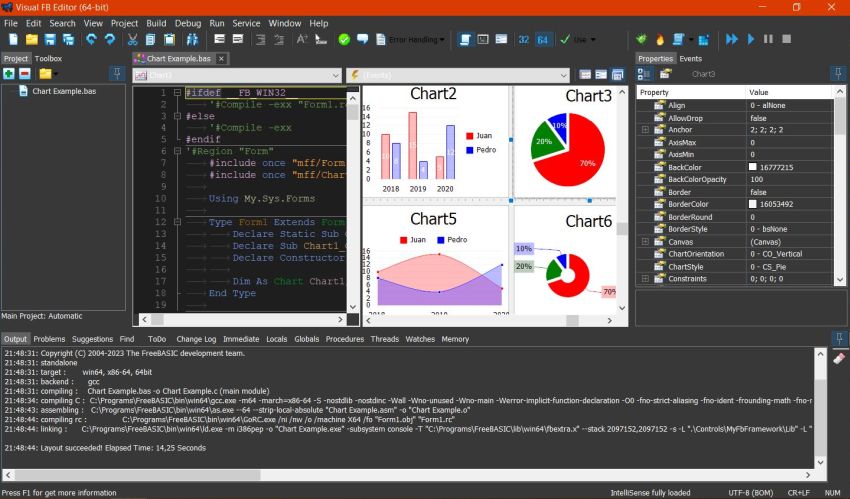
If you are used to work with Lazarus, or a similar RAD tool, you shouldn't have any problems with VisualFBEditor. To note, that the software includes a series of FreeBASIC examples. The screenshot below shows the successful build of "Chart Example.bas" (looks nice, doesn't it?).
|
Creating a GUI application.
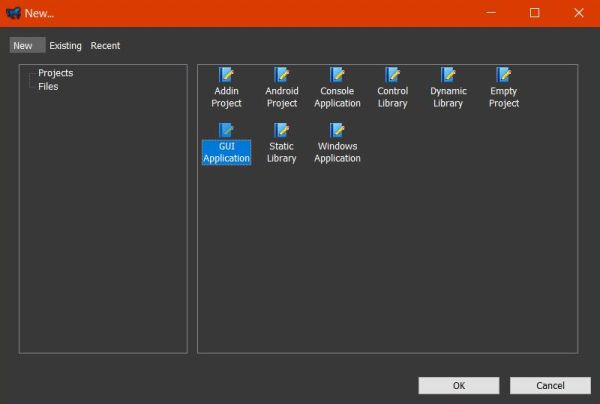
Lets try out VisualFBEditor by creating a simple desktop application that calculates the equation of a line passing through 2 points. From the menu bar, choose File > New.... This opens a window where we can select what we want to create: a GUI application, a console application, a static or dynamic library, an Android project, and some more. Here, choose GUI application.
|
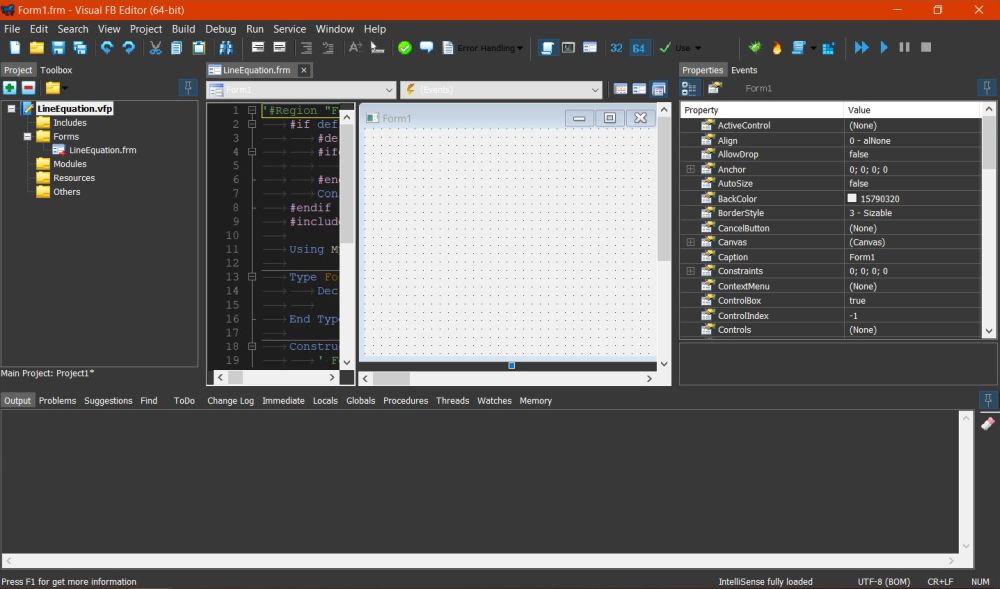
Save the project in its own directory. I used C:\Data\Programming\FreeBASIC\LineEquation, naming the project LineEquation.vfp, and the form LineEquation.frm. As a difference with Lazarus, where the Pascal source is stored as .pas file, VisualFBEditor does not create a .bas file; the source code will be stored in LineEquation.frm. On the screenshot below, both the form design and the form code are visible. To work with one or the other, you can display only one of them, using the commands in the View menu.
|
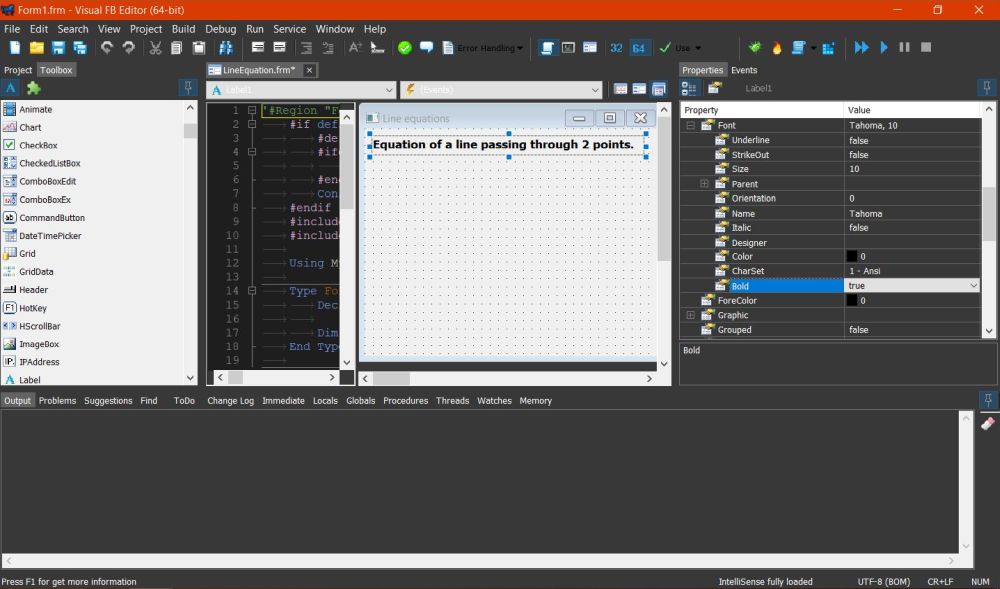
To put a component on the form, switch the left pane from Project to Toolbox. Select the component from the list and click at the location within the form where you want to place it. The Properties of the component selected will be shown in the right pane. On the screenshot, you can see how I set the Font.Bold property of the component "Label1" (that contains the application title) to "true".
|
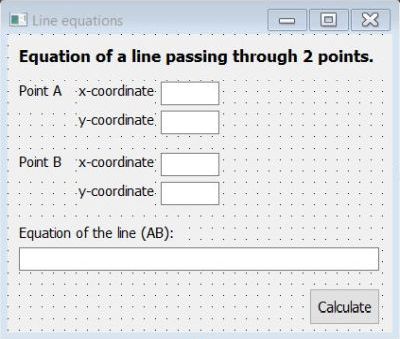
The following screenshot shows the form, how it should look like when finished. The user has to enter the x- and y-coordinated of the two points A and B in the corresponding text fields; the application will determine the equation of the line (AB) and display it it the corresponding field.
|
The determination of the line equation is actually done when the user pushes the "Calculate" button, i.e. when a Click event occurs on the button component. In the source code, this corresponds to the btCalc_Click method ("btCalc" being the name that I gave to the button). To make VisualFBEditor generate an event method, select the component, switch in the right pane from Properties to Events, and choose an event from the list. To generate the default event for a component (in the case of a button this actually is the Click event), just double-click the component on the form.
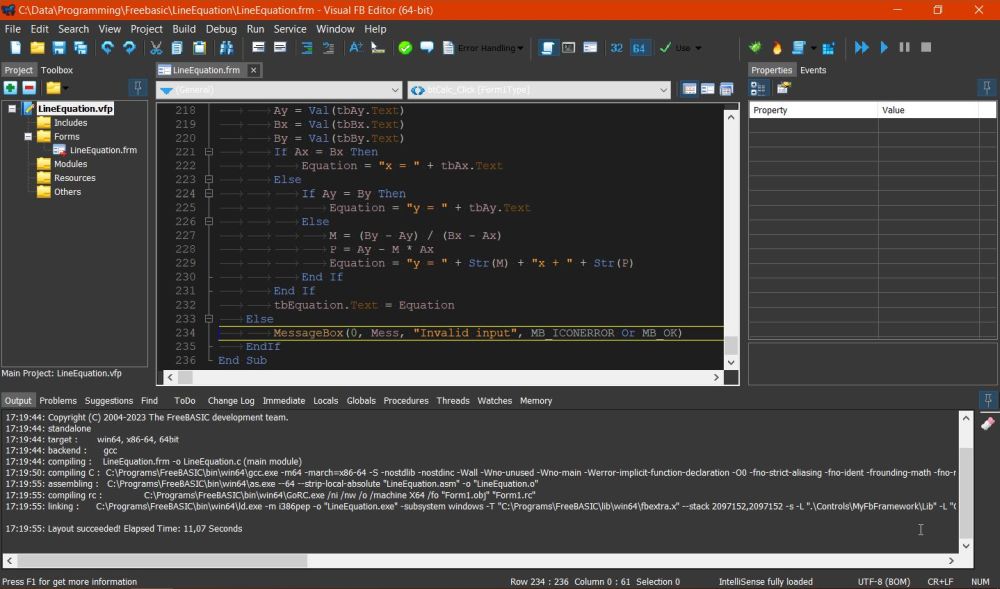
It's within the btCalc_Click subroutine, that we'll have to place the code to read the coordinates from the form, and to calculate and display the line equation. The screenshot shows a part of this code (to work with the code, I hided the form) during development. You can also see on the screenshot that the last build of the project was successful (with the creation of the application LineEquation.exe).
|
The source code is over 250 lines, so, I will skip a part of it when publishing it here. If you want to try out the application (perhaps modify it), you can click the following link to download the LineEquation source code.
The source code starts with a series of includes. Nothing to worry about: All this is generated by VisualFBEditor.
#if defined(__FB_MAIN__) AndAlso Not defined(__MAIN_FILE__)
#define __MAIN_FILE__
#ifdef __FB_WIN32__
#cmdline "Form1.rc"
#endif
Const _MAIN_FILE_ = __FILE__
#endif
#include once "mff/Form.bi"
#include once "mff/Label.bi"
#include once "mff/TextBox.bi"
#include once "mff/CommandButton.bi"
Then, the new class "Form1Type" (the form is actually called "Form1") is created for our form . This is done by extension of the class "Form", and adding the actual form's components, as well as the variables that we intend to use in the code. The components part is generated by VisualFBEditor, the variable part has, of course, to be manually added by the programmer (usage of bold font in the code below).
Using My.Sys.Forms
Type Form1Type Extends Form
Declare Sub btCalc_Click(ByRef Sender As Control)
Declare Constructor
Dim As Label Label1, Label31, Label311, Label32, Label21, Label211, Label321, Label2
Dim As TextBox tbAy, tbBy, tbBx, tbAx, tbEquation
Dim As CommandButton btCalc
Dim As Single Ax, Ay, Bx, By, M, P
Dim As String Mess, Equation
End Type
Follows the construction of the form components. Here just the beginning of the corresponding code (form, title label, and textbox for the y-coordinate of point A; all generated by VisualFBEditor).
Constructor Form1Type
' Form1
With This
.Name = "Form1"
.Text = "Line equations"
.Designer = @This
.Caption = "Line equations"
.SetBounds 0, 0, 340, 290
End With
' Label1
With Label1
.Name = "Label1"
.Text = "Equation of a line passing through 2 points."
.TabIndex = 5
.Caption = "Equation of a line passing through 2 points."
.Font.Size = 10
.Font.Bold = True
.SetBounds 10, 10, 310, 20
.Designer = @This
.Parent = @This
End With
' tbAy
With tbAy
.Name = "tbAy"
.TabIndex = 1
.ControlIndex = 3
.Alignment = AlignmentConstants.taRight
.ID = 1016
.Text = ""
.SetBounds 130, 65, 50, 20
.Designer = @This
.Parent = @This
End With
...
End Constructor
The next part is the main program code: Declaring the form "Form1" as an object of the class Form1Type (created at the beginning of the program), displaying this form and running the application. As we haven't associated any code with the application startup, the form (or better, the corresponding window) will "stand there" until the user does something (in particular until they push the "Calculate" button). Again, this code is entirely generated by the IDE.
Dim Shared Form1 As Form1Type
#if _MAIN_FILE_ = __FILE__
App.DarkMode = True
Form1.MainForm = True
Form1.Show
App.Run
#endif
And finally the subroutine Form1Type.btCalc_Click, that contains the code to be executed when the user pushes (clicks on) the "Calculate button". The declaration of the sub has been generated by VisualFBEditor, when we assigned a Click event to the button. The subroutine content (in fact the entire logic of our "line through 2 points" application), has of course to be written by the programmer.
Private Sub Form1Type.btCalc_Click(ByRef Sender As Control)
Mess = ""
If tbAx.Text = "" Then
Mess = "Missing x-coordinate for A"
ElseIf tbAy.Text = "" Then
Mess = "Missing y-coordinate for A"
ElseIf tbBx.Text = "" Then
Mess = "Missing x-coordinate for B"
ElseIf tbBy.Text = "" Then
Mess = "Missing y-coordinate for B"
End If
If Mess = "" Then
Ax = Val(tbAx.Text)
Ay = Val(tbAy.Text)
Bx = Val(tbBx.Text)
By = Val(tbBy.Text)
If (Ax = Bx) And (Ay = By) Then
Mess = "A and B cannot be the same point"
Else
If Ax = Bx Then
Equation = "x = " + tbAx.Text
Else
If Ay = By Then
Equation = "y = " + tbAy.Text
Else
M = (By - Ay) / (Bx - Ax)
M = Int(100 * M + .5) / 100
P = Ay - M * Ax
P = Int(100 * P + .5) / 100
Equation = "y = "
If M = 1 Then
Equation += "x"
ElseIf M = -1 Then
Equation += "-x"
Else
Equation += Str(M) + "x"
EndIf
If P > 0 Then
Equation += " + " + Str(P)
ElseIf P < 0 Then
Equation += " - " + Str(-P)
End If
End If
End If
tbEquation.Text = Equation
End If
End If
If Mess <> "" Then
MessageBox(0, Mess, "Invalid input", MB_ICONERROR Or MB_OK)
EndIf
End Sub
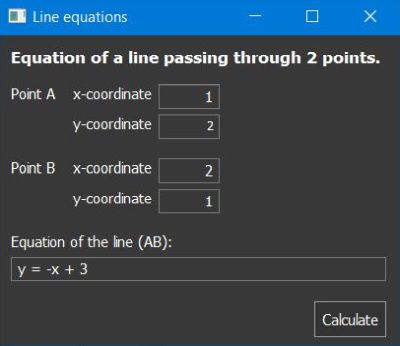
The screenshot below shows an execution of the application on my regular Windows 10.
|
Note: The binary LineEquation.exe seems to contain everything that is needed to run the application on a Windows 64-bit where neither VisualFBEditor, nor FreeBASIC are installed. In particular, the DLL chk.dll, placed by the IDE into the project folder, seems not be needed (?).
This terminates my tutorial about FreeBASIC on Windows 10. I hope that you enjoyed it and that, perhaps, it gave you a mind to try out this really interesting programming language. To note, that this tutorial only covered some aspects of working with FreeBASIC. For example, you can use FreeBASIC for database and network programming. And there are lots of other libraries and frameworks available, as for example GTK, CGUI and FLTK, that may all be used (instead of the Windows API or MyFbFramework) to develop FreeBASIC GUI applications.
If you find this text helpful, please, support me and this website by signing my guestbook.