Using Sublime Text as IDE for GCC/GFortran development.
This tutorial is about the usage of the GNU Compiler Collection (GCC), in particular the build of C, C++, and Fortran programs, and the usage of Sublime Text as development environment on MS Windows. The tutorial has been written while working on Windows 10; it should also apply to Windows 11.
Installing MSYS2.
GCC, along with other utilities like GNU Binutils for Windows (assembler, linker, archive manager) and a set of freely distributable Windows specific header files and static import libraries have been ported to the Windows platform and is available as MinGW ("Minimalist GNU for Windows"), which can be used to create 32 bit native executables on Windows platforms, and MinGW-w64 (a 64bit fork of MinGW), which provides a more complete Win32 API implementation including Win64 support and other modern features. MinGW-w64 can generate 32 bit and 64-bit executables for x86 CPUs.
The MinGW-w64 Project does not provide any binaries for download from its website. Instead, it maintains a list of pre-built toolchains and packages provided by other vendors. One of these is MSYS2, that will be used in this tutorial. The MSYS2 distributions include a command line terminal (Mintty), bash, tools like tar and awk, and build systems like autotools. The compilers and libraries for various programming languages are available as software packages.
MSYS2 will provide you with all that you need to compile and debug C, C++ and Fortran code, and to create Windows executables. Click the following link to download the MSYS2 installer from github. I actually use MSYS2 2024-01-13; I suppose that newer versions will work the same way as described here.
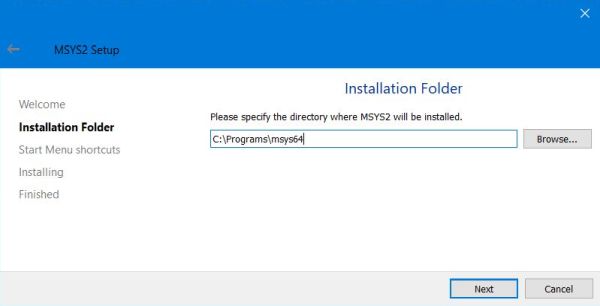
As always when an application's default installation directory is directly beneath the C: root, I changed it; my install directory actually is C:\Programs\msys64.
|
If you have a look at the Windows Start menu, you'll find several items in the MSYS2 folder: MSYS2 CLANG64, MSYS2 CLANGARM64, MSYS2 MINGW32, MSYS2 MINGW64, MSYS2 MSYS, and MSYS2 UCRT64. These correspond to the various MSYS2 subsystems, a series of specific build environments, that differ by environment variables settings, default compilers/linkers, processor architecture, system libraries used, etc. Each subsystem has its specific package repositories with its own native compiler toolchain. Each subsystem also has an associated shell, which is essentially a set of environment variables that allow the subsystems to co-operate properly. The items in the Start menu actually are the shortcuts for these shells. They open a Mintty terminal window, with a proper bash. Here, you can enter commands the same way as you would do in a Linux terminal.
Among the subsystems listed above all target the x86_64 architecture, except MINGW32 (i686) and CLANGARM64 (aarch64). All use the gcc toolchain, except CLANG64 and CLANGARM64 (llvm). All use the ucrt C library, except MINGW32 and MINGW64 (msvcrt) and MSYS (cygwin), and all use the libstdc++ C++ library, except CLANG64 and CLANGARM64 (libc++). It's based on these differences, that we decide to use a given subsystem for the builds that we intend to do. In this tutorial, we will build 64-bit programs using the gcc toolchain. So, 3 possible subsystems: MINGW64, MSYS, or UCRT64. Whereas MSYS has the best POSIX support (and should, for example, be used to build programs initially not intended for Windows), it's the other two that allow full access to the Windows API. MINGW64 was very popular, but the old msvcrt C library is more and more replaced by the newer ucrt with UTF8 support; it's ucrt that is officially used in the latest versions of Microsoft Visual Studio. Conclusion: The best choice for this tutorial is to use the MSYS2 UCRT64 subsystem. You can launch this environment by selecting the corresponding item in the Windows Start menu.
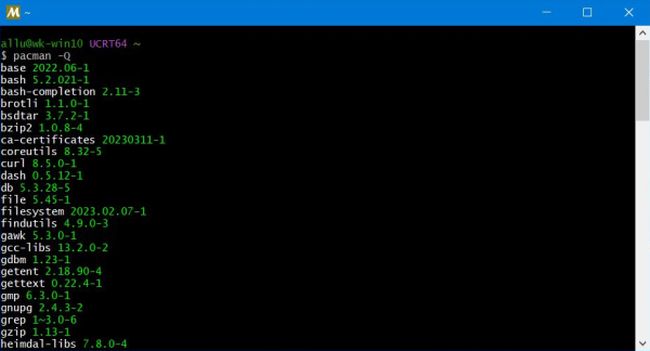
To display a list of the actually installed packages, use the command:
pacman -Q
|
If you scroll through this list, you may wonder that GCC seems not to be installed. And – that's effectively the case. By default, MSYS2 doesn't install any toolchain at all.
A word about package installation. As we saw above, each subsystem has its own toolchain and own libraries. They are located in a specific repository and will be installed to a specific location (subdirectory of the MSYS2 installation folder) on the local computer. To distinguish the packages intended for the different subsystems, packages are named using a specific prefix. For example, UCRT64 packages are prefixed with mingw-w64-ucrt-x86_64-, whereas MINGW64 packages are prefixed with mingw-w64-x86_64-.
Note: The MSYS subsystem is special. First, its packages have no prefix. Second, this environment is always active. All the other environments inherit from the MSYS environment and add various things on top of it. For example, in the UCRT64 environment, the $PATH variable starts with /ucrt64/bin:/usr/bin (MSYS packages are installed to /usr), so you have access to all UCRT64 based tools as well as all MSYS tools. One of the consequences of this is that you shouldn't install any MSYS toolchain (except if you really need it). For the other subsystems, there is no problem if GCC or GFortran is present twice, as staring a given shell, a given $PATH is set and you always will use the correct compiler. With a compiler present in the UCRT64 and the MSYS subsystem, however, both compilers are in the executable path, and this may get messy.
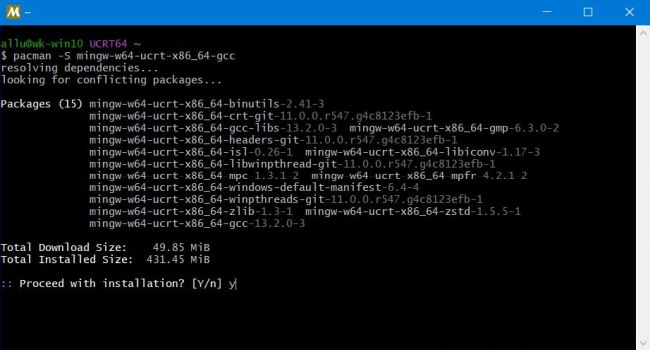
After all this theoretical stuff, we can finally proceed with the installation of GCC. Here is the command to install the packages for the UCRT64 environment:
pacman -S mingw-w64-ucrt-x86_64-gcc
|
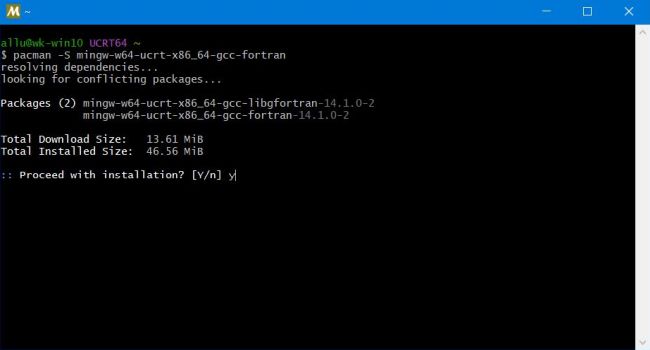
And the installation of GFortran for the UCRT64 environment:
pacman -S mingw-w64-ucrt-x86_64-gcc-fortran
|
You can perform a basic test if the toolchains are installed, by running the commands:
gcc -v
gfortran -v
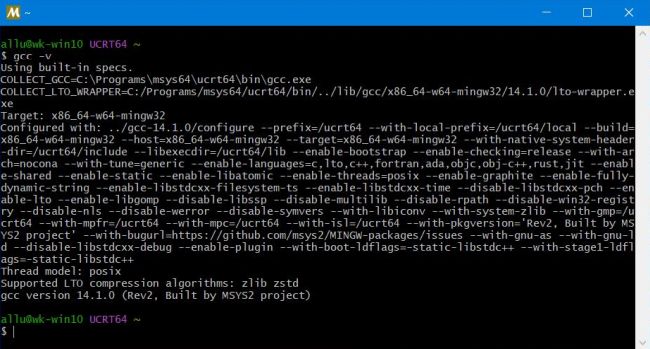
|
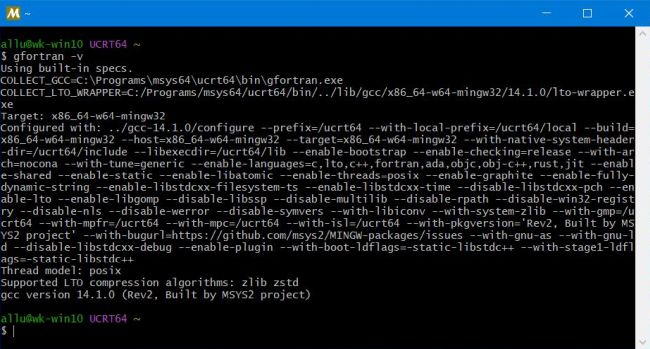
|
Notes:
-
You can install the complete toolchains for a given environment all at once. For example, for MINGW64:
pacman -S mingw-w64-x86_64-toolchain -
To update all packages, run the command:
pacman -Syu -
My GNU source files are located in a subdirectory of the custom Programming library in my home directory (C:\Users\Allu\Programming\GNU). To set this directory
as current directory in the UCRT64 shell and then list the directory content in long format, use the commands:
cd /c/users/allu/programming/gnu
ls -l
Building programs in the terminal.
Here are two simple "Hello World" programs, hello1.c in C, and hello2.cpp in C++.
#include <stdio.h>
int main() {
printf("Hello, World!");
return 0;
}
#include <iostream>
using namespace std;
int main() {
cout<<"Hello World!"<<endl;
return 0;
}
And here are the commands to build them:
gcc -o hello1.exe hello1.c
g++ -o hello2.exe hello2.cpp
The screenshots below show the build and execution of hello1.c (on the left) and hello2.cpp (on the right).
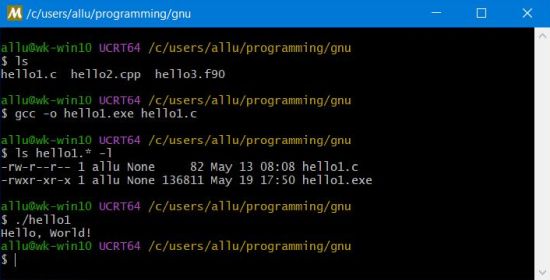
|
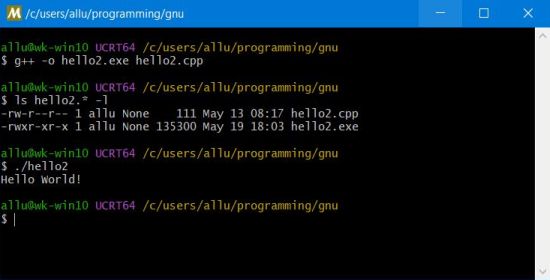
|
Here is the code of a simple "Hello World" program, hello3.f90, in Fortran.
program hello3
print *, "Hello World!"
end
You can build it using the command:
gfortran -o hello3.exe hello3.f90
The screenshot shows the build and the execution in the Mintty terminal:
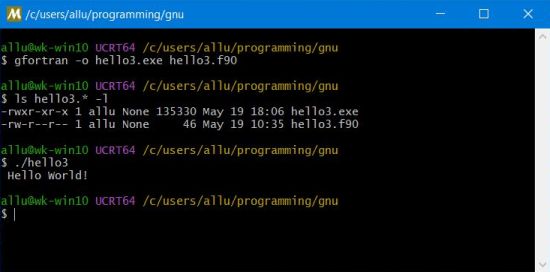
|
Installing Sublime Text.
If you just want to try out the GCC compilers, you could write the code in Notepad++, which has syntax highlighting for C, C++, and Fortran (as well as lots of other programming languages), and perform the build in the terminal, as shown above. However, if you want to do some serious programming, you'll need an IDE. There are several freeware IDEs, that can be used with the GNU Compiler Collection, available. One of them is VSCode by Microsoft; cf. my tutorial Installing VSCode on Windows 10; the tutorial includes information about how to build C and C++ programs. The IDE, used in this tutorial, is called Sublime Text and can be downloaded from the sublimetext.com website. The installation is straight forward; the default install folder is C:\Program Files\Sublime Text.
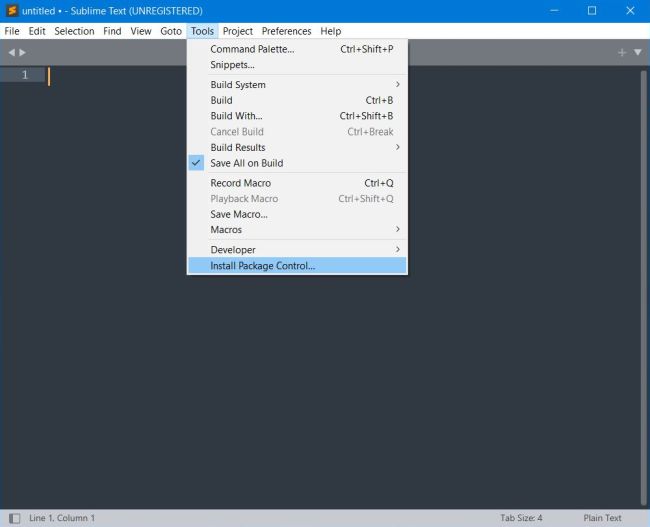
Sublime Text is package based, and the first thing to do is to install Package Control, the Sublime Text package manager. Select Tools > Install Package Control from the menu bar (screenshot). A "successfully installed" message will pop up, when the (silent) installation is finished.
|
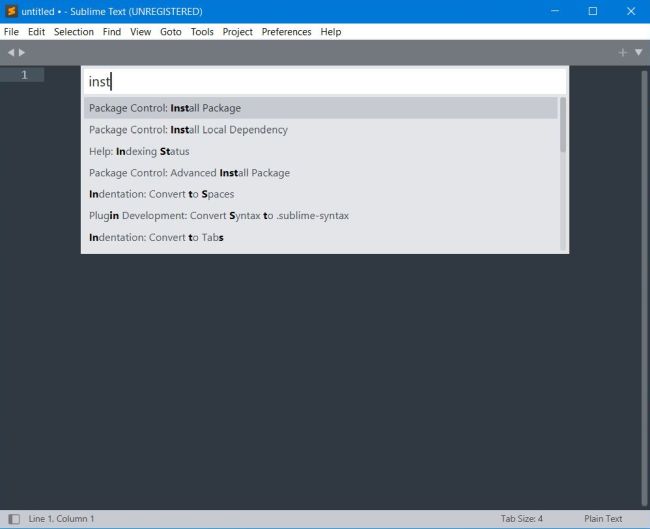
The second thing to do is to bring a real terminal to Sublime Text. New packages can be installed using the Package Control: Install Package command from the Command Palette (in the Tools menu; can also be opened by pressing Ctrl+Shift+P).
|
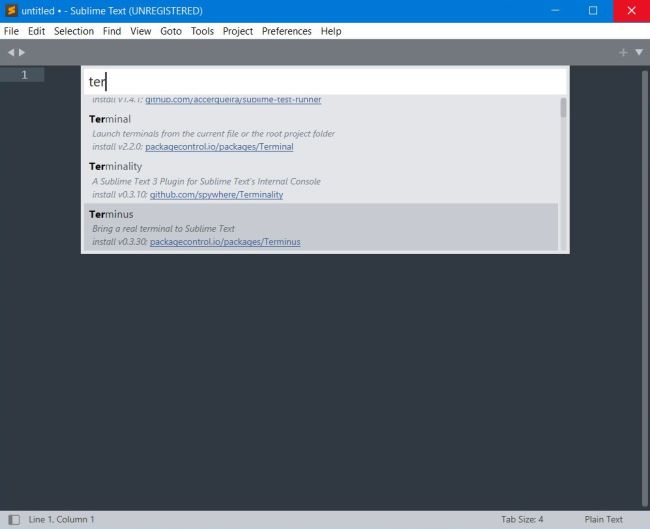
When you execute the "install package" command, a list of available packages is displayed. The "real terminal" package is called Terminus. Scroll downwards until you find it, or, better, type the first letters of the package that you are searching for. Select the Terminus package from the list.
|
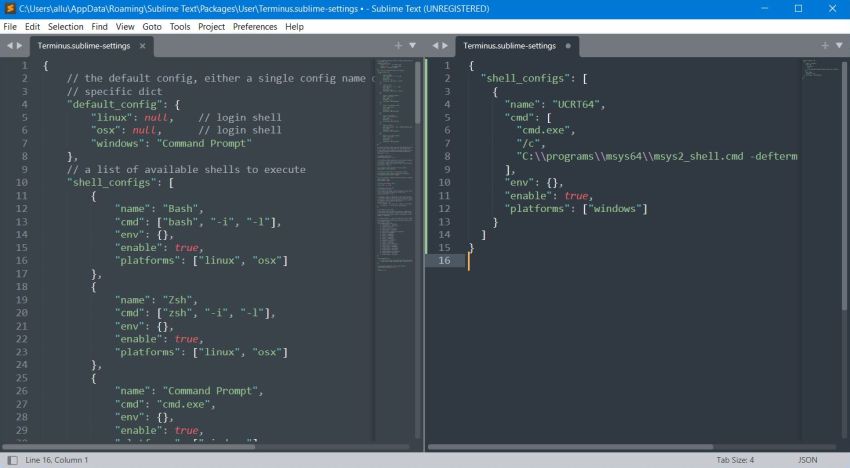
The configuration of the package is done using the menu command Preferences > Package Settings > Terminus > Settings. A two-panes window opens. The pane on the left contains the general settings for the terminal; don't touch them. The pane on the right is normally empty. It's here that we will enter the configuration for usage of the UCRT64 shell (if the pane already contains some configuration, append the UCRT64 configuration to the existing text). Here is the code to configure the UCRT64 shell.
{
"shell_configs": [
{
"name": "UCRT64",
"cmd": [
"cmd.exe",
"/c",
"C:\\programs\\msys64\\msys2_shell.cmd -defterm -here -no-start -ucrt64"
],
"env": {},
"enable": true,
"platforms": ["windows"]
}
]
}
|
Please, note that C:\\programs\\msys64 refers to the MSYS2 installation directory (by default, this would be: C:\\msys64).
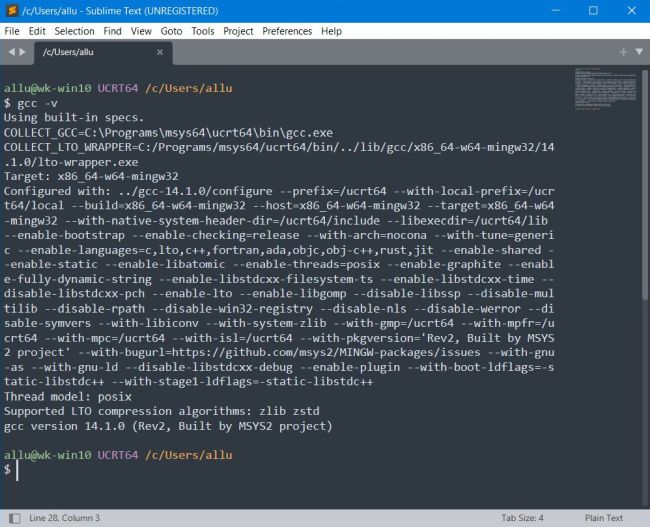
To start the UCRT64 shell, open the Command Palette and find Terminus: List Shells. This displays the shells available: Command Prompt and UCRT64; choose the latter one. Finally, you can choose if you want to open the shell in a tab, or in a panel. The screenshot shows the UCRT64 shell opened in a tab; I just ran the command gcc -v to display the version of the GCC compiler actually used.
|
Note that in the shells of Sublime Text, the current directory is automatically set to the actual Windows user's home directory.
Building C/C++ programs in Sublime Text.
Builds in Sublime Text are done by executing a pre-configured build system. You can see what build systems are available using the menu command Tools > Build Systems. You can set one of the systems in the list as default; it is this system that will be used when you select the Tools > Build menu command. To select a specific build system, choose the Tools > Build With... command, instead. Normally, there is no specific build system set as default; instead the build system selection is set to Automatic. In this case, if you run the Build command, the build system, that will be used, is chosen depending on the source file name extension. With the build systems installed by default, files with the extension .c will be build using the build system C Single File, files with the extension .cpp will be build using the build system C++ Single File. The first one using the GCC compiler (gcc.exe), the second one using the GNU C++ compiler (c++.exe); both creating a Windows executable with the same base name as the source file and the extension .exe.
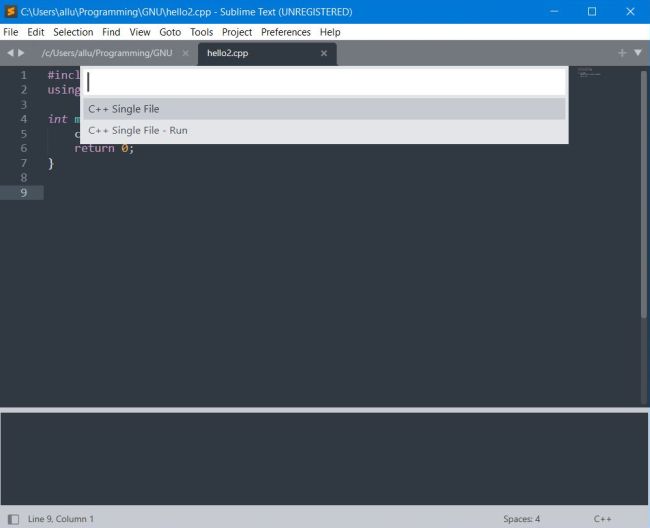
So, lets try it out. Launch Sublime Text and open the UCRT64 shell in one tab, the C++ source file hello2.cpp in another. With the source tab being the active one, choose Tools > Build from the menu. Instead of building the program, Sublime Text proposes two alternatives how to build the file: 1. using the build system "C++ Single File", and 2. using the build system "C++ Single File - Run". This is due to the fact, that the build system for .cpp files has been defined with these two alternatives; as you probably guess the second build system builds the source and if all goes well also runs the executable created.
|
If all goes well, the only message displayed will be the build execution time.
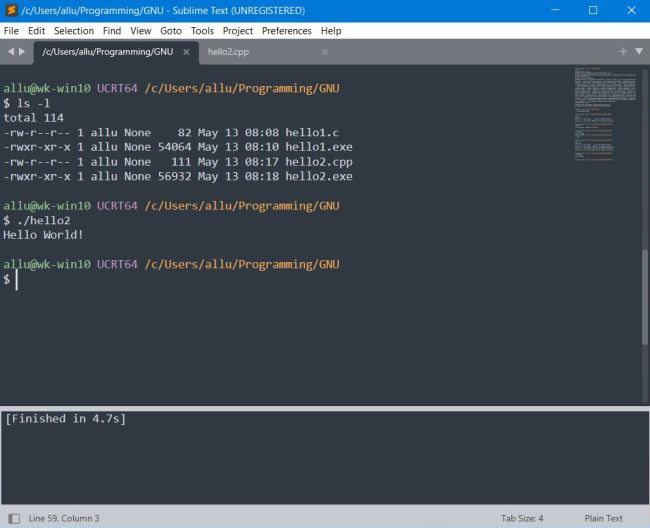
We can run the executable created using the "C++ Single File - Run" build system, or run it in Command Prompt (double clicking the .exe file in
File Explorer would not be useful for hello2.exe, as after the message has been displayed, Command Prompt would be automatically closed), or run it in our UCRT64 shell. By
default, the current directory is set to the user's home directory. We can use the cd command to enter the directory with the source (and
executable created), and then run the executable by typing its name (.exe will automatically added), that has to be prefixed by "./" (on Linux,
the current directory is not by default added to the executables path). So, in my case:
cd programming/gnu
./hello2
|
Similarly, we can build hello1.c using the "C Single File" build system (which it, too, has an alternative: "C Single File - Run", proposed when you choose Tools > Build with the source file hello1.c open in an editor tab).
But, what about Fortran, you might ask. Sublime Text offers no Fortran support by default. If you open hello3.f90, there will be no highlighting, and there is no way to build this file. We'll have to install some supplementary packages...
Adding Fortran support to Sublime Text.
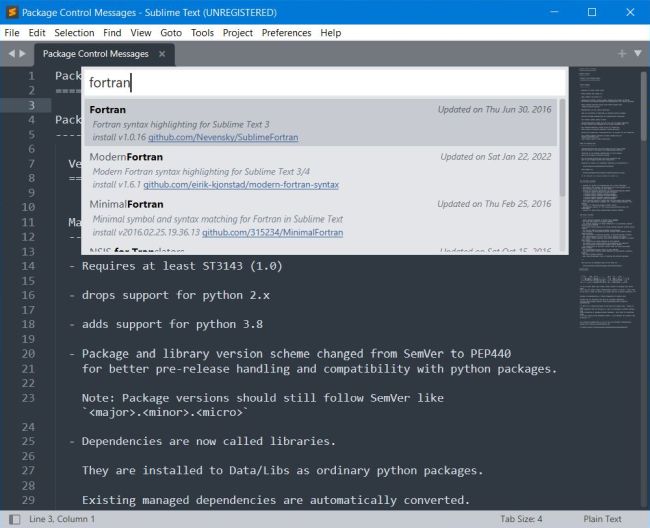
As you probably remember, new packages are installed using the Package Control: Install Package command from the Tools > Command Palette menu item. We'll install three further packages here, in order to get Sublime Text working with GFortran:
- Sublimelinter: the code linting framework, for Fortran errors and color syntax;
- sublimelint: error highlighting package, for Fortran errors;
- Fortran: Fortran syntax highlighting package.
|
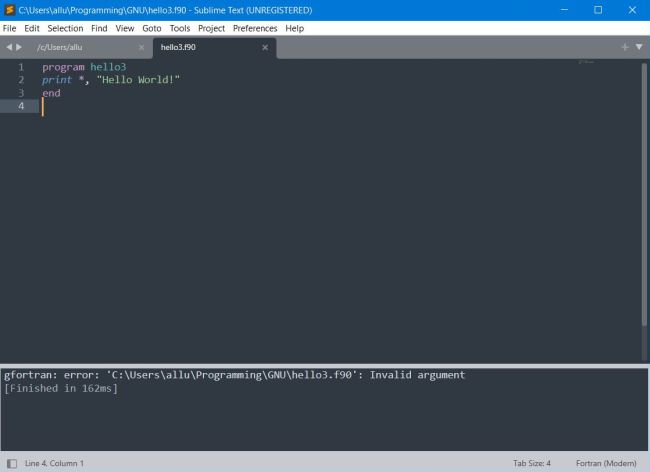
If now we open hello3.f90 in an editor tab, the Fortran source code is displayed with syntax highlighting. However, if we run the command Tools > Build, we get the error message: gfortran error: 'C:\Users\Allu\Programming\GNU\hello3.f90' invalid argument. Obviously, this error has been emitted by GFortran. Automatic build (based on the file extension .f90) has thus well been done by the GFortran build system (we can check this by explicitly selecting this build system). The conclusion to draw is that the code of this build system contains some errors!
|
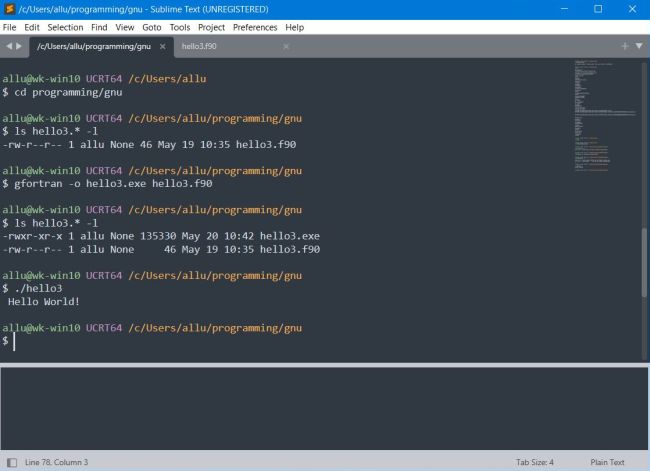
At this point, I used a simple work-around: I compiled the Fortran code in the UCRT64 shell (directly available in a tab of Sublime Text).
|
Creating a new GFortran build system.
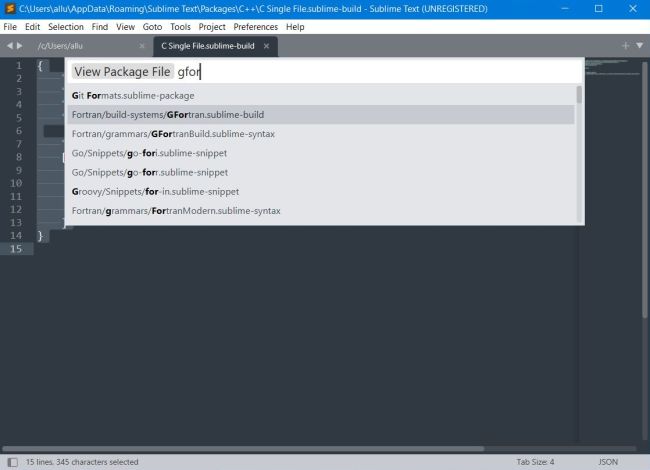
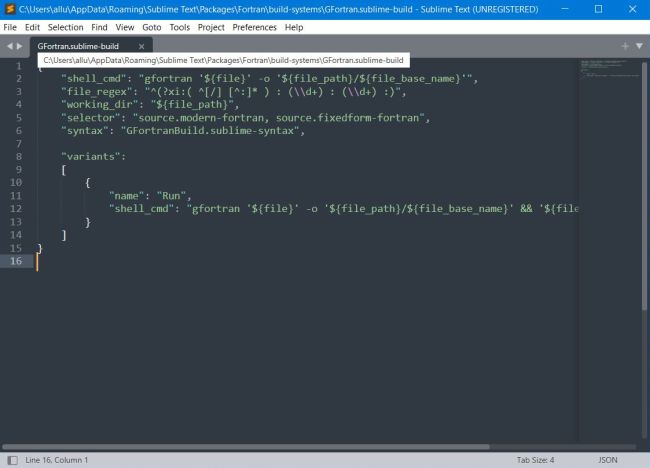
As the code of the GFortran build system seems to be the problem, having a look at this code and changing it was my first approach to make Fortran builds work with Sublime Text. We can view the code, using the Tools > Command Palette item from the menu bar, and searching for the command View Package File, then searching for GFortran. The list entry that we're looking for is actually called Fortran/build-systems/GFortran.sublime-build.
|
The screenshot below shows the JSON code for the build instructions. Observe the single quotes around ${file}; this appears not logical, and is probably the reason of the "invalid argument" error.
|
Changing the JSON code in Sublime Text is not possible. So, trying a different way. By passing with the mouse pointer over the filename in the tab title bar, the full path of the file is displayed. It is said to be located in some subfolder of the actual user's AppData folder. All we have to do is browsing to there and edit the file (in a text editor)? No, this is not possible! In fact, not only that the file does not exist; there isn't even a "Fortran" folder in the "Packages" directory!
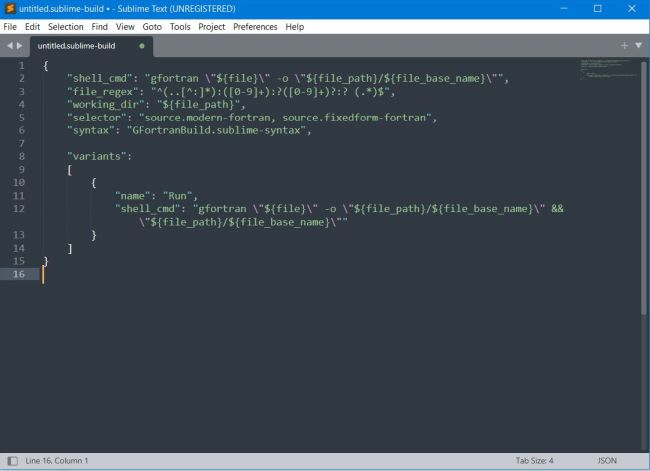
Where is the JSON code of the different build-systems stored? No idea! Anyway, there is a simple work-around: Lets just create a new build-system. This can be done using the menu bar command Tools > Build System > New Build System.... This opens an edit window, where I entered the following (correctly working) code:
{
"shell_cmd": "gfortran \"${file}\" -o \"${file_path}/${file_base_name}\"",
"file_regex": "^(..[^:]*):([0-9]+):?([0-9]+)?:? (.*)$",
"working_dir": "${file_path}",
"selector": "source.modern-fortran, source.fixedform-fortran",
"syntax": "GFortranBuild.sublime-syntax",
"variants": [
{
"name": "Run",
"shell_cmd": "gfortran \"${file}\" -o \"${file_path}/${file_base_name}\" \"${file_path}/${file_base_name}\""
}
]
}
The screenshot below shows the JSON code for the build instructions in Sublime Text. I saved it to a file that I named Fortran Single File.sublime-build. The file has to be saved to the directory C:\Users\<user-name>\AppData\Roaming\Sublime Text\Packages\User.
|
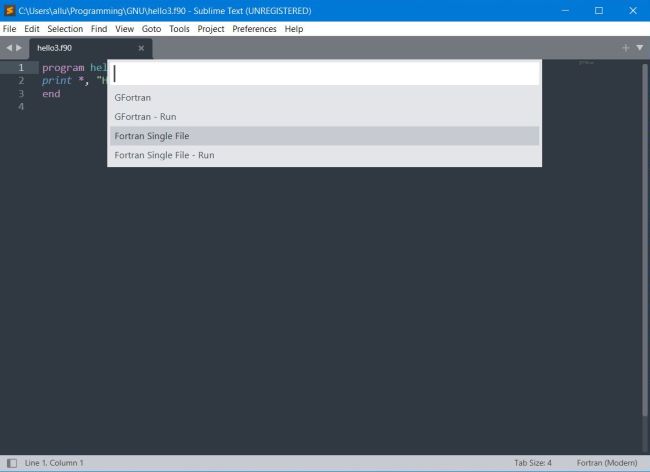
Now, to build a Fortran file, with the automatic (file extension dependent) build system selected, instead of running the command Tools > Build, execute the command Tools > Build With... and choose Fortran Single File (or Fortran Single File - Run) from the build systems proposed.
|
If you find this text helpful, please, support me and this website by signing my guestbook.