Some Knoppix 3.3 tips.
It's long ago, but in the early 2000th, the Knoppix Live-CDs were really famous and for lots of PC users, it was the first contact with "something different from MS Windows". The most amazing thing (all but not common those times) was that Knoppix was distributed as a live medium, i.e. it was possible to run this operating system from CD, without any need to install it onto the harddisk (and hereby risking to mess up Windows). Another positive surprise for those, who tried it out, was that the CD contained lots, lots of applications, a little bit belonging to all domains; a big difference with the Windows versions of those years, that did not include much more than Internet Explorer and Outlook Express, Windows Mediaplayer, Notepad and Wordpad, the Solitaire card game and some system tools. Having recently installed Knoppix 3.3 on a VMware virtual machine, I want to share here some tips about resolving some issues that I encountered.
1. Installing Knoppix onto harddisk.
Live-CDs are normally intended to try out a new OS and, if the user likes it, they are given the possibility to install it as a regular operating system onto a fixed
disk. This is normally done by a harddisk installation program, that you easily find, as it is present as a shortcut on the Live-CD desktop
(nowadays, most Live-CDs have one or several options to try the OS by running it in memory, or to directly install it onto a local disk). Knoppix 3.3 has no such
shortcut on its desktop. However, it includes a bash script, that you can run as root user in a terminal in order to create a real Linux
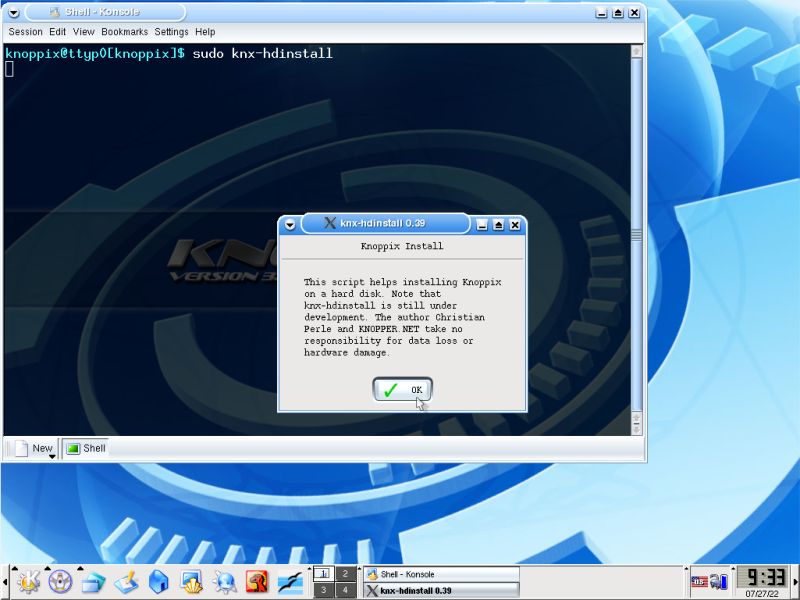
system on the fixed disk. To run this script, open a terminal and type the following:
sudo knx-hdinstall
This will launch the harddisk installation program; just follow the instructions on the screen...
 |
Note: On later versions of Knoppix, the HDD installation script has been renamed to knoppix-installer.
2. Accessing the CDROM drive.
Normally the CDROM drive should mount automatically, but this is not the case if you log in as the root user. I experienced this when, after choosing in VMware Player to install the VMware Tools (what does not work correctly as gcc, make and the Kernel headers are not included on the Knoppix CD), I did not find the CD on my Knoppix 3.3 system. There is always the possibility to mount a device manually in the terminal. For Linux beginners, lets put it like this: Mounting a device (such a CDROM drive) is creating a correspondence between a physical device (identified by its "name") to a directory within the file system (identified by its path). The Knoppix drive naming scheme is as follows:
| First partition on primary master IDE harddisk | /dev/hda1 |
| First partition on primary slave IDE harddisk | /dev/hdb1 |
| First partition on first SCSI harddisk | /dev/sda1 |
| First CDROM drive (SCSI or IDE) | /dev/scd0 |
| First floppy drive | /dev/fd0 |
We could mount the CDROM drive wherever we want within the filesystem, a good location being for example /mnt/cdrom. Here, the commands
to mount the CDROM drive:
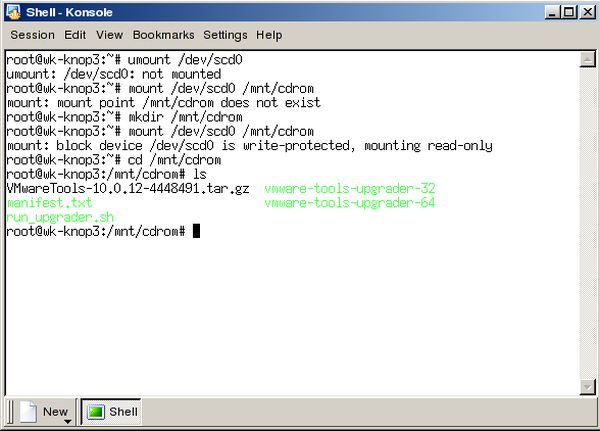
umount /dev/scd0
mount /dev/scd0 /mnt/cdrom
The umount command unmounts the drive (just for the case, it is already mounted). On the screenshot below, you see that I got the error
message mount point ... does not exist. That means that there is no subdirectory called cdrom in the
/mnt directory. You'll have to create this directory before running the mount command:
mkdir /mnt/cdrom
 |
The CD content is now available in the directory /mnt/cdrom. You can cd to it in the terminal as well as open it in the Konqueror file manager.
3. Changing the screen resolution.
Knoppix boots up with a resolution of 1024×768, what is rather impressive for a time, where lots of PC screens were limited to this resolution. However, after I had configured the dual boot with Windows XP (the Windows NT bootloader starting Lilo, that then loads the Linux kernel), as soon as X is started, i.e. when the system passes into graphics mode, the resolution was reset to 640×480, what's, of course, lots to small for comfortable working. Trying to choose a higher resolution in XFree86 Configuration failed. I was told that I would have to restart my session, I rebooted the system and with X being started, the resolution was reset to 640×480 again. I have no idea, how my dual boot configuration affects the screen resolution, but there must be a relationship, because when booting "normally", Knoppix was run with a screen resolution of 1024×768.
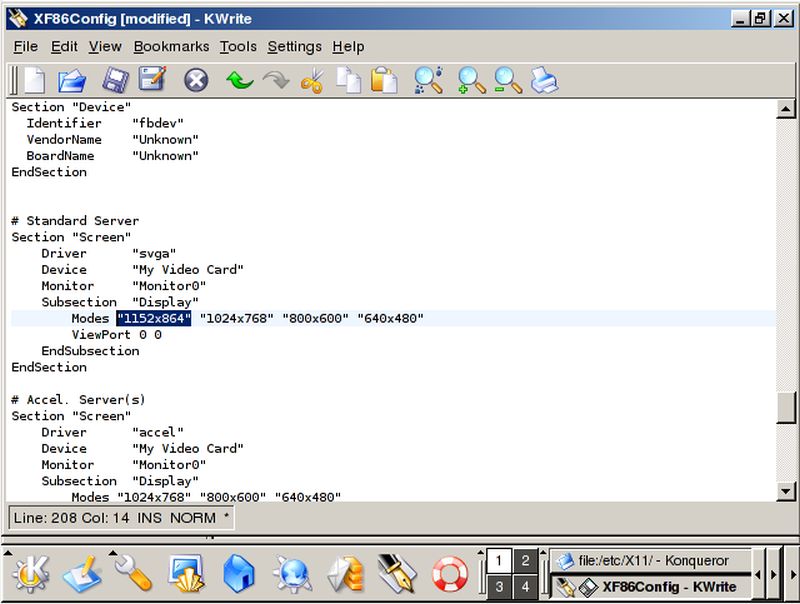
Anyway, I suppose that with "normal booting" you would be limited to 1024×768 pixels, what allows to work, but is a little bit poor on a 1920×1080 pixels screen. I usually run my VMware virtual machines in a windowed mode, with a guest screen resolution of 1440×900 (best vertical fit). Knoppix 3.3 does not support this resolution and thus I chose to use 1152x864 pixels. To be able to use this resolution, you have to manually edit the file /etc/X11/XF86Config-4. As root, you can do it using KWrite, the default (graphical) text editor on Knoppix 3.3.
I'm not sure if the configuration settings, that I made, are optimal, but they worked well for me. I think that the only change, that you must make, concerns the "Screen" section for the standard server: Just add the mode "1152×864" in the "Display" subsection, as shown on the following screenshot.
 |
In fact, I did a second change, but I think that this is not necessary. In the "Screen" section for the fallback server, I removed mode "640×480" in the "Display" subsection.
With the changes in /etc/X11/XF86Config-4 made, you can now set the 1152×864 screen resolution in XFree86 Configuration. Here, you can also set your actual keyboard, if you use some different from US. Should your new keyboard settings not work, try by changing the corresponding line in /etc/X11/XF86Config-4. To note, that the code for the German keyboard is "de" (and not "ge" or "gr")...
Note: As I said above, my Windows XP and Knoppix 3.3 dual boot machine runs on VMware Workstation and, due to missing development files, the installation of VMware tools fails. However, the tools installation is partially done, in particular a VMware video driver is installed. As a result, the file /etc/X11/XF86Config-4 is largely changed by the system (with my 1152×864 resolution still available in graphics mode as wanted).
If you find this text helpful, please, support me and this website by signing my guestbook.