Installing a Windows and Linux dual boot (UEFI boot with Windows 10).
This tutorial is about the UEFI boot of Microsoft Windows 10 and some Linux distribution, installed side by side on the same computer harddisk. The Windows release actually used is Windows 10 LITE Potato Edition (Windows 10 LITE 1703 Gaming Edition, 64bit), but the way to proceed should be exactly the same with any regular Windows 10. The Linux version used is Sparky Linux 7 Gameover Edition. Here again, the installation procedure should be the same or similar with any other UEFI booting Linux. Even if this might work with some Linux distributions, you should disable secure boot in your Firmware settings, or in VMware when creating the virtual machine. There are several webpages where it is said that fast boot has to be disabled. I did not find this option on my Potato Edition, what either means that on this release it is disabled by default, or that disabling it isn't really necessary. If you use a regular release of Windows 10, you should perhaps check this (in Power Management).
Microsoft has always been very intolerant in accepting another operating system installed in parallel with Windows (except for Windows 2000, where it seemed that they had changed their politics) and it's not because the booting method has changed from BIOS/MBR to UEFI, that things have become easier. If you search the Internet for information about a Windows 10 and Linux dual boot, you will find lots of articles, that pretend that you can just install Windows and then Linux and all should be fine. Other articles tell about having to use a third party boot loader, or to edit the UEFI settings. One fundamental fact, that most of these articles don't talk about, is that the 100 MB EFI partition, created by the Windows 10 installer, is to small to add a second OS (should this be a bad intention of Microsoft?), so it will not be the EFI partition content that will have to be changed, but the EFI partition itself that will have to be resized. For the rest, all goes its normal way: The Linux installation program detects Windows 10 and will automatically add it to the Grub 2 boot menu.
Installing our Windows 10 and Sparky Linux dual boot may be divided into the following 3 steps:
- Installation of Windows 10: Just install Windows as you would do if it was the only OS. The only important thing is to install Windows first; otherwise its installation will (more than probably) overwrite your Linux installation, or at least the Linux code in the EFI partition, and, of course, there will be no boot menu, but Windows booting all alone. Also to note that the procedure described here should work on a machine that is sold with Windows 10 pre-installed.
- Repartitioning the harddisk: It's easier to create space for Linux using Windows Disk Management or a partitioning tool, running on Windows, than to do this during the installation of Linux. But the most important is to resize the EFI partition from 100 MB to some 300 MB (the minimum accepted by Sparky); this needs the installation of a third party partition manager.
- Installation of Sparky: Regular installation with manual partitioning (the best way to do, I would say). The Sparky setup program will detect the Windows bootloader and add it to the Grub 2 boot menu.
1. Installing Windows 10.
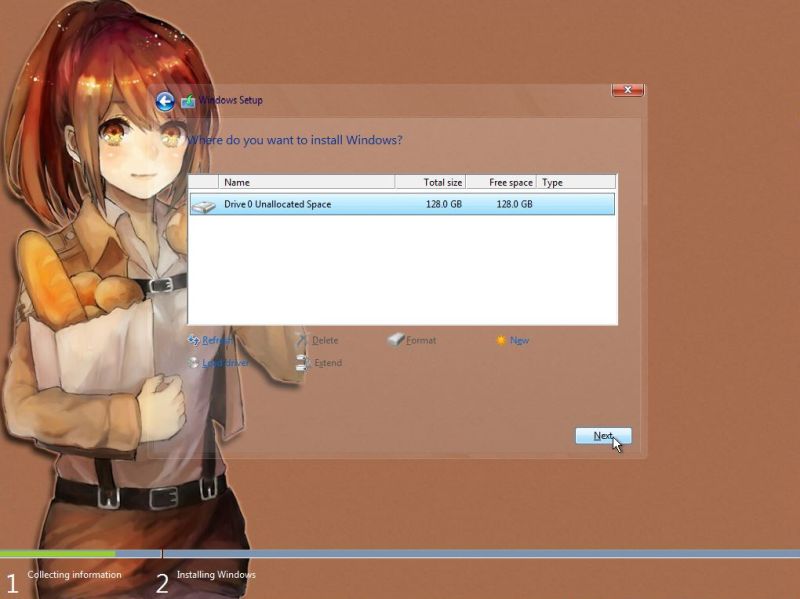
Boot from the Windows DVD (resp. the ISO, if you work in a virtual environment). In the case of my Potato Edition, the setup program asks for the language (I chose US English) and then for the version (Potato, Potato with Defender, Extreme Potato; I chose the first one of these). On the next screen, you are asked where you want to install Windows. On a fresh, unpartitioned harddisk, only one choice is given: Drive 0 Unallocated space. The installer will automatically create a GPT partition table and the different partitions, typical for a Windows 10 installation (cf. further down in the text).
|
Let the installation proceed as it usually does: file copy + device setup, input of user and other information, finishing setup. In the case of the Potato Edition, it is not possible to install updates (I think), and so I choose not to do it when asked for it during setup (this resulted in blocking the installation of updates until 2030, I saw later in Windows settings). I also had to reboot immediately after login, because Ghost required so. Finally, the desktop showed up.
The Windows 10 Potato Edition is really a "lite" edition, most of the standard Windows 10 applications and features being missing. On the other hand, it's a full functional, pre-activated Windows 10, ideal for trying out things like this dual boot. Also, most applications, that install on other releases of Windows 10, also install on the Potato Edition. This is in particular true for VMware Tools, that I installed at this stage (and thereby got the possibility to set the screen resolution as I wanted).
2. Creating space for Linux.
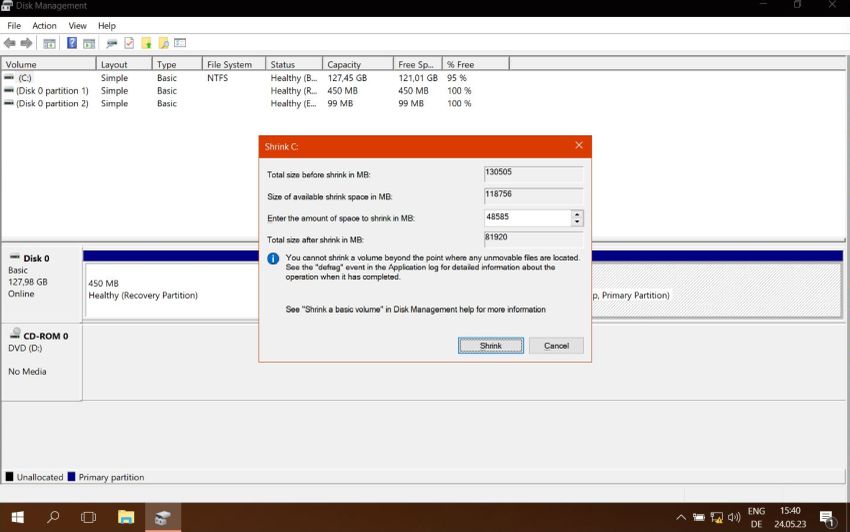
As I said above this is easier to do on the new Windows installation than later during the installation of Linux. You can do it using AOMEI Partition Wizard (cf. further down in the text), but it may also be done in Windows Disk Management. As you can see on the screenshot below, the Windows installer has created several partitions. At the start of the disk, a 450 MB recovery partition, a 99 MB EFI partition and, on my 128 GB harddisk, a 127,45 GB NTFS partition for Windows. This aren't actually all partitions that have been created. In fact, between the EFI partition and the Windows partition, there is a 16 MB hidden partition, flagged "msftres" ("Microsoft reserved"). We can safely ignore this partition, present on all Windows 10 systems, because it does not affect our dual boot configuration. My idea was to reduce the size of the Windows partition to 80 GB, using the so created free space for Linux. On the screenshot, you can see how I did this by entering a space to shrink value of 130,505 - 80 x 1,024 = 48,585 MB.
|
3. Failing to install Sparky.
You may skip this section if you want. It's a short description of how installation of the Linux OS fails if you do not change the size of the EFI partition created by Windows.
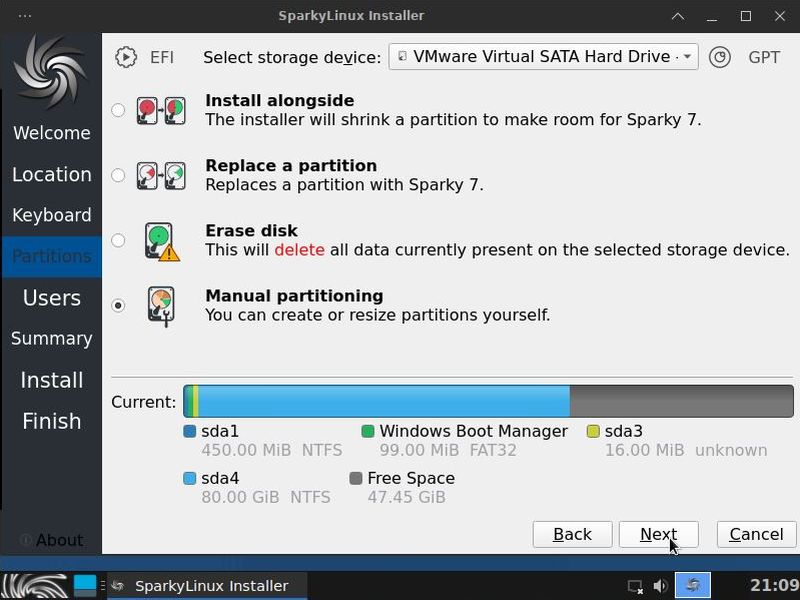
The screenshot below shows the harddisk partitions after installation of Windows 10 and the creation of space for Linux. As a difference of what is shown in Windows Disk Management, you can see 4 partitions here: sda1, the 450 MB recovery partition; sda2, the 99 MB EFI partition, sda3, the 16 MB Microsoft reserved partition ("unknown"); and the 80 GB Windows partition; the whole being followed by some 48 GB of unallocated space.
|
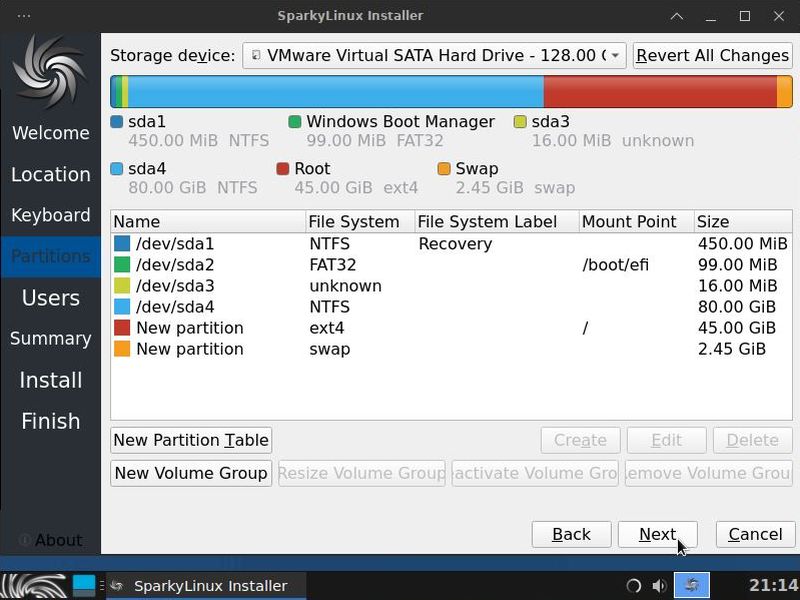
I chose to do a manual partitioning, exactly the same way as described in section 5 below. The screenshot shows the partition layout, ready to install Sparky, with two new partitions to create: the Sparky root partition and a Linux swap partition.
|
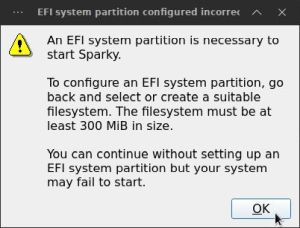
Setup continues normally until the manual partitioning operation should be performed. At this stage, you will get an error message that tells you that an EFI system partition is necessary to start Sparky.
|
4. Resizing the EFI partition.
The partition manipulations to be done here are not supported by Windows Disk Management. They cannot either be done by using the gParted live CD, because gParted can't expand FAT32 partitions. Installation of a third party partition manager on Windows 10 is the easiest way to do. I recommend AOMEI Partition Assistant for three reasons: First, there is an entirely free version; second, it's really powerful and easy to use; and third, it made my Windows 10 and Linux UEFI boot succeed, and thus should also make succeed yours.
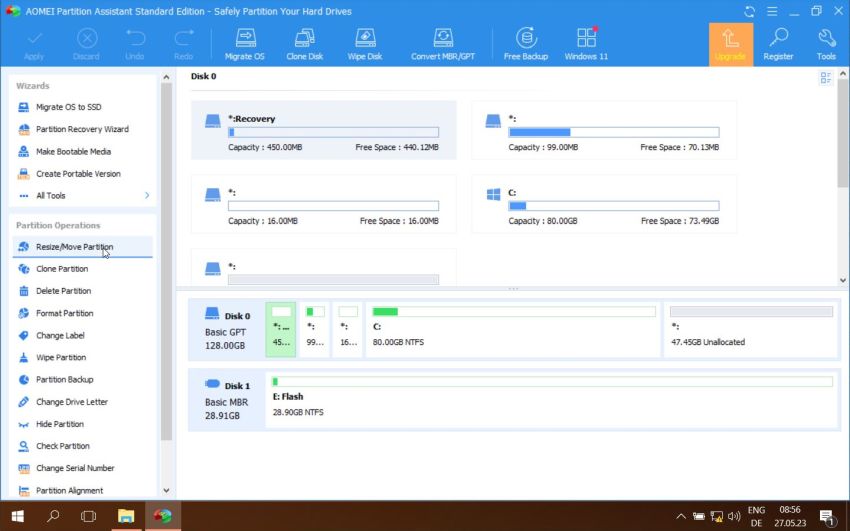
As we know from before and as we can see on the screenshot below, the 99 MB EFI partition is preceded by a 450 MB recovery partition, that is nearly empty and that will normally not be used. This layout seems to be ideal for our repartitioning operation. Way to proceed: Shrinking the recovery partition and expanding the EFI partition using the disk space freed up this way. So, in AOMEI, select the recovery partition and in the Partition Operations pane, choose Resize/Move partition.
|
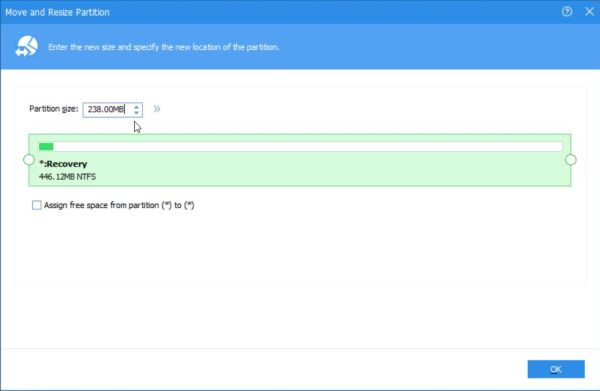
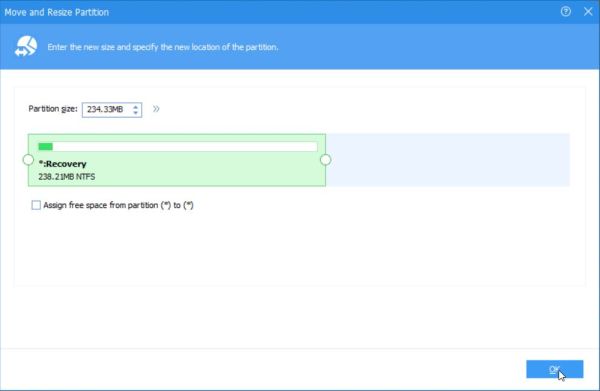
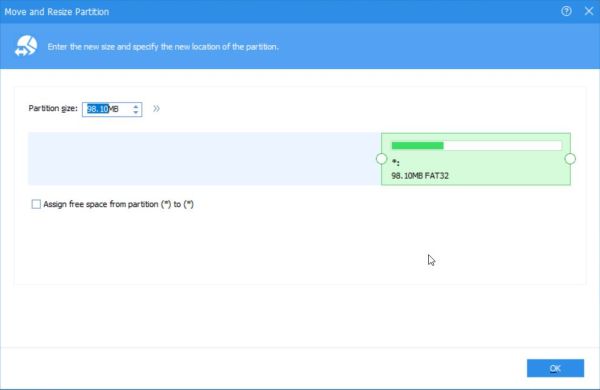
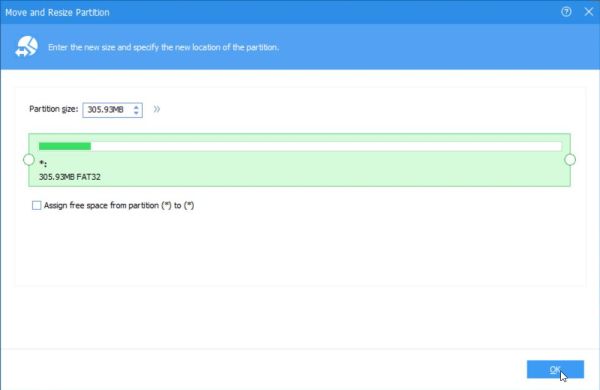
Shrinking a partition is all simple in AOMEI Partition Assistant: you may either enter a size value or drag the handles at the partition boundaries on the graphical display with the mouse. As Sparky will not install with an EFI partition of at least 300 MB, we must be sure to shrink the recovery partition to a size that liberates free space enough to get this value by adding the free space size to the actual EFI partition size. You can see on the screenshot on the left that I chose to shrink the recovery partition to 238 MB. I found this value after several trials (the values actually used differ from those that you enter, in order to meet partition layout and filesystem requirements). The screenshot on the right shows the "Move and Resize Partition" window, after the new size has been registered. The value in the edit field has been changed by the application. No idea why it was changed, nor why it is different from the size displayed on the graphics (that actually corresponds to the final size of the recovery partition).
|
|
You'll have to push the Apply button in the menu bar of the main AOMEI window, and then confirm your decision by pushing the Proceed button in the "Pending Operations" window. There shouldn't normally be a problem to succeed this operation that will take just some seconds.
Now, we can expand the EFI partition. To do so, select it and in the Partition Operations pane, choose Resize/Move partition. Even simpler to do as before: Just drag the resize handle at the beginning of the partition graphics to the left until all free space has been "filled". This results in an EFI partition of some 307 MB, that is what we actually want.
|
|
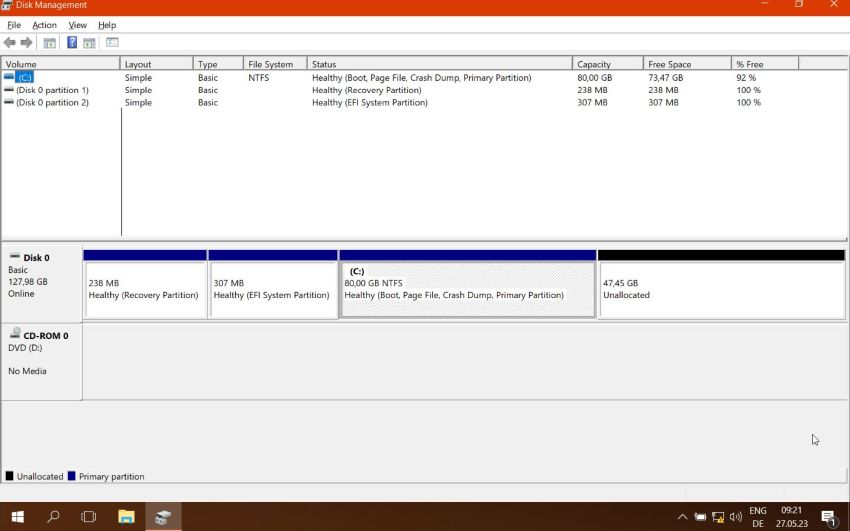
One of the potential issues, I was worried about when performing the repartitioning, is the fact that the first sector of the EFI partition is moved to a new physical location on the harddisk. There are booting systems (and I think it's the case for Grub 2) that do not work anymore if the boot partition is moved. Fortunately, this problem does not occur here. Either, EFI boot is not affected, either AOMEI Partition Assistant updates everything that has to be updated to make sure that all works correctly. The screenshot below shows the disk layout in Windows Disk Management after repartitioning has been done. You can see that the EFI partition has now a size of 307 MB (remember that the 16 MB Microsoft reserved partition is not shown).
|
5. Successfully installing Sparky.
In order to boot from the Sparky DVD, you have to change the boot order in the machine's Firmware settings. Set the EFI CDROM drive at the first place. I also moved the EFI harddrive one position up, thus preceding the Windows boot manager (even though this is not necessary, I think).
Boot the Sparky Live DVD and when the OS shows up, use the Sparky Installer icon on the desktop to start the installation wizard. Follow the instructions on the screen, ignoring the "Untrusted application launcher" warning, and entering the actual values for language, timezone and keyboard.
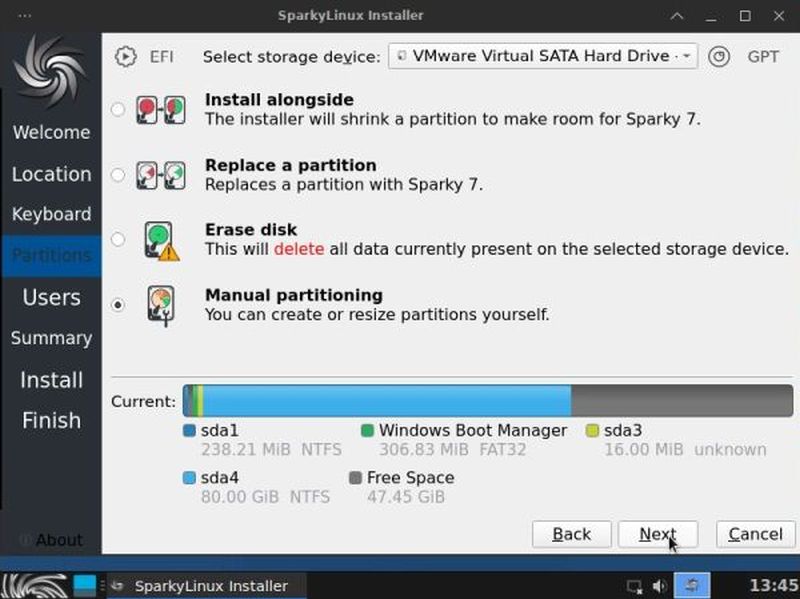
When the partitioning tool shows up, choose manual partitioning. Letting Setup do would probably work, too, but taking control yourself makes sure that it will. On the screenshot, notice the EFI partition that has now a size of 306.86 MB.
|
The next screenshot shows the partition layout with more details. The 3.97 MB of free space between the recovery and the EFI partition are due to partition size and boundary constraints; we can simply ignore it. The now 238.21 MB recovery partition (/dev/sda1) and the 16 MB Microsoft reserved partition (/dev/sda3) are not of importance for us, either.
Lets start with defining an EFI partition. Obviously that we use /dev/sda2, the EFI partition created by the Windows 10 installer (and containing the Windows bootloader code) and resized to 306.83 MB using AOMEI before. What we have to do is mounting this partition to be used by Sparky. Select /dev/sda2 and push the Edit button to do this.
![Windows 10 and Linux dual boot: Manual partitioning - Editing of the EFI partition [1] Windows 10 and Linux dual boot: Manual partitioning - Editing of the EFI partition [1]](../screenshots/win10lin_dualboot12.jpg)
|
The only thing we have to change concerning the EFI partition, is to define the mount point /boot/efi (you can select it from the drop down list). Be sure not to change the other values. If you choose to format the partition, the Windows bootloader will be overwritten; if you clear the boot flag, the system will no longer boot (I suppose).
![Windows 10 and Linux dual boot: Manual partitioning - Editing of the EFI partition [2] Windows 10 and Linux dual boot: Manual partitioning - Editing of the EFI partition [2]](../screenshots/win10lin_dualboot13.jpg)
|
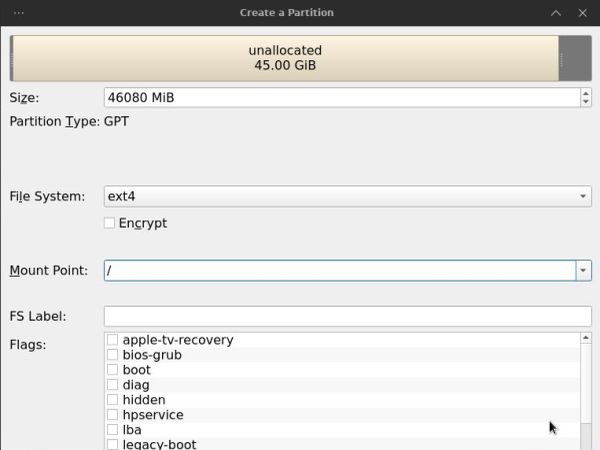
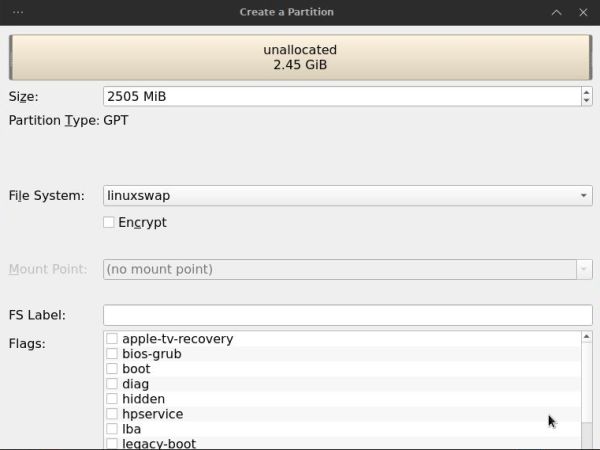
Now, we can create the partition(s) for Sparky. To do so, select the unallocated space at the end of the disk and push the Create button. The screenshot at the left shows the data to enter in order to create a 45 GB root partition, formatted with the ext4 filesystem and with mount point /. The screenshot at the right shows the creation of a swap partition (not mandatory, but to recommend) within the resting free space on the disk.
|
|
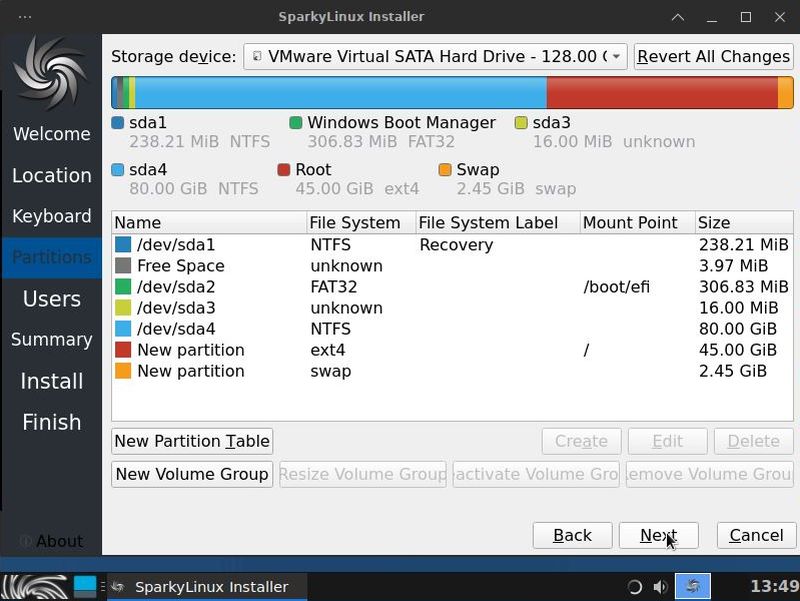
And here the disk layout, after all partitions and their mount points have been defined. To note, that if you want so, you may add a mount point for /dev/sda4 (the Windows 10 C: drive), too. Adding a mount point, not reformatting the partition, of course!
|
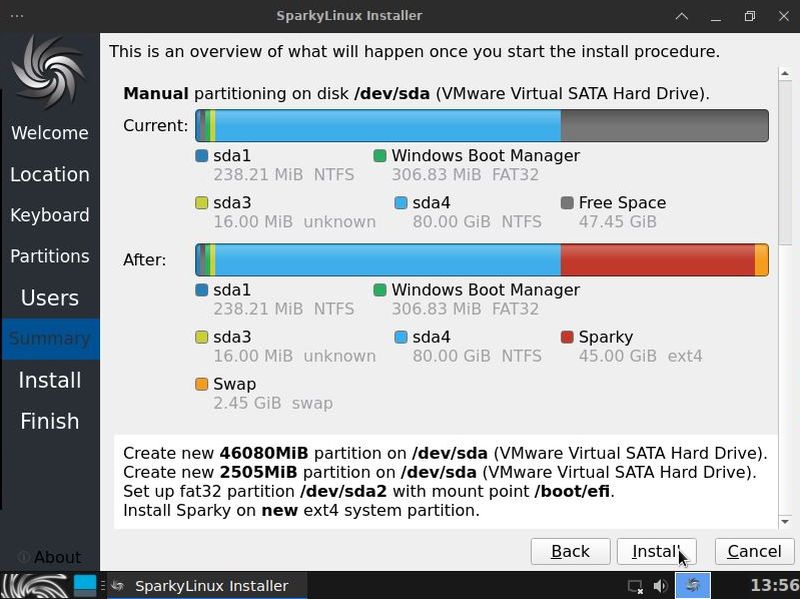
After input of computer name and user information, the old and new partition layout is displayed. Push the Install button to write the new partition layout to the harddisk and copy the Sparky files to the root partition.
|
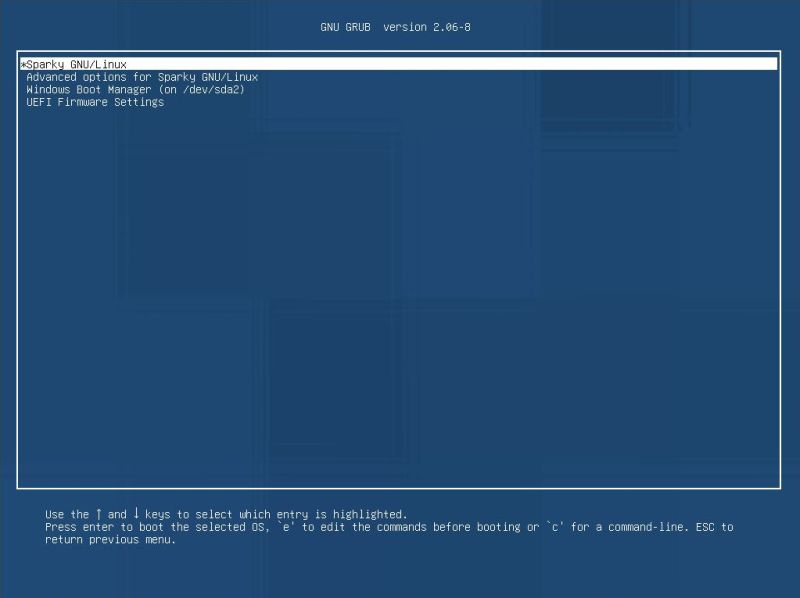
This is all, you have to do. The Sparky installer detects the Windows bootloader and automatically adds it to the Grub 2 boot menu, from where you can start either of the two operating systems, as well as access the UEFI Firmware settings.
|
If you find this text helpful, please, support me and this website by signing my guestbook.