Using the Windows 3.x Program Manager.
Windows 3.x has no Start Menu, as you find on later versions of the OS, but a so-called Program Manager, that contains an icon for the different program groups (created when Windows was installed, or created by the setup program of some software installed later on). Double-clicking a program group opens a new window showing the group's content: a set of icons, mostly of programs (executables), but also other files, such for example some application documentation. Thus, Program Manager is a handy tool to launch the applications installed on the computer (another way to do this, is to browse to the application folder in File Manager and double-clicking the .EXE file).
The major disadvantage of Program Manager is probably that if you have dozens of applications installed on your PC, you'll have dozens of program group icons in Program Manager, and using a Start Menu instead is lots more clear. On the other side, Program Manager includes all commands to create, edit and delete program groups or group items, and by this makes it easier to manage the program launchers than does Start Menu. That's a good thing, because at the times of Windows 3, not all setup programs did create a program group. And, if you download some software without an installer, you can easily create a group or add an item to an existing group.
Here, some examples of how I used the menu commands of Program Manager to reorganize my program groups.
Creating a new program group.
On my Windows 3.0 (French version), I had installed CorelDraw! 2.0, the application working well, but no program group having been created. So, I decided to do it manually. In Program Manager, choose File > New (French: "Fichier > Nouveau").
![Windows 3.0 Program Manager: Creating a program group [1] Windows 3.0 Program Manager: Creating a program group [1]](../screenshots/win3x_pm1.jpg)
|
A window pops up, where you are asked, what you want to create; select Program group (screenshot on the left), and in the following window, choose a name for the group. This is the name, that the group icon will have in Program Manager. In my case, I chose "CorelDraw!". The second input field, labeled Group file (French: "Fichier de groupe") will be filled in by Windows; just ignore it (screenshot on the right).
![Windows 3.0 Program Manager: Creating a program group [2] Windows 3.0 Program Manager: Creating a program group [2]](../screenshots/win3x_pm2a.jpg)
|
![Windows 3.0 Program Manager: Creating a program group [3: Naming the group] Windows 3.0 Program Manager: Creating a program group [3: Naming the group]](../screenshots/win3x_pm2b.jpg)
|
Adding a program to a group.
A program group is similar to a folder; it contains something (mostly program launchers), but cannot be used to run a program or do some other task by itself. So, to be able to launch CorelDraw! from Program Manager, we have to add a launcher for the CorelDraw! executable to the newly created program group. Before doing so, open the group, where you want add a program. Then choose choose File > New.
![Windows 3.0 Program Manager: Adding a program to a group [1] Windows 3.0 Program Manager: Adding a program to a group [1]](../screenshots/win3x_pm3.jpg)
|
In the window, where you are asked, what you want to create; select Program this time (screenshot on the left). In the following window, choose a name for the program item. This is the name, that the program will have in the Program Manager group window. I named it "CorelDraw!", like the group. The important thing now is to add the correct path to the executable. You can use the Browse (French: "Parcourir") button to do so. On the screenshot on the right, this has already been done and the path is actually filled in. You may wonder how we find the executable. Normally an application is installed in its own folder, that normally is created as a subdirectory of C:, sometimes of C:\WINDOWS (in my case, a multiple boot system with several partitions, the CORELDRW folder, containing the application files, was created in D:\WINDOWS) and in this folder search for an .EXE file (in this example CORELDRW.EXE).
![Windows 3.0 Program Manager: Adding a program to a group [2] Windows 3.0 Program Manager: Adding a program to a group [2]](../screenshots/win3x_pm4a.jpg)
|
![Windows 3.0 Program Manager: Adding a program to a group [3: Entering program name and path to the executable] Windows 3.0 Program Manager: Adding a program to a group [3: Entering program name and path to the executable]](../screenshots/win3x_pm4b.jpg)
|
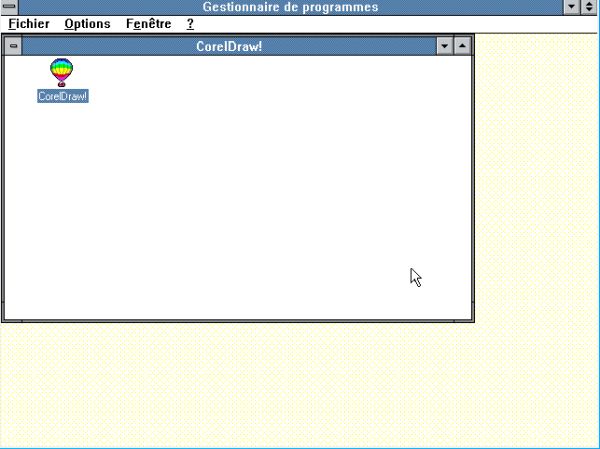
Most Windows programs contain a program icon, and it's this icon that the application launcher will have in Program Manager. The screenshot shows the newly created program group "CorelDraw!" with the newly created program item "CorelDraw!", appearing as an icon that, when double-clicked, will launch the CorelDraw! 2.0 application.

|
Deleting a program group.
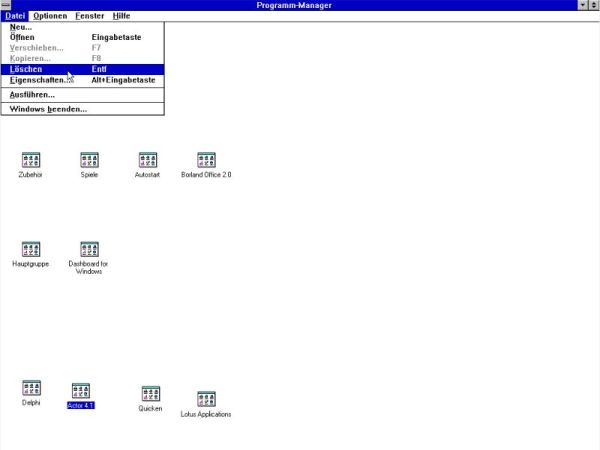
On my Windows 3.1 (German version), I had installed Actor 4.1, that I later wanted to completely remove. To remove a program group in Program Manager, select the group, that you want to remove (here the group "Actor 4.1") and choose File > Delete (German: "Datei > Löschen").

|
Windows asks you to confirm the deletion. If you do so, the program group will be removed. To note, that this removes the program group from Program Manager, without removing the files of the application from the filesystem. This has to be done in File Manager as explained in Uninstalling a program on Windows 3.x.
Moving a program to another group.
The setup program of Microsoft Win32s installs the card game application Freecell in order to check if install has been successful and if it is possible to correctly run 32bit applications. The game launcher is placed into an automatically created program group called "Win32 applications". Here, how I moved the game launcher to the "Games" program group on my Windows 3.11. In Program Manager, open the source group and select the program that you want to move (in this example the program "Freecell" in the program group "Win32 applications"). From the menu, choose File > Move....
![Windows 3.11 Program Manager: Moving a program to another group [1: Selecting the program to be moved] Windows 3.11 Program Manager: Moving a program to another group [1: Selecting the program to be moved]](../screenshots/win3x_pm7.jpg)
|
The Move Program Item window opens. In the combobox, showing a list with the available groups, select the destination program group ("Games" in this example).
![Windows 3.11 Program Manager: Moving a program to another group [2: Selecting the destination group] Windows 3.11 Program Manager: Moving a program to another group [2: Selecting the destination group]](../screenshots/win3x_pm8.jpg)
|
Renaming a program group.
When I installed Microsoft Works on my Windows 3.0 (French versions), the setup program created a program group called "Solutions Microsoft". I decided to rename this group to "Microsoft Works" later and here is how I did proceed. Select the group, that you want to rename in Program Manager and from the menu, choose File > Properties (in French: "Fichier > Propriétés").
![Windows 3.0 Program Manager: Renaming a program group [1: Opening the group's properties] Windows 3.0 Program Manager: Renaming a program group [1: Opening the group's properties]](../screenshots/win3x_pm9.jpg)
|
The Group Properties window opens. It shows two input fields: one for the group name, the other for the group file. In our example, the "name" field contains "Solutions Microsoft" (screenshot on the left). The second field is set and used by Windows; just ignore it. We can now simply change the "name" field content, setting it to the new group name ("Microsoft Works" in this example) (screenshot on the right).
![Windows 3.0 Program Manager: Renaming a program group [2: Original group properties] Windows 3.0 Program Manager: Renaming a program group [2: Original group properties]](../screenshots/win3x_pm10a.jpg)
|
![Windows 3.0 Program Manager: Renaming a program group [3: Modified group properties] Windows 3.0 Program Manager: Renaming a program group [3: Modified group properties]](../screenshots/win3x_pm10b.jpg)
|
If you find this text helpful, please, support me and this website by signing my guestbook.