| 5. |
Perl. |
| |
5.1. |
Perl distributions. |
| |
|
|
Perl is a powerful scripting language, allowing the development of applications in a minimum
of time. One of its major features is its unlimited possibilities to handle strings of any kind, what made it the most used programming language
in bioinformatics. Perl is included with all Unix based operating systems; lots of the terminal programs of these systems actually are Perl scripts.
Perl is very suitable to access MySQL and other databases and with Perl-CGI it's also easy to write web applications.
|
|
There are several free Perl distributions available for MS Windows, all as binaries, most for both 32bit and 64bit platforms. "ActivePerl is the leading distribution of open source Perl.", ActiveState
write on their website. I used it in the past, giving it up with newer versions: ActivePerl comes with its own modules, with the side-effect that not
all CPAN modules (cf. below) may correctly be installed with ActivePerl (what is in particular the case of BioPerl). DWIMPerl
is a really nice distribution, including not only a complete development environment, called Padre, but also the widgets to
write graphical Perl applications. Unfortunately, DWIMPerl seems no longer be under active development; the last version was released in 2012. On the
DWIM Perl website, they write: "No new version of DWIM Perl has been released for quite some time. You are probably better
off using Perlbrew to install it on Linux or Strawberry Perl for Windows." The base of DWIMPerl actually is Strawberry Perl
(version 5.14.2.1 RC for the last DWIMPerl distribution); it's the actual version of Strawberry Perl, that I choose for my Windows 10 system.
|
|
Note: The Strawberry Perl language, that I used, when writing this tutorial, was version 5.26.1.1. For some considerations,
concerning version 5.32.0.1 (2021) and version 5.40.0.1 (2024), cf. More recent Perl releases.
|
|
| |
5.2. |
Installing Strawberry Perl. |
| |
|
|
"Strawberry Perl is a Perl environment for MS Windows containing all you need to run and develop Perl applications. It is designed to be as close as possible
to the Perl environment on UNIX systems. It includes Perl binaries, compiler (gcc) + related tools, all the external libraries (crypto, math, graphics, xml ...),
all the bundled database clients and all you expect from Strawberry Perl."
|
|
The paragraph above is how the developers of Strawberry Perl describe their product on their website.
The site contains the links to download the latest version for both Windows 32bit and 64bit as .msi files. I decided to install both packages. Actual version:
5.26.1.1.
|
| Installing Strawberry Perl 32bit. |
|
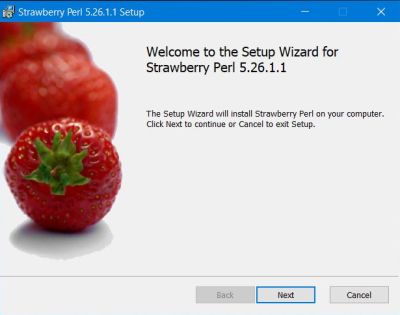
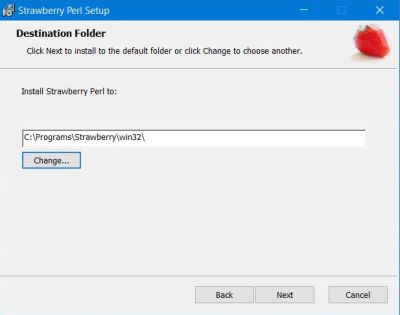
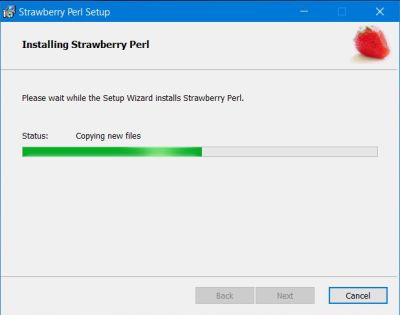
To start the installation, double-click the strawberry-perl-5.26.1.1-32bit.msi file. The setup program uses "C:\Strawberry" as default
installation directory. As for Apache and PHP, I choose to install into my "C:\Programs" directory and using subdirectories "win32" and "win64" to properly
separate the two versions. So, the path of my 32bit Perl actually is "C:\Programs\Strawberry\win32\".
|
|
|
| Installing Strawberry Perl 64bit. |
|
My 64bit setup program is called strawberry-perl-5.26.1.1-64bit.msi. Similarly as what I did for the 32bit version, I used the
Change... button on the setup Destination folder screen, to change it to "C:\Programs\Strawberry\win64\".
|
|
| |
5.3. |
Running a Perl console program. |
| |
|
|
You may run a Windows Command Prompt program from any directory by specifying its full path; thus you may run Perl by typing "C:\Programs\Strawberry\win64\perl".
To run the program by only typing its name, the directory, it is in, must be specified in the Path environment variable. Typical paths
specified in the system variables (valid for all users) are for example "%SystemRoot%" and "%SystemRoot\System32%" (corresponding to "C:\Windows" and
"C:\Windows\System32" respectively), the Path variable for the user actually logged in typically contains "%USERPROFILE%\AppData\Local\Microsoft\WindowsApps"
(with %USERPROFILE% = "C:\Users\[Username]").
|
|
The Strawberry Perl installation program automatically adds the paths needed to the Path system environment variable. The way how this is done depends on the
setup program: Some of them add the new paths at the beginning of the list, others add them at its end, as does Strawberry Perl. This is important to know,
because if Windows is told to run a Command Prompt program, it reads the path variable from left to right (first the user, then the
system variable) and the first directory match found will be the folder used to look for the program to be executed. As I installed
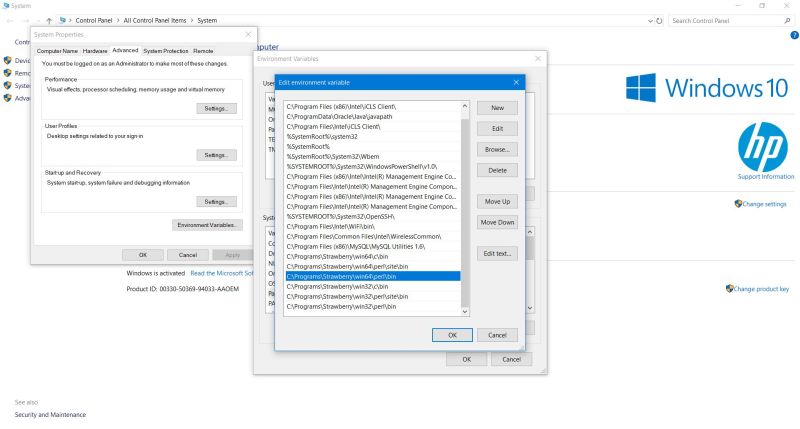
both the 32bit and 64bit version of Strawberry Perl, the Path environment variable contains the path to both Perl interpreters, the one actually used being the
one, whose path is mentioned first and as the setup program adds entries to the right of the Path string, it would be the 32bit version. As I intend to normally
use the 64bit version of Strawberry Perl, I have to modify the Path environment variable, placing the 64bit paths before the 32bit ones.
|
| Editing the Path environment variable. |
|
The exact way how to do this varies with the Windows version you use. The description below applies to Windows 10; I think on Windows 8.x it's very similar,
perhaps even the same. Right-click This PC (My Computer on older Windows versions) and choose Properties. The page, displaying basic computer information is opened; in the left pane of this page, choose Advanced
system settings and in the window, that opens, push the Environment variables button. In the list of the system variables,
select the Path variable and click the Edit button. If I remember well, with older Windows versions you
have to directly edit the entire string if you want to change the value of an environment variable. In Windows 10, the different directories being part of
the Path variable are displayed as a table and each of them may be separately accessed to modify or delete it, to move it up (towards the beginning of the
string) or down (towards the end of the string). The following screenshot shows the content of my Path system variable, after I moved up the 3 64bit related
Strawberry directory names.
|
|
|
| Idenifying the (default) Perl installation. |
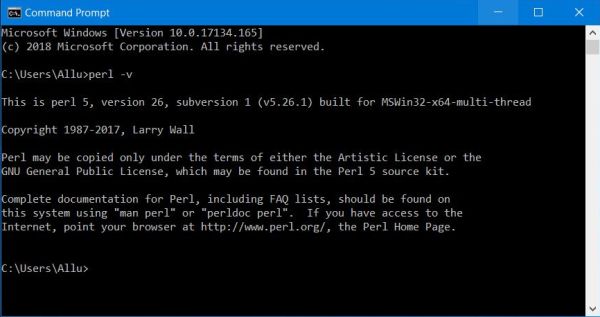
To display the actual version of Perl (i.e. the default Perl installation, as specified in the Path environment variable), open a Command
Prompt window (you can find Command Prompt in the Windows System folder in the Start menu) and
type:
perl -v
This will display not only the Perl version number, but also if it is or not the 64bit program.
|
|
|
| Simple Perl command line program. |
|
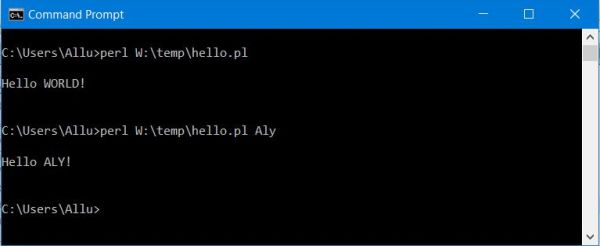
In a text editor (such as Notepad or Notepad++), write the following Perl script, and save it as "hello.pl" (in my case into the "W:\temp" directory).
|
use strict; use warnings;
(my $name) = @ARGV;
$name = 'World' unless (defined $name);
print "\nHello " . uc($name) . "!\n\n";
exit;
|
|
Here's the command to run this script in Command Prompt and the output that it produces. Note the 2 arguments passed to perl.exe: the first, intended for
the interpreter itself, being the name of the script, the second intended for the script, being the first entry in the @ARGV array read by hello.pl.
|
|
|
|
| |
5.4. |
Running Perl-CGI on Apache. |
| |
|
Common Gateway Interface (CGI) is a set of standards that defines how information is exchanged between a web
server and a custom script. Normally, when a browser contacts a web server using the HTTP protocol to ask for a URL (i.e. a web page
filename), the server will check the URL and will look for the filename requested. If it finds the file, it sends it back to the browser
without any further execution (or, if it contains code such as a PHP script, lets execute the PHP interpreter this code); if it doesn't
find the file, it sends an error message (Error 404).
However, it is possible to set up the HTTP server in such a way, so that whenever a file in a certain directory is requested, that file is
not sent back; instead it is executed as a program, and whatever that program outputs as a result, that is sent back to your browser to
display. This can be done by using CGI, a special functionality available within the web server. Programs, that are executed by the server to
produce the final result (mostly creation of a webpage), are called CGI scripts. These CGI programs can be Perl or
Python scripts, shell scripts, C or C++ programs, etc.
|
Running a Perl-CGI script on Apache needs 2 things:
- Configuring a script directory in the Apache configuration file (cf. part 1).
- Using the shebang (#!) line as first line in the CGI script to inform the web server where the Perl
interpreter is located.
|
Notes.
- It is possible to run CGI scripts from any directory by setting a handler and using using the ExecCGI option in the Options directive. This is
however not recommended for security and other reasons.
- On Linux, the shebang line is mandatory for all scripts. On MS Windows, it may be omitted for command line programs, but you always must specify
it in a Perl-CGI script.
- If the Apache web server runs on Linux (as it does on most web hosting Internet sites), the CGI script has to be set executable. A chmod 0755 works well.
|
| Configuring Apache for CGI. |
|
If you installed Apache in its default directory, you normally haven't to make any modifications to the httpd.conf file,
as Apache is distributed configured to use its CGI features. As I installed my web server to "C:\Programs" (cf. part 1), the CGI related entries in httpd.conf have to be adapted as follows:
|
ScriptAlias /cgi-bin/ "c:/Programs/Apache24/cgi-bin/"
<Directory "c:/Programs/Apache24/cgi-bin">
AllowOverride None
Options None
Require all granted
</Directory>
|
| Testing Perl-CGI. |
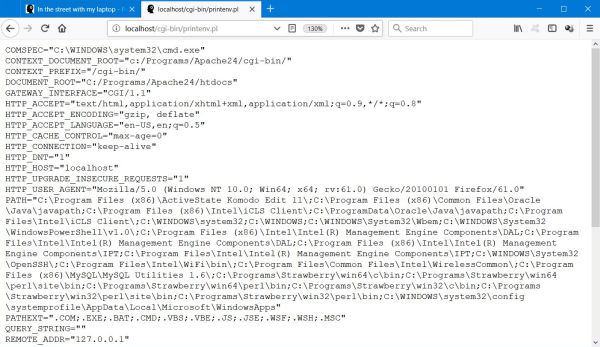
Apache distributions normally include a Perl-CGI script called printenv.pl, that may be used to display the environment variables. Before running
it, we have to change the shebang line, in my actual case:
#!C:/Programs/Strawberry/win64/perl/bin/perl.exe
Note the usage of "/" instead of "\", usually used on MS Windows. On Linux, don't forget to make the script executable!
|
|
To run the script, type the following URL in your browser address field: localhost/cgi-bin/printenv.pl
|
|
|
|
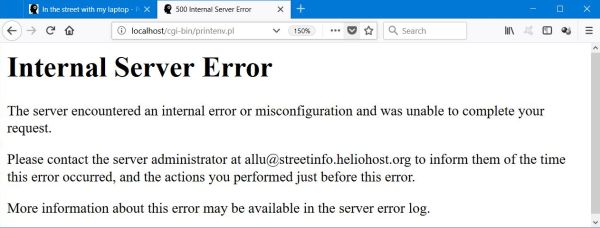
Errors in a CGI script may result in an Internal server error (500), what in my case (personalized 500.shtml file)
looks like this:
|
|
|
|
| |
5.5. |
Accessing MySQL databases with Perl. |
| |
|
|
DBI (DataBase Interface) is Perl's database access module. It defines the methods, variables and conventions
required to provide a consistent database interface to the programmer, regardless of the actual database or databases being used. DBI
provides this database independence by dynamically loading appropriate database drivers to do the actual work in the background. A large
number of driver modules are available for Perl, including drivers for all the major database servers (DBD::mysql in
the case of a MySQL server) and several drivers for other database-independent interfaces such as ODBC. DBI also provides error checking
and handling and specifies default methods for non-database specific tasks.
|
|
DBI and DBD::mysql are included with most Perl distributions, so they are with Strawberry Perl. This means that no special installation or
configuration is necessary to access a MySQL database from a Perl script.
|
Accessing a MySQL database from Perl includes the following steps:
- Creating a handle for the MySQL database that you want to query and connect to the database: connect method.
- Creating a handle for your SQL statement: prepare method with possibility to use placeholders
without specifying the values they are to be bound to, allowing us to prepare a statement once, and the execute method,
allowing us to execute the statement many times with different sets of data.
- Retrieve the records returned by your query: several methods available.
- Disconnecting from the database: disconnect method.
|
| Simple MySQL (CGI) script. |
|
The following script does the same as we did with PHP in part 3: Displaying the number of cities in the "city" table of the "world" database.
|
use strict; use warnings;
use CGI qw(:standard);
use CGI::Carp qw(fatalsToBrowser);
use DBI;
my $database='world'; my $username = 'nemo'; my $passwd = 'nemo';
print header;
my $dbh = DBI->connect("dbi:mysql:database=$database", $username, $passwd, { AutoCommit => 1, RaiseError => 1 })
or die "Failed to connect to database: $DBI::errstr";
my $sql = "SELECT count(*) FROM city";
my ($count) = $dbh->selectrow_array($sql);
print "<html>";
print "<head><title>Perl-MySQL test</title></head>";
print "<body><p>Number of cities in database 'world' = $count</p></body>";
print "</html>";
$dbh->disconnect();
|
|
The screenshots below show the script output in the web browser in the following cases: (1) MySQL server not running, (2) wrong user password,
(3) all ok.
|
|
|
Notes:
- In order to have the error messages displayed, the print header; statement must precede the MySQL connection statement,
otherwise you'll get an Error 500 (that doesn't tell you what went wrong).
- Testing the return code of MySQL after each database query may be a good practice, but isn't really necessary: Setting RaiseError
=> 1 in the database connect statement will result in the display of the standard MySQL error message and abortion of the script as soon as an
error is encountered.
|
|
| |
5.6. |
Perl modules from CPAN. |
| |
|
CPAN (Comprehensive Perl Archive Network) is a large collection of Perl software and
documentation. You can begin exploring it from either the CPAN website or any of the mirrors listed at http://www.cpan.org/SITES.html.
CPAN is also the name of a Perl module, CPAN.pm, which is used to download and install Perl software from the CPAN
archive.
MetaCPAN is an open source search engine for the Comprehensive Perl Archive Network (CPAN).
It includes a comfortable web-based view and a first class mirror of the canonical CPAN content.
|
|
Most Perl distributions provide a command line CPAN client, which makes installation of Perl modules more than easy.
After installation of Strawberry Perl, you'll find a CPAN client entry in the Start menu (for both the 32bit and 64bit
version). Double-clicking it, opens Command Prompt and starts the CPAN client (with Perl distributions not including this shortcut, start Command
Prompt and type "cpan"). The prompt in the CPAN window is cpan> (just as the current directory is the prompt in Command
Prompt itself) and the program works with simple commands, parameters and options similar to other shells. To get help with the CPAN client, type
h.
|
| Installing Perl modules from CPAN. |
I never took the time to have a closer look at the cpan commands. Here the two that you need to install a Perl module (with all default settings):
To get a list of "anything" available (authors, bundles, distributions, modules), matching the regular expression specified (not sure, but I
think that letters in "regexp" have to be lower-case), type i /regexp/.
To install (download, make, make test, make install and also download and install required dependencies; if there is lots to compile, this may
take a while) a given module, use install filepath, where filepath is the full filename as specified in the list displayed,
i.e. including author name and directory with possible subdirectories, filename and file extension (normally .tar.gz). As in normal Command Prompt, you
can use copy/paste for the filename: Select the .tar.gz archive name with your mouse, right-click the CPAN icon in the upper-left corner of the window,
choose Edit and then Copy. At the cpan> prompt, type install, followed by a space, then right-click in the console window and hit ENTER.
Note: To properly close the CPAN client (and avoid file-lock-problems during the next run), use the
q command to terminate the program.
|
As example, the installation of some Perl module allowing to handle MP3 tags. Launch the CPAN client and enter the following commands:
i /mp3/
install ILYAZ/modules/MP3-Tag-1.14.tar.gz
q
The screenshots show the download and display of the modules list (1), the initiation of the install process (2), the make test
run (3) and the make install run (4). If the last lines displayed (before returning to the CPAN command) tell that the installation
was successful, your module has been installed (mostly to perl/site/lib) and that it may be used as any module originally included
with your Perl distribution.
|
|
|
|
|
|
| |
5.7. |
Using Komodo Edit as Perl editor. |
| |
|
|
It's not mandatory to install an IDE or programming editor to develop Perl applications; writing the code in a text editor like Notepad++ (with syntax highlighting for Perl and lots of other languages)
and compiling in the console is always possible. On the other side, if you seriously use Perl as programming language, using a "real" Perl
editor has lots of advantages: Not only syntax highlighting, but also syntax checking, the error messages being caught inside the editor
program, running the script from within the editor instead of using a separate console window, access to Perl help and other useful features,
with a real IDE, possibility of interactively debugging your program...
|
There are several Perl editors (or IDE) available for MS-Windows. Here a list of some of them:
- Padre: Padre is a complete and free IDE for Perl and part of DWIMPerl as
mentioned above. Padre itself is written in Perl, so you might think it would be possible to install it into your actual Strawberry
distribution (using CPAN). Unfortunately, this seems not be possible. When I tried, after compiling (downloading dozens of dependencies)
during an hour, it failed during the final installation steps. On some Internet sites, there is reference to a standalone Padre .msi
file, but the corresponding links are dead...
- The Java development platform Eclipse may be extended by a plugin for Perl, called
EPIC. All free, I suppose. As I never worked with Eclipse, no idea how useful this
solution would be.
- At the beginning of this text, I mentioned Active Perl. ActiveState provides a complete Perl development environment, called
Komodo IDE. It includes version control and collaboration tools and
gives access to ActiveState Platform, an online service allowing to automatically build & update open source
runtime environments for several programming languages and target platforms on demand in minutes. There is a free version of Komodo IDE
and the access to the platform available. In their "What are the best..." comparing Komodo IDE and Komodo Edit, Slant give preference to the editor, telling that the free version of the IDE "lacks most of the functionality that the paid
version has".
- Komodo Edit is the free and open-source counterpart of
Komodo IDE. It includes syntax highlighting and checking for Perl, PHP and lots of other languages. The possibility to run external programs and
the usage of predefined variables (similar to those in batch files) makes it easy to configure it to build Perl applications using your actual
Perl installation. Komodo Edit, my choice on my Windows 10 Strawberry Perl system.
|
|
Installing Komodo Edit.
|
|
Download the installer from the ActiveState site and double-click it to install Komodo Edit with all default options. The first time you run the
program, some configuration settings are asked for: I usually use an indentation of 2 (instead of standard 4) and do not participate in "make ...
even better".
|
|
When trying the editor, Avast! Free Antivirus blocked it by reporting a threat in python.exe. I'm quite sure that this must be a false positive. I
can't imagine that a society like ActiveState distributes software containing viruses and Malwarebytes Free did consider the file as clean...
|
|
Configuration is done using Preferences (as most other items, you find it by clicking the horizontal bars icon in the upper
right corner of the application's window). One thing to change here is setting the interface color (Appearance tab) to Classic: this results in a white background, the default black one making it really difficult to work. I checked Trim
end of line and Ensure line ends with eol marker in the File saving tab and made Komodo the
default application for .pl, .pm and also .php files (if this doesn't work from within Komodo, do it in your Windows Default
applications). Important change to do in the Web and browser tab: Set the browser to use by Komodo
to your web browser's path (in my case "C:\Program Files\Mozilla Firefox\firefox.exe") instead of using the default setting View
in external default browser, setting that produces an error when running browser related commands.
|
|
|
|
Running Perl command line scripts.
|
|
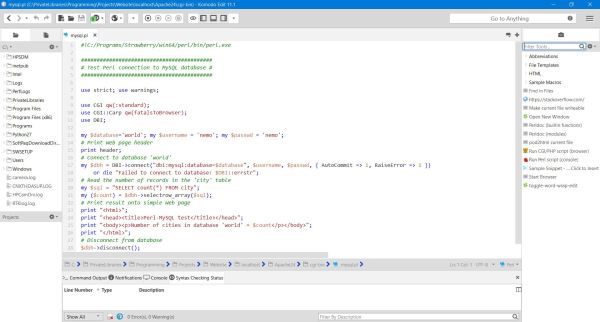
Komodo Edit offers syntax highlighting and checking for lots of programming languages and the toolbox, allowing to define your
own tools, to run Windows commands and programs, to start GUI applications. With the possibility to include predefined variables (similar to those you use
in batch files), it is made easy to run your Perl scripts from within Komodo Edit. To create a new tool, in the toolbox pane (at the right of the editor pane),
click the down-arrow near the Filter tools combo box and choose Create new command. The tool configuration
window opens and here you can define what your tool should do and how it should do it. To edit the tool's settings, right-click it and choose Properties.
|
The first tool, that I created is intended to run the script in the active editor window with Strawberry Perl and display its
output in a new Windows Command Prompt. I named my tool "Run Perl script (console)", chose the Strawberry Perl icon as the icon to be displayed
in the toolbox and as command, I entered the following (in the window's "Command" tab):
%(perl) -I"%D" "%D\%f"
where "%(perl)" is one of these predefined variables and means "run the default Perl interpreter"; "%D\%f" specifies the full path (%D = directory,
%f = filename plus file extension) of the actually edited file and is passed as first argument to the Perl interpreter; -I"%D" is a second argument for
Perl, a runtime parameter, that tells Perl that for including modules (Perl -I option), beside searching at the standard places, also to look in the
current file's directory (%D). In fact, with some Perl interpreters, the current directory is automatically searched for modules, but this is not the case for
Strawberry Perl! The Insert output and Pass selection as input check boxes in the Create new command window have to be let unchecked. Finally, to run the script in a new console, in the Advanced
options tab, change Run in to "New console". If you prefer, you may let the default option "Command output tab",
what means running the command in the lower pane of Komodo Edit.
|
|
|
|
Running Perl-CGI and PHP scripts.
|
|
The second tool is intended to run Perl and PHP scripts on the webserver. Or more precisely, as I use to store my development related files in a Windows
library, the action to be done by the new tool is to copy the script in the active editor window from the Programming library to the
webserver, and run it (using Strawberry Perl respectively PHP) in the default web browser. It's not possible to directly define this double task of
the tool within Komodo Edit's Create new command. This is primarily due to the fact, that the copy process runs in Command
Prompt, whereas the web browser is a desktop GUI application. Another problem is, that I want to use the same tool for Perl CGI and PHP scripts. And finally,
the destination folder of the script not only varies with the file type, but may also vary depending on the script itself (my AnimalDB related scripts, for
example, aren't stored in /cgi-bin/, but in /cgi-bin/animaldb/).
|
As Komodo Edit allows to run any external program, I decided to write a Free Pascal command line program, that, based on a
configuration file (primarily to allow other users to use it with their own options, such as no file copying, if the file already is on the server, or
setting their own destination folders, with or without taking into consideration the original directory of the file), copies the file, that is actually
edited in Komodo Edit from my Programming library to the Apache webserver and then starts the Firefox browser, pointed to the corresponding server URL.
I named this tool "Run CGI/PHP script (browser)" and the command to be entered in the Create new command window is:
webstart.exe "%D\%f"
where webstart.exe is the name of my Free Pascal command line program.
In the Advanced options tab, Start in has to be set to the installation directory of Komodo Edit
(in my case C:\Program Files (x86)\ActiveState Komodo Edit 11). This is necessary, because I copied my program, the related batch files and the configuration
file to this directory. As Run in, you may either use "Command output tab" or "New console" (see below for details).
|
|
|
|
Running my Perl/PHP webscripts tool.
|
My Perl/PHP web scripts tool, as Windows 64bit executable or as Free Pascal source, may be downloaded from the
Lazarus/Free Pascal download page of my site. Unzip the archive to the Komodo Edit installation directory (that you have to define as "Start in"
in the tool's configuration Advanced options tab). Be sure, that you have all 5 files together:
- webstart.exe: the executable
- webstart.conf: the configuration file (see below)
- webstart.conf.bak: backup of the configuration file (for the case that you mess up the .conf file when changing it)
- copy.bat and start.bat: Windows batch files (used to run the Windows "copy" and "start" commands)
|
|
There are 2 ways to run the tool: in a new Command Prompt or in Komodo Edit's command output tab. If you run the tool within
Komodo Edit, it runs silently, i.e. you'll not bothered with the Command Prompt window, the file is copied (if settings are to do so) and the
browser opens with the output of the Perl CGI script or the .php page displayed. The only thing you'll see in Komodo Edit is the message "1
file copied" and a "Return: 0" in the status bar. Only, in the case, where everything went well, of course. If there was
an error (if the configuration file is corrupted, if you specified invalid parameter options or a non-existing directory), the browser will not open
in most cases, you may get a Windows desktop error message and you may or may not get a message concerning file copy. Anyway – thanks to good old DOS
features still existing in modern Windows systems and being accessible with Free Pascal – an error code is displayed in the
status bar of Komodo Edit. Common error codes (250-253 being custom codes):
|
2: File not found,
3: Path not found.
250: Configuration file error.
253: Unknown script type.
|
|
If you run the tool in a separate Command Prompt, you get a verbose output about what the program does and, in the case where
it fails because of an error in the configuration file, a message telling you what's wrong. Thus, this way to proceed is useful for debugging purposes,
whereas normally you want to run it in "silent mode". The screenshots below show the successful execution for a Perl CGI script (1) and a failure due
to a misspelling in the configuration file (2).
|
|
|
|
Configuration file for my Perl/PHP webscripts tool.
|
Here the content of my actual webstart.conf file:
FileCopy=true
ServerPath=C:\Programs\Apache24
CGIPath=cgi-bin
PHPPath=htdocs\php
CGISubdirectory=true
PHPSubdirectory=false
SeverName=localhost
ServerProtocol=HTTP
ServerPort=80
CGIExtensions=.pl;.pm
PHPExtensions=.php
BrowserPath="C:\Program Files\Mozilla Firefox"
BrowserProgram=firefox.exe
|
|
With the comments (starting with "#"), most settings should be understood without further explanations. As configured, webstart.exe copies the file
actually edited in Komodo Edit (and located in my Programming library) to my local Apache webserver and then points the Firefox browser to the corresponding
URL. The path of the copy destination directory is formed by ServerPath (the Apache installation directory) + "cgi-bin" (for Perl CGI) and "htdocs\php"
(for PHP). If the source file path contains a subdirectory, it is added to the destination path for Perl CGI, but not for PHP. Thus, a file located in
[Programming library]\cgi-bin\animaldb will be copied to C:\Programs\Apache24\cgi-bin\animaldb without the need to modify the configuration file. Note
that for .pl and .pm files, cgi-bin is not considered as a subdirectory to be added to the path. Also note, that for .php files, htdocs\ is automatically
removed when the path is transformed to a URL.
|
|
| |
5.8. |
Displaying help for Perl functions and modules. |
| |
|
|
POD (Plain Old Documentation) is a basic markup language that’s used to format text without much effort involved. It’s
specifically designed for documenting Perl source code and modules. POD can be used in two ways: It can exist directly within the source code
of a Perl file OR it can exist as a separate POD file. When it exists within the code, you can think of it like comments in any other programming
language, except fancier and more flexible. With POD files you can create manual-type pages that are suited for user-oriented documents (the file
being pure documentation not including any source code). POD files are text files, so you could view them in any text editor, but they would be
difficult to read because of the markup tags. The simplest way to display Perl functions or modules documentation from the corresponding POD files
is to use perldoc. Just type perldoc -h in Command Prompt to see how it's to be used. An
alternative is using perldoc {perldoc parameters} > {filename}.txt, that allows to save the perldoc output to {filename}.txt,
instead of displaying it onto the console. Convert POD to HTML is easy, using pod2html. Type pod2html -h
in Command Prompt to get help about this feature.
|
As POD is available not only for Perl itself (keywords, functions, regex...) but also for most Perl modules, it would be nice to be able to use
it for context help in our Perl editor, just selecting a function or module name, hitting a button and viewing the corresponding POD in the web
browser. Pod2Html for Perl build-in functions and Pod2Html for Perl modules are two tools,
that are configured in Komodo Edit. However, if you try them, you just get error messages. Here what I did to be able to use these features.
- Create a working directory somewhere you are sure to have write access to. I used "W:\Temp" on my work drive (another possibility would for
example be a folder in your User or Documents directory).
- Modify the command corresponding to the tools as follows:
For the functions tool: %(perl) -e print && perldoc -u -f %w | pod2html > "w:\temp\pod.html" && %(browser) w:\temp\pod.html
For the modules tool: %(perl) -e print && perldoc -u %w | pod2html > "w:\temp\pod.html" && %(browser) w:\temp\pod.html
- Let Run in as is ("Command Output Tab"), but specify "W:\Temp" (or whatever you used as working directory) as "Start in" directory in the Advanced Options tab of the tools' properties.
|
|
| |
5.9. |
More recent Perl releases. |
| |
|
|
The actual (2024) version is Strawberry Perl 5.40.0.1. The x64 version runs smoothly on my Windows 10 VMware virtual machine with
Apache Lounge 2.4.57 (not tested with MySQL).
|
|
On my Windows 10 laptop, I use Strawberry Perl 5.32.0.1 (2021) with Apache Lounge 2.4.46 and MySQL 8.0.22.
|
|
It's on my laptop, that I use Komodo Edit. My actually used version is Komodo Edit 12.0.1. Running this version of the editor is
not blocked by Avast! Free Antivirus (that reported a threat in python.exe with the version, that I used before). Configuring Komodo Edit for Strawberry Perl
and setting up the Pod2Html tools work just as described above for the older versions. This is also true for my custom solution to run Perl-CGI scripts from
within the editor.
|
|


![Perl module installation [1] Perl module installation [1]](../screenshots/perl7a.jpg)
![Perl module installation [2] Perl module installation [2]](../screenshots/perl7b.jpg)
![Perl module installation [3] Perl module installation [3]](../screenshots/perl7c.jpg)
![Perl module installation [4] Perl module installation [4]](../screenshots/perl7d.jpg)
![Komodo Edit: Perl command line tool [1] Komodo Edit: Perl command line tool [1]](../screenshots/komodo2a.jpg)
![Komodo Edit: Perl command line tool [2] Komodo Edit: Perl command line tool [2]](../screenshots/komodo2b.jpg)
![Komodo Edit: Perl CGI/PHP tool [1] Komodo Edit: Perl CGI/PHP tool [1]](../screenshots/komodo3a.jpg)
![Komodo Edit: Perl CGI/PHP tool [2] Komodo Edit: Perl CGI/PHP tool [2]](../screenshots/komodo3b.jpg)
![Perl CGI/PHP tool execution [1] Perl CGI/PHP tool execution [1]](../screenshots/komodo4a.jpg)
![Perl CGI/PHP tool execution [2] Perl CGI/PHP tool execution [2]](../screenshots/komodo4b.jpg)