| 8. |
Tomcat application server. |
| |
8.1. |
Tomcat distributions. |
| |
|
|
"The Apache Tomcat® software is an open source implementation of the Jakarta Servlet, Jakarta Server Pages, Jakarta Expression Language,
Jakarta WebSocket, Jakarta Annotations and Jakarta Authentication specifications. These specifications are part of the Jakarta EE
platform. The Jakarta EE platform is the evolution of the Java EE platform. Tomcat 10 and later implement specifications
developed as part of Jakarta EE. Tomcat 9 and earlier implement specifications developed as part of Java EE."
|
The paragraph above is how The Apache Software Foundation themselves describe the application server on their
Tomcat website. This tutorial explains how to install Tomcat on MS Windows, how to configure
it to run JSP files and Java servlets, how to set up cooperation between Tomcat and the Apache webserver. Two major questions that the novice may ask
themselves:
- Do I need Tomcat to run a website? No. If you want to run a static website or create dynamic webpages using Javascript, the
only software you need is a webserver, as described in my Apache webserver tutorial. On Apache, you
can also run PHP and Perl CGI scripts (as described in the corresponding tutorials on my site). On the other hand, if you want to run Java
based web applications, such as JSP and servlets, yes, then you need to install Tomcat.
- Do I need the Apache webserver to run Tomcat? No. Tomcat can serve HTML (and Javascript) pages, so can function as a webserver itself. However, in the
practice, a cooperation between Apache webserver and Tomcat is the better solution. To note, that the setup of this cooperation
requires some serious configuration (manual editing of config files) to be done.
|
|
As a difference with the Apache webserver, the Apache Software Foundation hosts Tomcat binaries on their website. On the main
Tomcat page, the left pane shows links to the different releases of Tomcat; this tutorial uses Tomcat 10. The link leads to the
download page for the corresponding release, Tomcat 10 Software Downloads in our case.
On this page, you find several binary packages for Windows. I choose the 32-bit/64-bit Windows Service Installer, my download being a
file called apache-tomcat-10.0.23.exe (your actual Tomcat version will probably be a more recent one, what should change nothing concerning the installation
and configuration steps described in this document).
|
|
| |
8.2. |
Installing the Java Development Kit. |
| |
|
To use Tomcat, for what it has been build, you need to install Java on your computer. The type of installation primarily depends on your requirements:
- If you want to run Java programs but not develop them, install the Java Runtime Environment (JRE).
- If you not only want to run but also to develop Java applications, install the Java Development Kit (JDK).
|
|
To run Tomcat, you only need to install the JRE. On the other side, there is no real reason not to opt for the JDK. Important to know, that
a given version of Tomcat requires a minimum version of Java. To be honest, I personally do not understand the version numbering
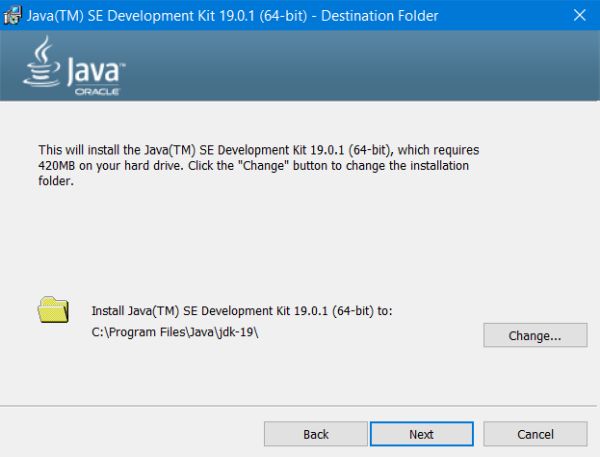
of Java related products. So, I downloaded the latest one (November 2022): JDK 19 runs fine on my Tomcat 10. You can download the
JDK from the corresponding Java Downloads page. The installation
is not more than double-clicking the executable. Just to note, that it is a good practice to uninstall any existing version of Java before installing a new one.
|
|
|
|
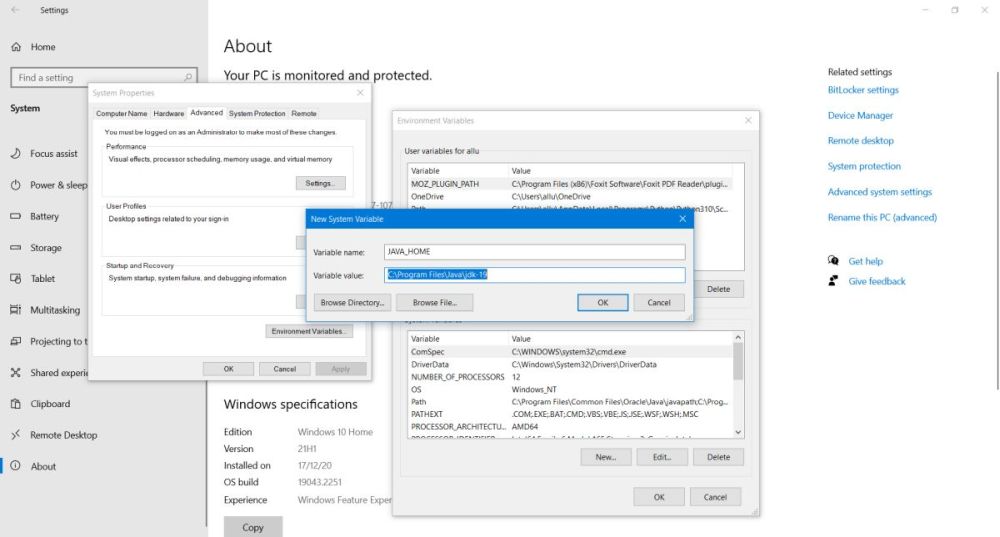
You should however set the JAVA_HOME environment variable. To do so in Windows 10, open Settings > System >
About and click the Advanced System Settings link in the Related settings list (at the right
side of the window). In the opening System Properties window, choose the Advanced tab and push the
Environment Variables button. In the corresponding window, push the New... button in order to add a
new system environment variable. As variable name, enter "JAVA_HOME", and to set the variable value, use the Browse Directory
button to browse to the installation directory of the JDK. In my case, this directory is "C:\Program Files\Java\jdk-19".
|
|
|
|
| |
8.3. |
Installing Apache Tomcat. |
| |
|
|
If you use the Tomcat 32-bit/64-bit Windows Service Installer, that I mentioned at the beginning of the tutorial, the setup program
will do all installation work for you: installation of the software, installation of the Windows service, search for Java, launch of the server configuration
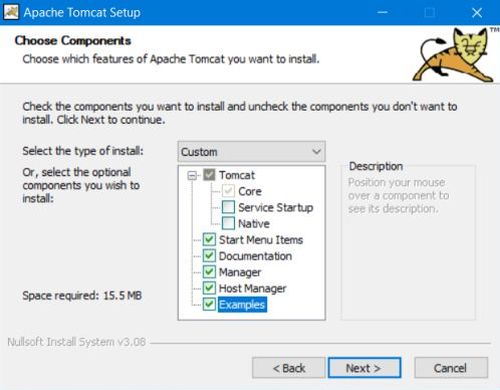
(with default values that should be ok for most users). After the Welcome screen, you are invited to select the components to be installed. I think, it's a good idea to install the examples (not selected by default); you may also want to install
the Host manager. If you want Tomcat to start automatically with Windows, select the Service Startup
checkbox.
|
|
|
|
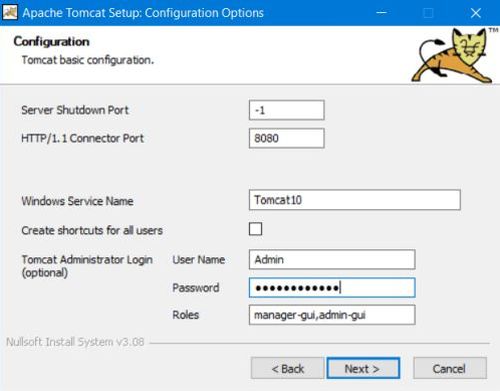
The following window concerns the configuration of the server. The major setting here is the port, Tomcat should be listen to.
By default, Tomcat uses port 8080. That's probably because it often runs together with Apache webserver, that listens on port 80.
You may change this port, if you want, perhaps for security reasons, or, if you run Tomcat without Apache, use port 80, allowing to access the server, without
having to specify a port in the browser address. You should also specify user name and password for the Tomcat administrator login.
|
|
|
|
The setup program now searches for a valid JRE and should find our JDK at C:\Program Files\Java\jdk-19. Then asks for the installation folder. Please, note that
I changed the default folder, using "C:\Program Files\Tomcat 10.0". In the last window of the setup wizard, you are asked if you want to start Tomcat. If you
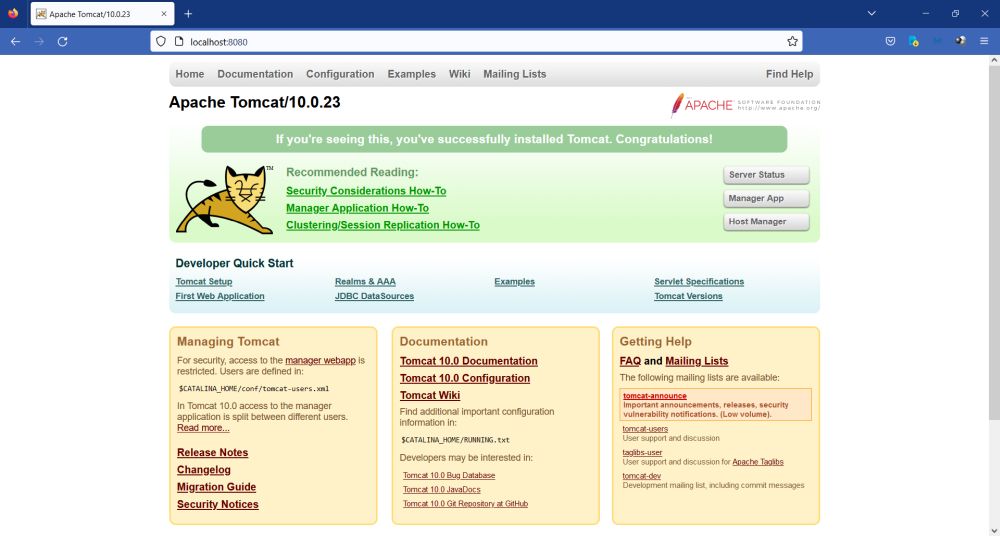
do so, you'll be able to access it with your web browser, by entering the address localhost:8080.
|
|
|
Some facts that you should remember:
- Tomcat listens at all available IP addresses, thus instead of using 127.0.0.0 (localhost), you can
use any IP of any of your computer network cards.
- You can also use your computer's name instead of localhost. My Windows 10
computer name being "wk-win10", most screenshots in the tutorial show accessing Tomcat with the address http://wk-win10:8080
- The Tomcat homepage and pages as the examples are publicly accessible, whereas all administration related
pages require you to sign in, using the user name and password specified when configuring the server.
- Administration related pages may only be accessed from localhost! If you try to view the server status
using the address http://wk-win10:8080/manager/status, you'll get an Access denied (403) error.
|
|
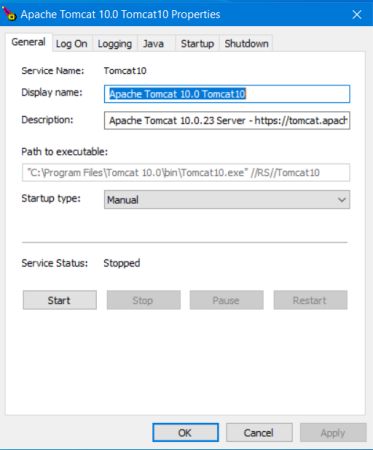
Similar to the Apache webserver monitor application, Tomcat for Windows, as we did install it, includes Tomcat
monitor, that allows to view the server online/offline status, to start and to stop it, as well as to launch Tomcat
configuration, a tool that allows you to manage the Tomcat service. However, when you try to launch these tools, you'll get an error message, telling you
that you probably haven't the permission to access the item referenced by the shortcut.
|
|
|
|
The reason for this issue is that the Tomcat installation folder is inaccessible (protected). The simplest way to solve the problem is to open File Explorer, to browse to the "C:\Program Files" folder and to double-click the "Tomcat 10.0" folder. In the dialog box popping up and
telling you that you currently haven't the permission to access the folder, click the Continue button in order to give the actual
Windows user permanent access to the folder. This done, all content of the Tomcat installation folder may be accessed and the Tomcat
monitoring and configuration utilities may normally be launched from the Start Menu.
|
|
|
You can (optionally) change some settings of the server by manually editing the Tomcat configuration files. To note, that this is
intended to be done on a test server, but not on a real world production server. And, to be sure: Always
backup configuration files before changing them!
- Enable directory listing: Edit the file web.xml in the Tomcat conf directory and set the value of the listings parameter to "true". Here the modified part of my
web.xml:
<servlet>
<servlet-name>default</servlet-name>
...
<init-param>
<param-name>listings</param-name>
<param-value>true</param-value>
</init-param>
<load-on-startup>1</load-on-startup>
</servlet>
- Enable automatic reload after code changes: Edit the file context.xml. Search for the element
"<context>" and modify it as follows:
<context reloadable="true" crossContext="true" parallelAnnotationScanning="true">
...
</context>
To note that auto-reload not always works correctly and thus sometimes, Tomcat has to be restarted after you have changed the code of a servlet.
|
|
| |
8.4. |
Tomcat web applications directory structure. |
| |
|
|
The context element represents a web application, which is run within a particular virtual host. Each web application is based on
a Web Application Archive (WAR) file (WAR files are not discussed in this tutorial), or a corresponding directory containing the
corresponding unpacked contents. If you are interested in a detailed description of this rather complex concept, please visit
Apache Tomcat 10 Configuration Reference: The Context Container.
From a practical point of view, we can consider a context corresponding to a subdirectory of the webapps
folder, that contains all web content on a Tomcat server. The JSP and servlet samples, installed with Tomcat setup, for example, are defined within the
context "examples". This implies that they are located in the directory webapps/examples, and it also implies that the example pages may be accessed by using an
address with base URL http://localhost:8080/examples/. If you enter this address as such in your web browser, the file webapps/examples/index.html will be served.
This is similar to accessing an examples folder, located in the Apache webserver htdocs. As a difference with the htdocs folder, the Tomcat webapps folder itself does not include any web application files. In fact, there is
a special context, called ROOT. Webpage files defined within this context are located in the Webapps/ROOT directory, but as a difference
with other contexts, the base URL to access them is http://localhost:8080/. If you type this address as such in your web browser, the file webapps/ROOT/index.jsp
will be served.
|
In this tutorial, we will use a new context, called "ws". So, the first thing we have to do is to create the folder webapps/ws. In order to deploy the new context, Tomcat has to be restarted. Now, have a look at the file logs/catalina.{actual-date}.
You should see an entry like:
{timestamp} INFO [main] org.apache.catalina.startup.HostConfig.deployDirectory Deploying web application directory [C:\Program Files\Tomcat 10.0\webapps\ws]
{timestamp} INFO [main] org.apache.catalina.startup.HostConfig.deployDirectory Deployment of web application directory [C:\Program Files\Tomcat 10.0\webapps\ws] has finished in [16] ms
|
|
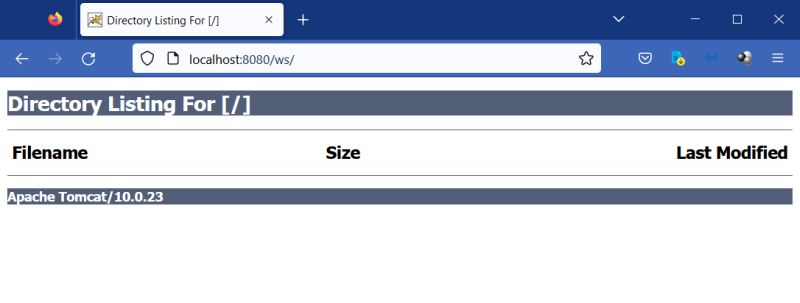
With directory listing enabled (cf. 8.3), we can also test the successful deployment of the new context in the web browser. Address: http://localhost:8080/ws/.
|
|
|
The directory structure of a Tomcat web application has to follow some standard rules:
- The "main" directory of a web application is called context root (document base directory); it has
always to be a subdirectory of webapps. The files of several web applications may be placed under the same context root.
- All your HTML files and resources visible to the web users (HTML, CSS, images, scripts, JSP) should
be placed under the context root, either directly, or in a subfolder.
- The directory WEB-INF, even though located under the context root, is not visible to the web
users. It's in this directory, where you keep your application's web descriptor file web.xml.
- The directory WEB-INF/classes contains all Java classes (such, for example, servlet class-files) of the
application. It's also here where you can place the corresponding Java sources.
|
|
| |
8.5. |
Running JSP applications. |
| |
|
Java is for Java Server Pages, what C# and Visual Basic are for ASP.NET. A JSP file is essentially a HTML file, with embedded Java code.
Here a simple example, that displays the current date and time.
<html>
<head>
<title>Test JSP</title>
</head>
<body>
<h2>Test Java Server Pages</h2><br/><br/>
<p>
Today's date: <%= (new java.util.Date()).toLocaleString() %>
</p>
</body>
</html>
|
|
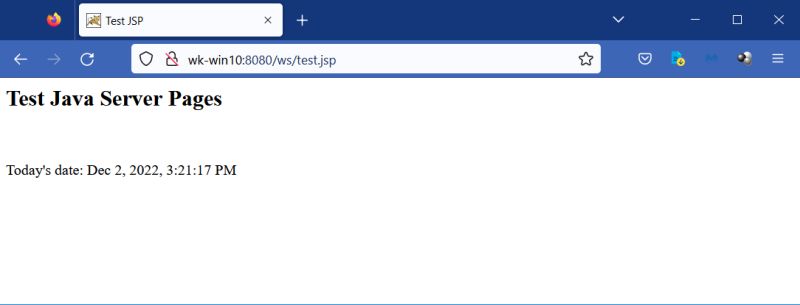
There is nothing special to do to deploy a JSP application. Just create the JSP file, name it, for example, test.jsp and copy it to our webapps/ws folder.
And to access it in your web browser, type the address http://wk-win10:8080/ws/test.jsp (remembering that wk-win10 is the name of my
computer).
|
|
|
|
| |
8.6. |
Running Java servlets. |
| |
|
Servlets are real Java web applications. Thus in order to run them on our Tomcat, the following steps are necessary:
- Creating the Java source code. You can do it in a text editor, such Notepad++, or using one of
the numerous Java IDE (e.g. Eclipse). Java source files have the extension .java.
- Compiling the Java sources. The compilation creates a Java class file
with the extension .class. It's this file that will be executed by Tomcat. If you have Eclipse (or another Java IDE) installed, you can do the compilation
from within it. Otherwise, you can use the Java command line compiler javac, that is included with the JDK.
- Deploying the application. There are different ways to do so. Again, if you are working with Eclipse, you can do it from
within the IDE. A simple way to do it, is copying the necessary files to the correct folders within your application's context root. Remember, that
even if you configured Tomcat auto-reload, it might be necessary to restart the server.
|
Simple "Hello World" Java servlet:
import java.io.*;
import jakarta.servlet.*;
import jakarta.servlet.http.*;
import jakarta.servlet.annotation.*;
@WebServlet("/sayhello")
public class HelloServlet extends HttpServlet
@Override
public void doGet(HttpServletRequest request, HttpServletResponse response) throws IOException, ServletException {
response.setContentType("text/html");
PrintWriter out = response.getWriter();
out.println("<!DOCTYPE html>");
out.println("<html>");
out.println("<head><title>Test Tomcat servlet</title></head>");
out.println("<body>");
out.println("<h1>Hello, world!</h1>");
out.println("</body></html>");
out.close();
}
}
|
Some important remarks concerning the code:
- There are several ways to implement a servlet. The probably simplest consists in creating it as an extension
of the HttpServlet class.
- The name of the main class is the name that will have the Java CLASS file. So, we have to save our
Java source file as HelloServlet.java and the compilation will create a file called HelloServlet.class.
- Servlets are not directly referenced in the web browser address, but there is necessity to create a so-called
servlet-mapping, that consists in defining the URL to be used to access the servlet class file. In older versions of Tomcat,
this mapping was done by settings, defined in web.xml (located in the {context-root}/WEB-INF folder). With the actual versions of Tomcat, this mapping may
directly be done in the servlet source, using the directive @WebServlet. In our example, the class file name will be HelloServlet
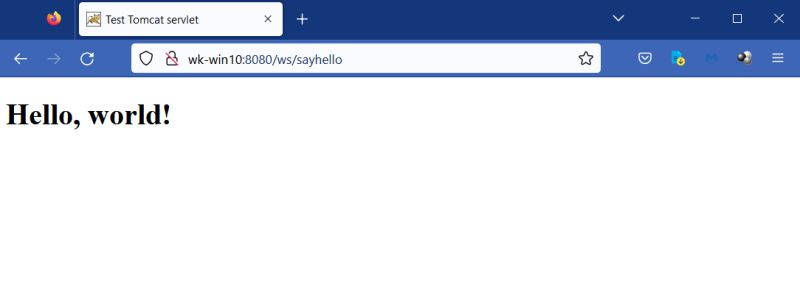
and @WebServlet has been set to "/sayhello". This means that in order to run the servlet file HelloServlet.class, we'll have to enter the address
http://wk-win10:8080/ws/sayhello in the web browser (remember that "ws" is the name of this application's context).
|
As I said above, the compilation of the servlet source can be done in the command line using the javac compiler included with the JDK.
Compiling a servlet requires the servlet-api.jar library, not included by default within the JDK. With this library being available
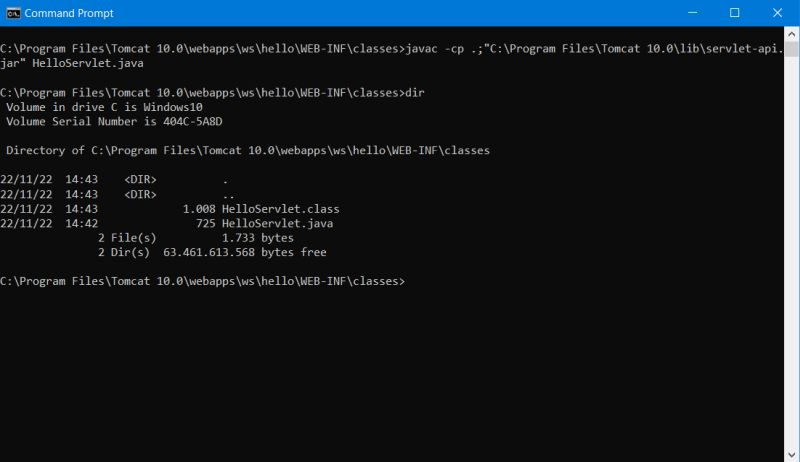
in the Tomcat lib folder, we simply can add it as a file to be included for the compilation in the javac command line. Being in the directory containing the source file, run the command:
javac -cp .;"C:\Program Files\Tomcat 10.0\lib\servlet-api.jar" HelloServlet.java
As shows the screenshot, this produces a file called HelloServlet.class, this file being the code executed by Tomcat when the mapped URL is accessed.
|
|
|
|
With the possibility to define the servlet-mapping in the Java source code, the deployment of the application is nothing
more than saving HelloServlet.class (together with HelloServlet.java) in the folder webapps/ws/WEB-INF/classes. To run the servlet in the web browser,
enter the address http://wk-win10:8080/ws/sayhello.
|
|
|
|
| |
8.7. |
Using Tomcat in cooperation with Apache. |
