Installing a Windows and Linux dual boot (Windows NT bootloader).
This tutorial is about the BIOS boot of an old version of Microsoft Windows and some Linux distribution, installed side by side on the same computer harddisk. Old version of Windows, because the newer versions only support UEFI boot; here Windows XP is used. Other possibilities would be Windows NT or Windows 2000; Windows 9x, as well as Windows Vista and following do not support a boot menu feature. Concerning Linux, most 32bit distributions capable of BIOS booting could be used. Here it's Knoppix 3.3. The tutorial describes how to proceed to use the Windows NT bootloader (common name for the bootloader of Windows NT, 2000 and XP) to boot the two operating systems. Alternatives would be to use the Linux bootloader (as described in my tutorial Installing a Windows and Linux dual boot (Linux bootloader) or to install a specialized third-party boot manager).
The dual boot method, that uses the Windows bootloader to start the two OS, is more difficult to implement than the one using the Linux one. In fact, Windows XP well supports the feature to boot several operating systems, but automatic inclusion of this OS into the bootmenu only works with another Windows system (cf. my tutorial Installing a Windows 2000 and Windows NT dual boot. This is obvious, as Windows cannot read the Linux filesystem. On the other side, Windows is capable to chainload the Linux bootloader, under the condition that its code is located on the Windows partition.
Here the steps necessary to install a Windows XP and Knoppix 3.3 (Linux) dual boot using the Windows NT bootloader:
- Install Windows XP on a primary partition that you create at the begin of the installation procedure. As partition size, choose the portion of the disk, that you want to use for Windows. The Windows XP bootloader will be written to the MBR (what will allow Windows XP to boot from the harddisk).
- Install Knoppix. Using the partitioning tool cfdisk, create a logical partition (using the unallocated part of the disk) with two logical drives, one for Linux, one for swap. Be sure to choose not to install the Knoppix bootloader to the MBR. This will write LILO to the Linux partition's VBR, the NT bootloader remaining the loader installed in the MBR. As a consequence, Windows XP (and only Windows XP!) will be bootable from the harddisk. The tutorial presupposes that your computer has a floppy drive and that you profit of the Knoppix installation option to create a boot diskette.
- Copy the Linux bootloader code from the Linux partition's VBR to a file on the Windows partition.
- Edit the Windows boot menu file to add the instructions to chainload LILO.
- Optionally, you can edit the LILO bootmenu file to remove the Windows XP menu entry and to set a timeout value of 0 seconds, in order to boot Knoppix instantly.
1. Installation of Windows XP.
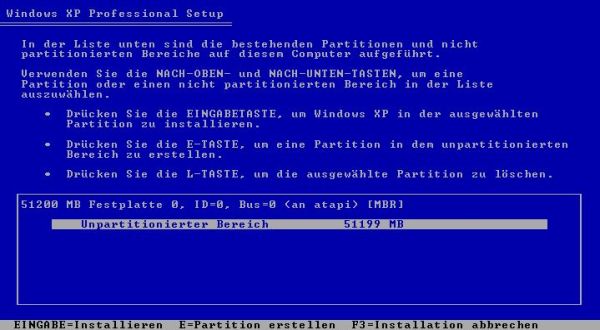
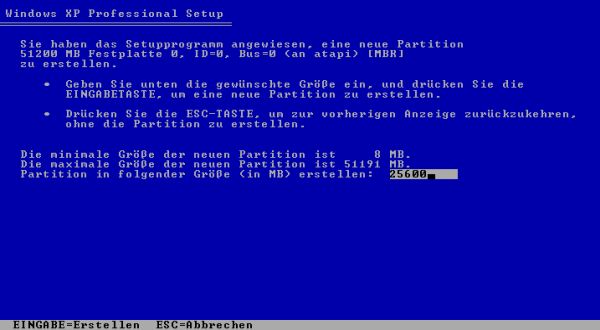
To be sure that your computer is booted from CDROM, boot into BIOS Setup and check if the boot sequence is well 1. CD-drive, 2. harddisk, 3. removable devices. Insert the Windows XP CDROM and power-on the computer. On the Welcome screen, hit ENTER to install a fresh copy of Windows XP. The setup program allows you to choose where to install the OS (screenshot on the left). Do not hit ENTER (this would use the whole disk for XP), but hit the letter, corresponding to creating a partition in the unallocated space (letter "E" for the German version of Windows XP, that I use here; I suppose that for the English version it's "C"). On the next screen, you can choose the partition size. I chose 25 GB, half the size of my 50 GB harddisk.
|
|
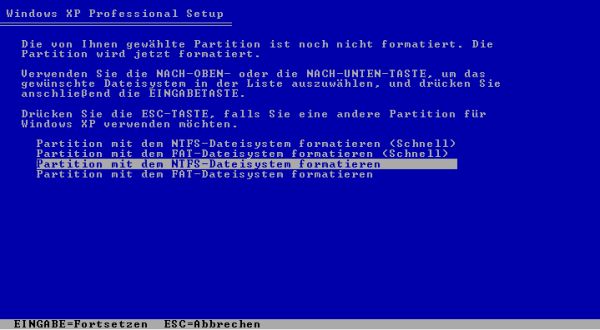
The setup program gives you the choice to format the newly created partition with NTFS or FAT. FAT makes not really sense here, as it usually means FAT16 that does not support a 25 GB partition. Or, does it mean FAT32 here? Anyway, the NTFS filesystem has lots of advantages and is the normal choice for Windows XP.
|
The partition is formatted, the files are copied and after rebooting, the graphical Windows XP installation wizard is launched; just follow the instructions on the screen.
2. Installation of Knoppix.
With the CD-drive set as first boot device, insert the Knoppix-CD and power on the computer. At the boot menu screen, just hit ENTER to boot the Knoppix Live-CD with
default parameters. The installation of Knoppix 3.3 to the harddisk is done by a bash script. In a terminal, enter the command:
sudo knx-install
After an informational screen, you are asked, where to install Knoppix, one single option being given: hda1.
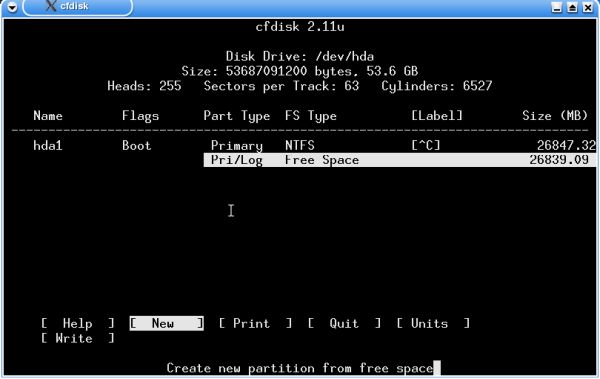
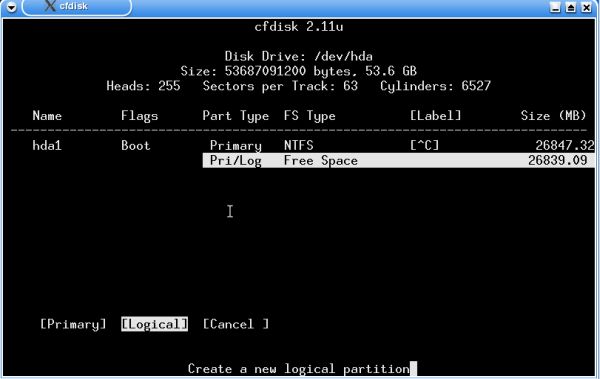
cfdisk is launched, showing a 25 GB NTFS partition (the one containing Windows XP) and 25 GB of free space. Select the free space area and choose to create a new partition (screenshot on the left). On the next screen, choose to create a logical partition (screenshot on the right).
|
|
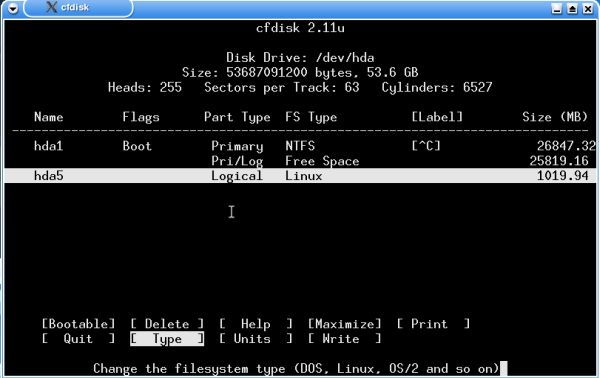
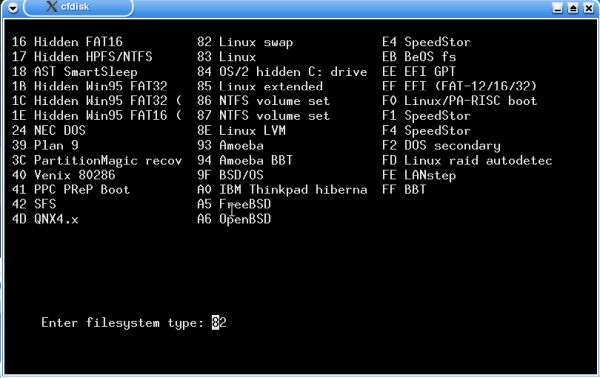
The next two screens let you enter the partition size and its position on the disk. Choose a size of 1 GB and create the partition at the end of the disk. The screenshot at the left shows the partition layout, when this has been done. Select the 1 GB partition and choose to change the partition type. Actually set to 83 (Linux), choose type 82 (Linux Swap), as shown on the screenshot on the right.
|
|
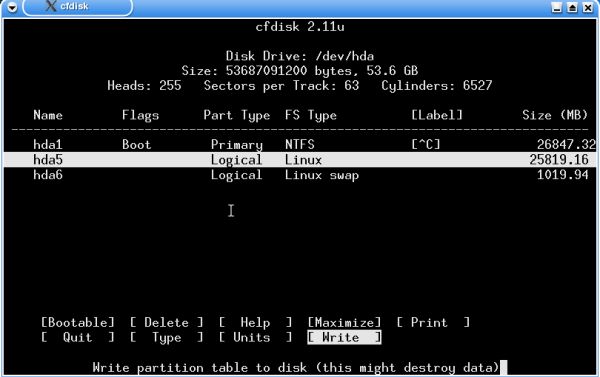
Now, lets create our Linux partition. In the free space (between the NTFS and the Swap partition), create a new logical partition. As size, choose the whole free area (some 24 GB). The partition type is automatically set to type 83 (Linux). The screenshot shows the partition layout when the new partition has been created. Choose Write from the cfdisk menu to write the new partition table to the disk. As this is an action, that cannot be undone, and, if you made a mistake in the selections made, could destroy all data on the disk, cfdisk asks you if you are really sure to do so. Confirm and quit the partitioning tool.
|
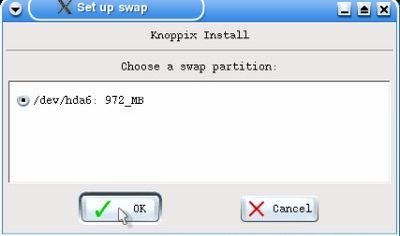
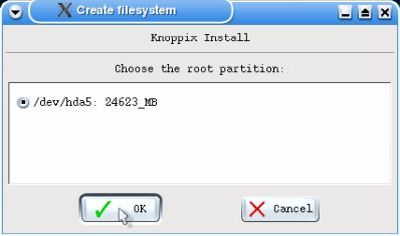
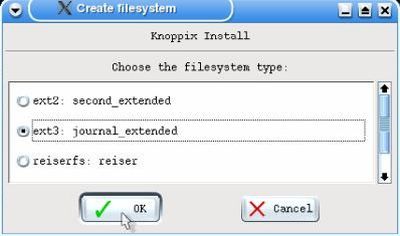
The partitions being created, the installation program continues with the assignment of the mount points. First, you are asked, if you want to use a swap partition; confirming, pushing the Yes button, you are asked to choose what partition you want to use for swap. One single option is displayed: use /dev/hda6 as swap (first screenshot). Confirm to set up, i.e. format, the partition. You next are asked to choose the partition to be used for your Linux system. One single option is displayed: use /dev/hda5 as root partition (second screenshot). Finally, you have to choose a filesystem for the root partition. At Knoppix 3.3 times, ext4 wasn't yet available; choose the ext3 filesystem (last screenshot).
|
|
|
Now, the files are copied from the CDROM to the harddisk. The installation program continues with asking, one by one, which servers should be started at boot time. Be sure to start kdm (graphical login). System configuration continues with setting the host name, setting up the network, setting users and passwords.
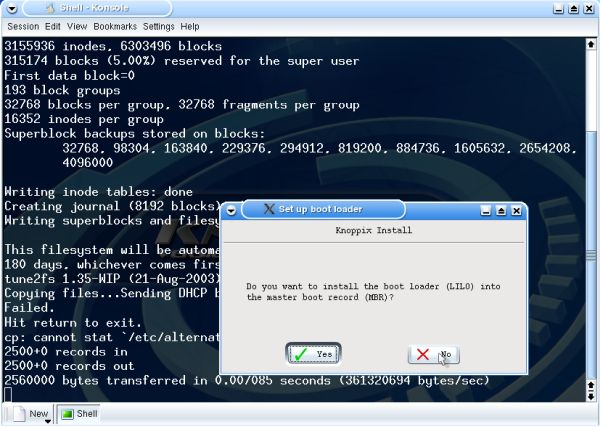
Then, the important decision to take: Where to install the bootloader? The installation script asks if you want to install LILO to the MBR. Push the No button in order not to install the bootloader to the MBR. This will instead install it to the volume boot record of /dev/hda5.
|
Another important step to do before the installation process is terminated. Be sure to answer Yes when asked if you want to create a boot diskette.
3. Copying the Linux bootloader code to the Windows partition.
For those, who are not familiar with expressions like MBR and VBR, here some explanations (taken from Wikipedia).
A boot sector is the sector
of a persistent data storage device (hard disk, floppy disk, optical disc) which contains machine code to be loaded into RAM and then executed by a computer system's
built-in firmware (e.g. the BIOS). Usually, the very first sector of the hard disk is the boot sector, regardless of sector size (normally 512 bytes) and partitioning
flavor (MBR or GPT). The purpose of defining one particular sector as the boot sector is interoperability between firmware and various operating systems. The purpose
of chainloading first a firmware, then some code contained in the boot sector, and then, for example, an operating system, is maximal flexibility.
A master boot record (MBR) is a special type of boot sector at the very beginning of partitioned computer mass storage devices like fixed disks,
for example. The MBR holds the information on how the disc's sectors are divided into partitions (the harddisk's partition table), each partition
notionally containing a file system. The MBR also contains executable code to function as a loader for the installed operating system, usually by passing control over
to the loader's second stage, or in conjunction with each partition's volume boot record (cf. further down in the text). This MBR code is usually referred to as a
bootloader. Normally, when installing an operating system to a harddisk, its bootloader is installed to the MBR, what allows to start this
operating system, when the computer is turned on. In our case here, the Windows NT bootloader has been installed to the MBR and thus, when powering on the computer,
Windows XP will be started.
A volume boot record (VBR), also known as volume boot sector, partition boot record or partition boot sector, is a boot sector, that may be
found on a partitioned data storage device, such as a hard disk, or an unpartitioned device, such as a floppy disk, and contains machine code for bootstrapping programs
(usually, but not necessarily, operating systems) stored in other parts of the device. On non-partitioned storage devices, it is the first sector of the device. On
partitioned devices, it is the first sector of an individual partition on the device (with the first sector of the entire device being a Master Boot Record containing
the partition table). The code in volume boot records is invoked either directly by the machine's firmware or indirectly by code in the master boot record or by a boot
manager. Invoking a VBR via a boot manager is known as chain loading. Some dual-boot systems, such as NTLDR (the bootloader for all releases
of Microsoft's Windows NT-derived operating systems up to and including Windows XP and Windows Server 2003), take copies of the bootstrap code that individual operating
systems install into a single partition's VBR and store them in disc files, loading the relevant VBR content from file after the bootloader has asked the user which
operating system to bootstrap. This is how Windows NT is booted in my Installing a Windows 2000 and Windows NT dual
boot tutorial. It works similarly here with Windows XP and Knoppix, but first a little issue has to be solved.
When we installed Knoppix, we chose not to install the bootloader to the MBR and, by this choice, it was automatically installed to the VBR of the Linux partition. So, it should be possible to tell NTLDR to start Linux by chainloading the code in the VBR of /dev/hda5 (where Knoppix is installed). However, Windows XP has no driver to read the ext3 filesystem on the Linux partition, thus, the VBR with the code of LILO to be chainloaded is not accessible to NTLDR. This seems to be a major issue, but, in fact, it's quite simple to solve the problem: Just copy the content of the VBR to a file on the NTFS partition and tell NTLDR to chainload the code contained in this file.
As Windows XP can't access an ext3 formatted partition, the copy has to be done on Knoppix. That's why it was so important to create a Knoppix boot diskette: If, after
the installation of Knoppix, you shut down the computer or reboot it, without having done the file copy, your Linux OS will not be bootable (at least not from harddisk;
you could always try to fix the problem by booting the Knoppix Live-CD...). Linux systems have some amazing command line commands and one of them is dd: It allows, for example, to copy a given number of bytes from one partition to a file on another partition. In our case, we want to copy the
VBR, i.e. the 512 first bytes, of the Linux partition (/dev/hda5) to a file on the Windows partition (/dev/hda1). This has (probably) to be done in several steps. As
a difference with today, Linux systems of that time were normally able to read data on NTFS partitions, but not to write to them. That's why, to be sure to avoid all
problems, we'll use a floppy diskette to transfer the data from one system to the other2. Lets call the file bootsect.lnx and start by copying the VBR to the
Knoppix filesystem. In a Knoppix terminal, run the command:
dd if=/dev/hda5 of=/bootsect.lnx bs=512 count=1
The second step is to copy bootsect.lnx to the diskette. This may be done by entering the following in the Knoppix terminal:
mount -t msdos /dev/fd0 /mnt
cp /bootsect.lnx /mnt
umount /mnt
The third step of the copy operation is done on Windows XP. Copy the file from the diskette to the root of the C: drive. You can do it using
File Explorer or do it in Command Prompt, by entering:
a:
copy bootsect.lnx C:\bootsect.lnx
4. Adding Linux to the Windows bootmenu.
That was rather a lot of work and adding Knoppix to the Windows XP bootmenu is still to be done. Could all have been automatic, if Microsoft had previewed to entirely support the installation of another operating system aside with Windows...
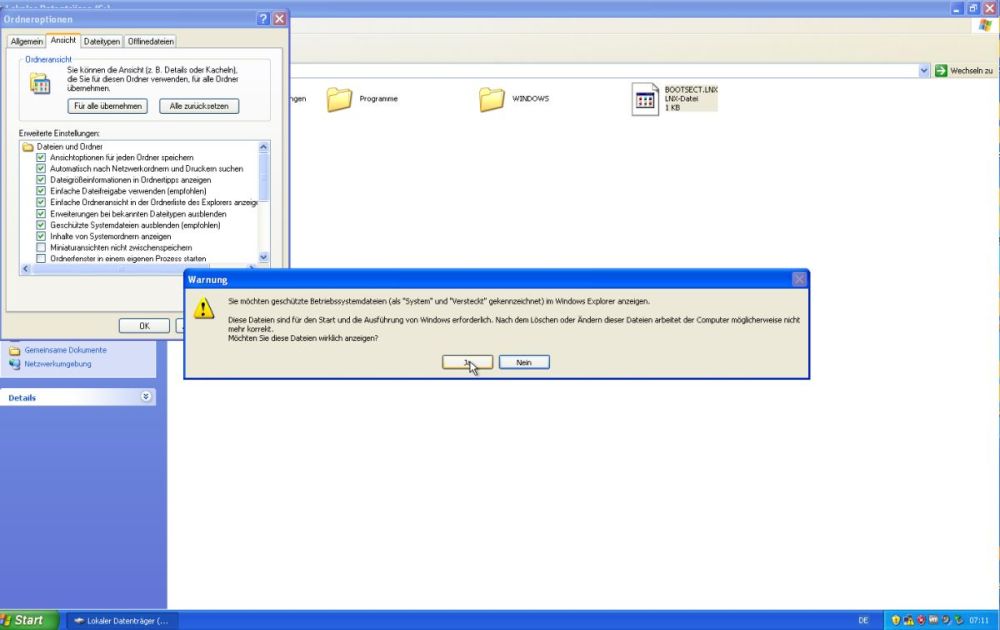
The Windows XP bootmenu is described in a file called boot.ini, located at the root of the C: drive. As this is a hidden system file, you can't normally see it and you'll have first to change the folder viewing options. In File Explorer, choose Extras > Folder Options. The Folder Options window opens; switch to the View tab. First, choose to show all hidden files and folders (in opposition to don't show hidden files and folders), then uncheck Hide protected operating system files. A warning message pops up; confirm that you want to show the system files.
|
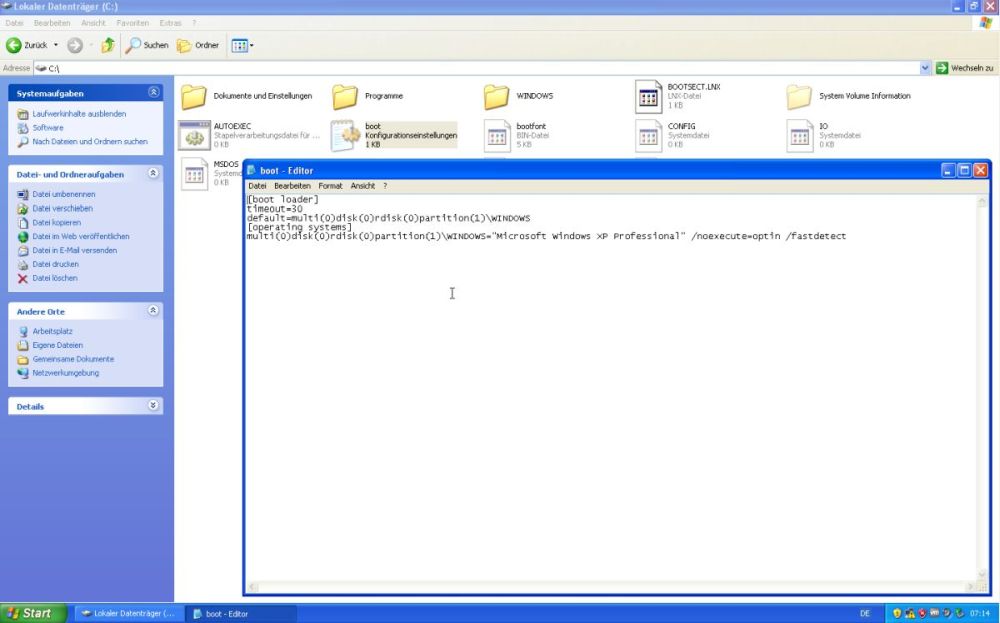
Now boot.ini becomes visible and you can open it with Notepad (or any other "real" text editor). The screenshot shows the original content of the file with one single entry in the bootmenu: Windows XP Professional, located on partition(1).
|
To add Knoppix to the Windows XP boot menu, all you have to do is to add an entry in the [operating systems] section
of the boot.ini file. Such entries have the format "OS information"="bootmenu display item". In the case of Windows, the OS information is the partition and the folder,
where Windows has been installed, in the case of other operating systems, it's the file containing the other OS bootloader code. In our case, just add the following (I
suppose that using the "boot.ini format" to describe the partition would have been more correct than simply using the drive letter, but this works fine):
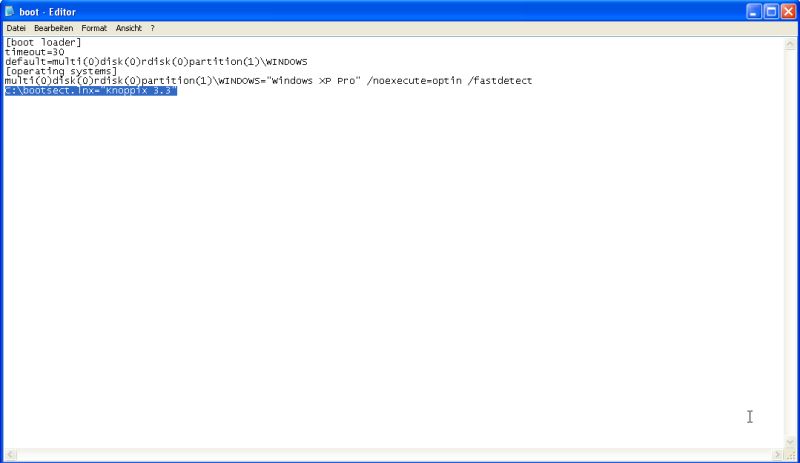
C:\bootsect.lnx="Knoppix 3.3"
The screenshot shows the modified boot.ini file (note that I also changed the bootmenu display-name for XP).
|
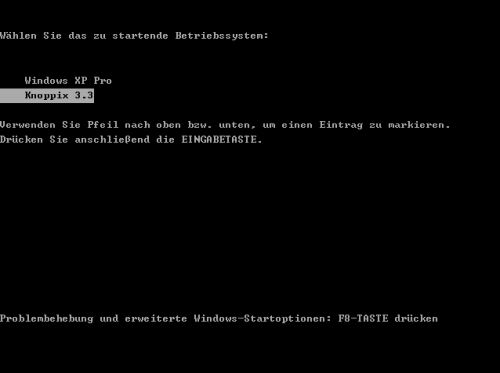
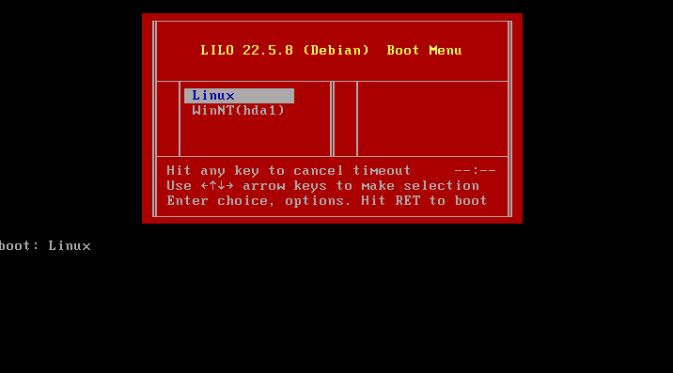
Now, if you turn on your computer, a bootmenu, letting you choose the OS is displayed (screenshot on the left). When you choose Windows XP Pro this OS is started. When you choose Knoppix 3.3, the LILO boot menu is displayed; this is what chainload is (screenshot on the right). Surprised, to have an entry for Windows XP in the LILO bootmenu? This is what Linux systems do automatically: if they find any other OS, they do recognize, on the computer, they add them to their boot menu (situation that I describe in my Installing a Windows and Linux dual boot (Linux bootloader) tutorial). This entry in the LILO menu doesn't harm anyone and you can let it there, if you want (and the tutorial has come to an end for you). If you'd like to remove it (I personally find that it's completely useless and that it looks somewhat weird), continue with the next section of the tutorial.
|
|
5. Removing Windows from the Linux bootmenu.
Please, be aware that if you want to do this, you'll have to:
- edit the LILO configuration file;
- reinstall LILO in the Linux partition VBR;
- recopy the Linux partition VBR to the Windows partition.
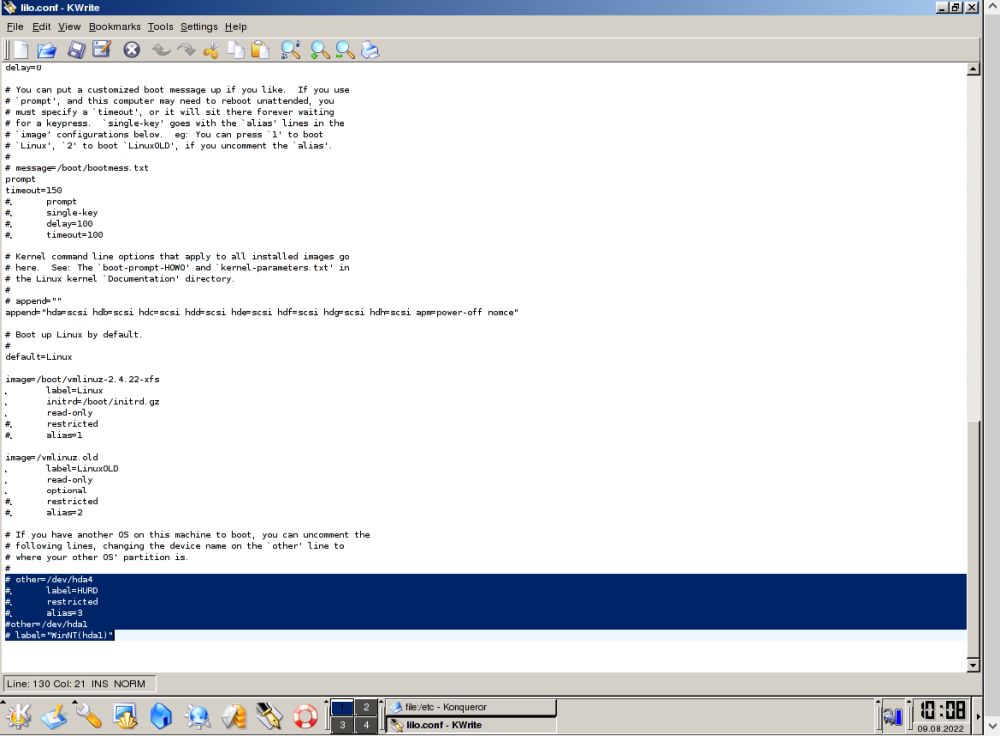
The configuration of the Knoppix bootloader is contained in the file /etc/lilo.conf. When logged in as root (what you should not do on a real world system), you can edit it with KWrite, the default text editor on Knoppix. There are two changes to make:
- Changing the timeout value, in order to boot Linux instantly:
delay=0 - Comment out (or remove) the Windows XP boot entry
#other=/dev/hda1
#label=WinNT (hda1)
|
Modifying the file is not enough, you'll have also to reinstall LILO. This installation doesn't need any parameters given by the user; all information, that's needed,
is stored in lilo.conf. In particular, lilo.conf contains the following line:
boot=/dev/hda5
that tells the installer to write LILO to the VBR of the Linux partition (and not to the MBR).
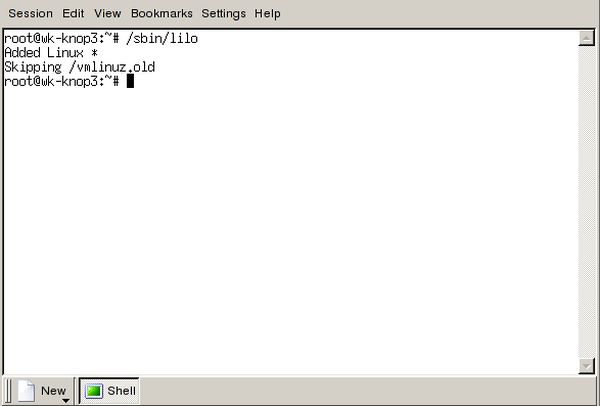
To install LILO, open a terminal and run the command
/sbin/lilo
|
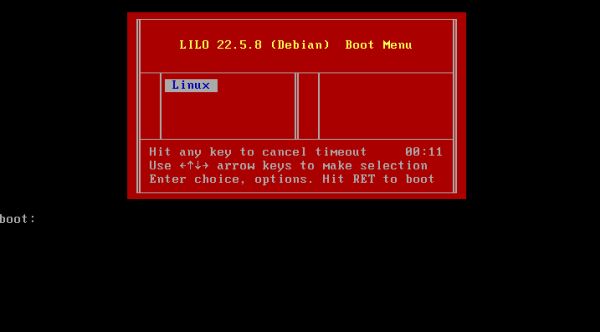
The LILO code has now be changed in the VBR, but this has no effect on the actual boot process: As the Windows XP bootloader chainloads the code in C:\bootsect.lnx, you will still have the old configuration, when booting the computer at this stage. To change this, we'll have to repeat the copy VBR procedure, described in section 3. When done, if we choose Knoppix 3.3 in the Windows XP boot menu, the LILO boot menu, with the single bootmenu entry Linux, shows up for just a second (just the time to take some action, if there is a problem with Knoppix) and then the boot process of the Knoppix OS instantly starts.
|
Notes:
1: Concerning the physical device "names" used in Knoppix, cf. Some Knoppix 3.3 tips.
2: The tutorial presupposes that your computer has floppy-drive. If not, you can try to transfer bootsect.lnx using a CDROM, an FTP server, or perhaps even to write
directly to the NTFS partition.
If you find this text helpful, please, support me and this website by signing my guestbook.