| 7.2. |
MariaDB database server. |
| 7.2.0. |
MariaDB - a fork of MySQL. |
| |
|
In his book Mastering MariaDB, Federico Razzoli writes "Why then did Monty Widenius,
the creator of MySQL, leave the project to start a fork called MariaDB? That was because, in 2005, Oracle bought the InnoDB storage engine. In 2008, Sun
Microsystems bought MySQL, which in turn was bought by Oracle in 2009. Since that acquisition, MySQL belongs to its biggest competitor: a big corporation whose
business is mainly proprietary, high-cost software.". MariaDB is 100% open source (based on the MySQL Community Edition). It offers backward compatibility, a whole
set of new storage engines, new features and extensions including the JSON, WITH and KILL statements, a Graph DBMS and is said being lots faster than MySQL. Some
features of MySQL (mostly corresponding to proprietary code, that only users of MySQL Enterprise Edition have access to) are missing in MariaDB. MariaDB does not
support data masking and dynamic columns, but its major disadvantage is probably that it's relatively young (initial release in 2009), so there's no guarantee
further updates and versions will be forthcoming. Use the following link to view a detailed comparison of MariaDB and MySQL at Guru99.
|
|
This text is about installing MariaDB on Microsoft Windows and its access from PHP and Perl scripts, located on an Apache webserver, running on Windows (cf.
parts 1, 2 and 5 of the tutorial). There is a MariaDB Community Edition, that you can download (freely, of course) from the MariaDB website. There are a 32bit and a 64bit version (as well as binaries for other operating systems). MariaDB
may be downloaded as Windows installer package (.msi file) or as .zip archive. I used the installer, because it does all for you, including the creation of
shortcuts to the command line tools, as well as of some important directories and files in the Start menu; I'm also not sure, if the .zip download includes HeidiSQL, a free GUI application, that you could call the equivalent of MySQL Workbench (cf. part 3). Note, that the MariaDB download does not
include any connectors, nor any sample databases, as does the "all-in-one" package, distributed by MySQL Community.
|
|
Note: As a difference with the other 5 parts of the tutorial, written in 2020, maybe even before, the text about MariaDB is from
October 2021. The MariaDB database server, that I used, when writing this part of the tutorial, is version 10.6.4 (x64).
|
|
| 7.2.1. |
Installing MariaDB. |
| |
|
As said above, the following text concerns the installation of the MariaDB Community Edition database server (version 10.6.4 64bit, Windows
installer package) on MS Windows (Windows 10). I guess, that you are aware, that if you have installed MySQL, you don't need MariaDB. On the other hand,
there is no problem to install both servers, what I actually did myself. Using MySQL for my "real" data, MariaDB is actually just a try-out. This could change
in the future, for example if HelioHost opts to use MariaDB on their Tommy server, where my website will be hosted again, as soon as they are ready with Plesk.
|
|
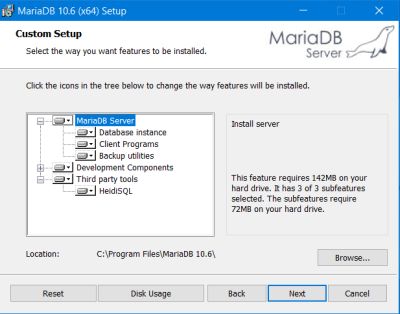
Double-click the setup file (actually mariadb-10.6.4-winx64.msi, 53MB) to start the installation process. After the splash screen and the license agreement,
choose the components, that you want to be installed: database server, clients, backup tools, development components and HeidiSQL
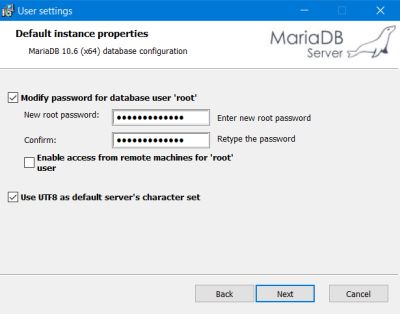
(third party software; cf. below). On the Default instance properties screen, set the password for database user root. You may allow root to access the server from remote machines (that makes only sense if your server runs on the Internet or is part
of an intranet). Except if you are sure that your data will only contain ANSI characters, you should check the Use UTF-8 as default server's
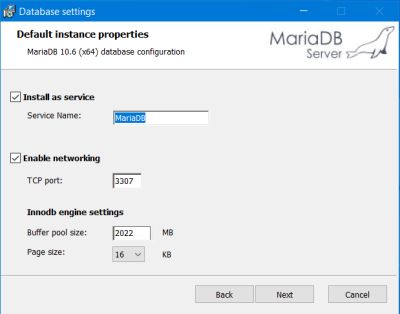
character set. The next screen asks for installing MariaDB as a service (seems obvious to me to do so) and if and at what port
to enable networking. As my MySQL server listens on its default port 3306, I chose to use port 3307 for MariaDB. On this screen,
there are also the settings for the Innodb engine; I let the defaults.
|
|
|
|
Note: As for MySQL, you can manage, start, restart and stop the MariaDB service in Windows Services
(that you can find in Control Panel > Administrative Tools).
|
|
| 7.2.2. |
MariaDB management with HeidiSQL. |
| |
|
"HeidiSQL is free software, and has the aim to be easy to learn. 'Heidi' lets you see and edit data and structures from computers running one of the
database systems MariaDB, MySQL, Microsoft SQL, PostgreSQL and SQLite. Invented in 2002 by Ansgar, HeidiSQL belongs to the most popular tools for MariaDB
and MySQL worldwide."
|
|
The paragraph above is how this great free database management tool is described on the HeidiSQL website. HeidiSQL is open source and includes an
astonishing set of features. To mention only a few of them: Connection to multiple servers in one window; connection via GUI or command line, using an
SSH tunnel or not; data export from one server/database to another; find specific text in all tables of all databases of a server; optimization and
repair of tables in a batch manner; launch of a parallel mysql.exe command line window using your current connection settings...
|
|
If you want to use HeidiSQL with MySQL or PostgreSQL, you can get it from the HeidiSQL website.
If you want to use it with MariaDB and used the Windows installer package to install the database server, you already have it, downloaded and installed.
|
|
Connecting to the MariaDB server.
|
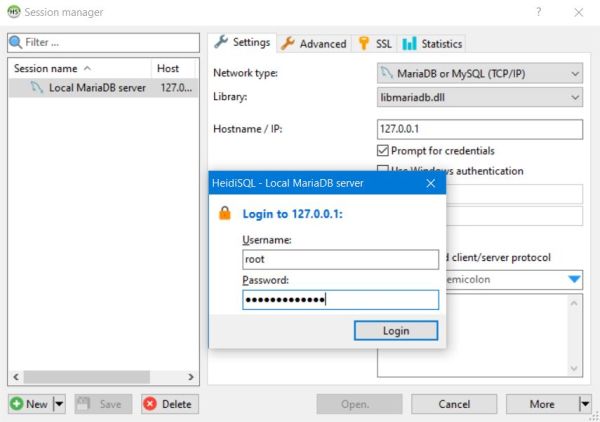
Before we can connect to MariaDB, we have to create a session. You normally create a session for each of the database servers, that
you manage with HeidiSQL, but you can also create separate sessions for different users, and even for given databases. To create a session, push the New button at the lower left corner of the HeidiSQL window. In the Settings tab, fill in the following (some
fields being already filled-in correctly):
- Network type: MariaDB or MySQL (TCP/IP)
- Library: libmariadb.dll
- Hostname/IP: 127.0.0.0
- In order to use the same session with different database users, check the Prompt for credentials check box. This will disable
input to the User and Password fields.
- Port: 3307 (as with my MySQL listening on port 3306, I configured MariaDB on this one)
|
|
|
|
Push the Save button to create the session. To give it some meaningful name, right-click the "Unnamed session" in the left pane
of the window and choose Rename; type the new session name (replacing "Unnamed session"). In the Advanced
tab, you can configure things like logging of DLL and DML queries; in the SSL tab, you can configure SSL, if you use a secure
connection. I let all defaults in these two tabs.
|
|
With the session selected, push the Open button. As we configured the session to prompt for credentials, a dialog box, asking for
user name and password opens. Log in as root (the only user existing so far).
|
|
|
|
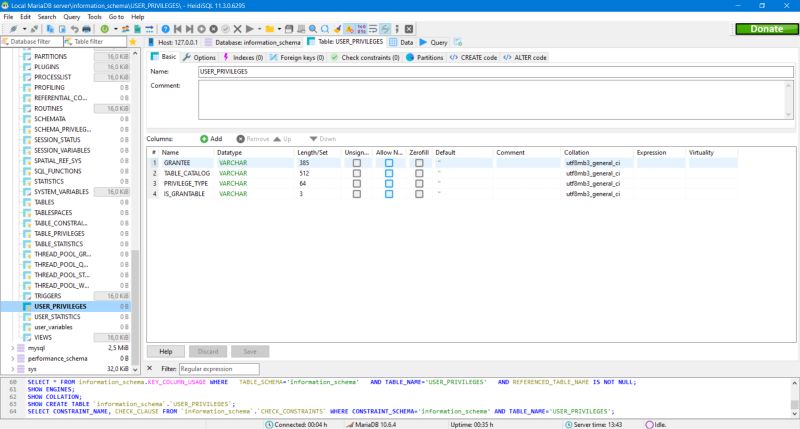
The databases are listed in the left pane. The right pane has multiple tabs; on each action done, a new one opens. Clicking a database
in the left pane, shows all its objects (as a drop-down tree) and in the right pane the objects' details are displayed. Clicking a table in the drop-down tree,
shows the table structure in the right pane. To display the table data, click Data
in the tabs menu.
|
|
|
|
Basic MariaDB configuration.
|
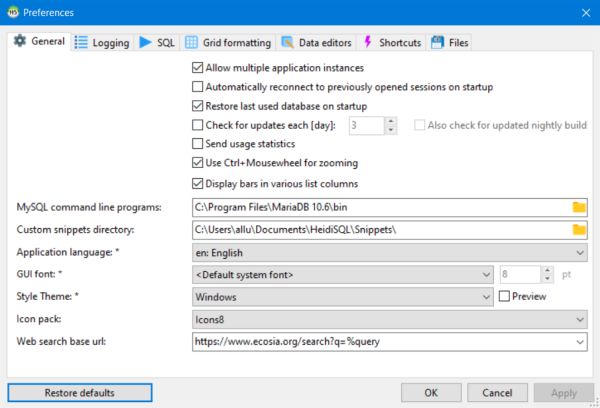
The configuration of the MariaDB server is done by choosing Tools > Preferences. There are lots of options (that I didn't take the
time to view the meaning of). Here the settings that I changed (letting the default values for the other options):
- General: I set the path to the MySQL command line tools to the bin subdirectory of the MariaDB installation folder
(C:\Program Files\MariaDB 10.6\bin). I guess that letting this field blank has the same effect and that the reason for this setting is primarily if you want
to use "some other" MySQL programs.
- SQL: Just as a personal preference, I choose a tab width of 2 (instead of 3) and checked the TAB to spaces check box.
- Files: As I save the queries, that I want to keep, in my Programming library, no real sense to save them here (and by the way avoiding being remembered
all the time that there are unsaved tabs), I unchecked both the file saving and the file reopen options.
|
|
|
|
| 7.2.3. |
Creating the sample database "world". |
| |
|
In order to show how to use HeidiSQL to manage databases and database content and in order to continue the tutorial with the same data as in the chapters
before, let's create the "world" database, as included as sample with MySQL Community Edition. Click the following link to download the "world" database SQL.
|
|
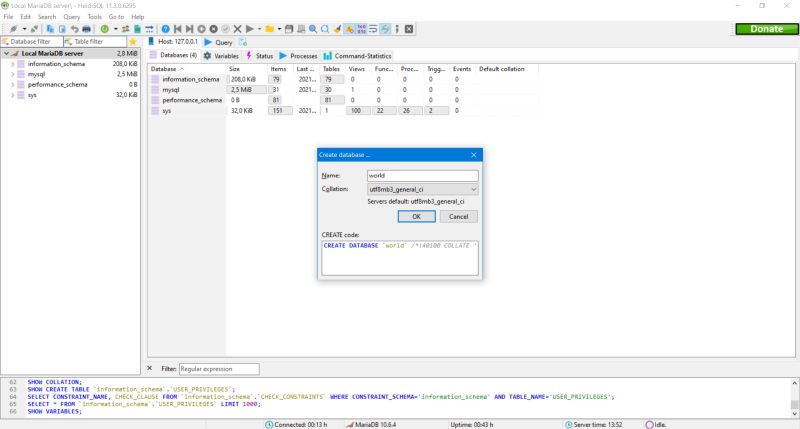
To create the database, click the server entry at the top of the drop-down list in the left pane to select it. Then right-click in the left pane and from the
opening context menu, choose Create new > Database. In the Create database window, enter the database name ("world") and the collation (utf8mb3_general_ci = server default when UTF8 has been chosen in the
server configuration). Push the OK button to make the changes take effect.
|
|
|
|
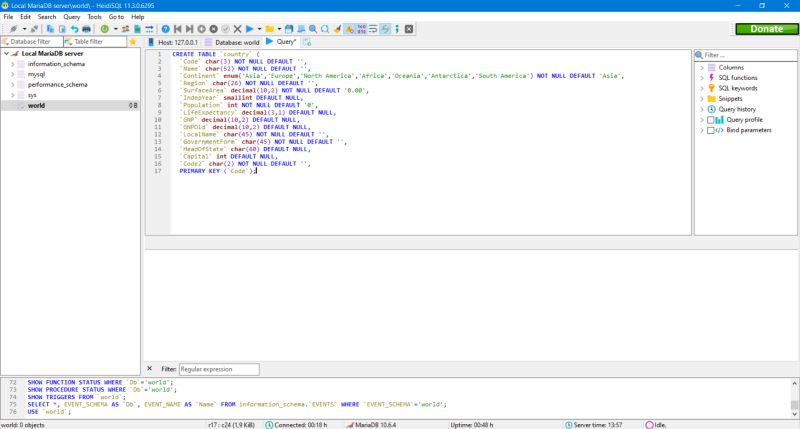
You can create tables in a similar way as you create a database: Selecting the database, in the drop-down list in the left pane, right-clicking in the left pane
and from the context menu, choosing Create new > Table. Then, you can add the table fields with their characteristics. I don't usually
create tables this way, but directly enter the CREATE TABLE statement in an SQL tab. To do so in our case, just
copy the SQL statements from the download file to the SQL tab. To run the query, push Execute SQL in the icon bar of the HeidiSQL window.
Important: Be sure to create the "country" table first one! The two other tables include foreign keys, that reference this table
and this reference must exist before it can be used in a foreign key definition.
|
|
|
|
Note: As you can see on the screenshot, I didn't specify a storage engine in my SQL statement, when I
created the table. This means, that the engine is chosen by MariaDB and this choice (for all 3 tables of my "world" database) was InnoDB,
that seems to be the MariaDB default engine.
|
|
To fill the data into the "world" database's tables, just copy/paste the INSERT statements from the download file into an SQL tab.
As for the table creation, you have to fill the "country" table, before filling the two other ones!
|
|
| 7.2.4. |
Creating MariaDB users. |
| |
|
We will now create two new MariaDB users, similarly as we did for MySQL (cf. part 3 of this tutorial).
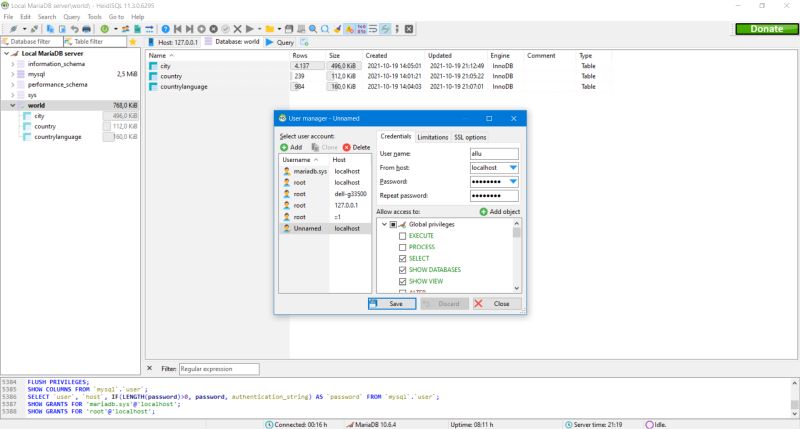
Click the Manage user authentication and privileges icon in the icon bar (or choose Tools > User manager).
The User manager window opens. To add a new user, use the Add button. The right pane of the window will then
show the fields to enter the credentials, limitations and SSL options for this user.
|
|
In the Credentials tab (I let all settings in the other tabs at their default values), you have to enter the user name, the password
and the host from where they may connect to the server. The host specified here should normally be localhost. This tab also allows to
specify the privileges for this user. Privileges may be viewed as the permissions a given user has when accessing the MariaDB server
(from a given host). When creating a new user, the Allow access to list contains a single object called Global
privileges. These are the permissions a user has to access all databases on the server. The screenshot below shows the creation of user "allu", who, from
localhost, has the global privileges SHOW DATABASES, SELECT and SHOW VIEW. To create the user, push the
Save button.
|
|
|
|
I then created a second user, called "nemo", with no global privileges at all. Beside the global privileges, there are database specific
privileges, i.e. the permissions a given user has to access this database. To change the credentials for a given user, select them in the left pane
and do your changes in the right one. To define allu's privileges for the database "world", do as follows: Select user "allu" in the left pane, then click the
Add object button at the top of the privileges list. A window with the drop-down objects tree for this MariaDB server opens; choose the
"world" database and push OK.
|
|
|
|
A Database "world" object is added to the privileges list and you can set the database specific privileges the same way as you did
for the global privileges before.
|
|
|
|
A word, concerning my two users "allu" and "nemo". You may see "allu" as a standard user. With the global privileges, as described
above, he can read the data of all databases on the server. For individual not system databases (those coming with MariaDB) and not "special" databases (as
for example statistics and visitor reviews databases, for which I use a user, who may only access these ones), I give him all data privileges (INSERT, UPDATE,
DELETE, EXECUTE). Thus, he has full access to the database content, but no permission to modify its structure (for what I use root). The second user "nemo" may
be seen as a limited user or read-only user. No global privileges, but SELECT and SHOW VIEW privileges
on not system and not "special" databases. As the "world" database is for test purposes only, I did, however, not observe these roles, giving "allu" all
privileges, except GRANT and LOCK TABLES and I gave "nemo" full data access.
|
|
| 7.2.5. |
Accessing MariaDB with PHP scripts. |
| |
|
The PHP script, described in this paragraph was tested on Windows 10 64bit with Apache Lounge 2.4.46, PHP 8.0.0 and MariaDB Community Edition 10.6.4; the database
used is the MySQL sample "world", created on MariaDB as described above. The installation of Apache and PHP have been described in
part 1 resp. part 2 of this tutorial. If you have
configured PHP for MySQL as described in part 3, you'll have nothing to do: the
configuration of Apache/PHP for MariaDB is exactly the same as it is for MySQL.
|
|
Configuring Apache for PHP.
|
Add the following to the Apache configuration file (httpd.conf); note the usage of the slash (/) instead of the Windows usual backslash
(\)!
AddHandler application/x-httpd-php .php
AddType application/x-httpd-php .php
LoadModule php_module "C:/Programs/PHP/php8apache2_4.dll"
PHPIniDir "C:/Programs/php/"
|
|
Enabling the PHP extensions for MySQL.
|
To use PHP to access the MariaDB database, uncomment the following in your PHP configuration file (php.ini) file:
extension=mysqli
extension=pdo_mysql
|
|
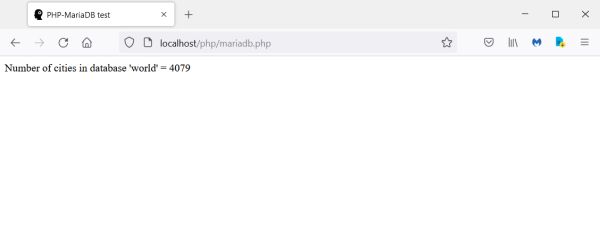
The following sample test script mariadb.php (placed in the Apache htdocs/php directory) does the same as those, described in the other parts of the tutorial:
Display of the number of cities in the "city" table of the "world" database. In fact, the script is exactly the same as the one I used with MySQL, except that
I had to change the port to 3307, as my MariaDB does not use the standard port 3306.
|
<html>
<head>
<title>PHP-MariaDB test</title>
</head>
<body><p>
<?php
$host= 'localhost:3307'; $database='world'; $user = 'nemo'; $passwd = 'nemo';
$mysqli = new mysqli($host, $user, $passwd, $database);
$sql = "SELECT count(*) AS _count FROM city";
$uresult = $mysqli->query($sql, MYSQLI_USE_RESULT);
$count = 0;
if ($uresult) {
$row = $uresult->fetch_assoc(); $count = $row['_count'];
}
echo "Number of cities in database 'world' = $count";
?>
</p></body>
</html>
|
|
|
|
| 7.2.6. |
Accessing MariaDB with Perl scripts. |
| |
|
The Perl scripts, described in this paragraph were tested on Windows 10 64bit with Apache Lounge 2.4.46, Strawberry Perl 5.32.0.1 (x64) and MariaDB Community
Edition 10.6.4; the database used is the MySQL sample "world", created on MariaDB as described above. The installation of Apache and Strawberry Perl have been
described in part 1 resp. part 5 of this tutorial.
It is possible to access MariaDB using the DBD::mysql driver, thus the scripts written for MySQL should mostly (cf. below) work with
MariaDB, too. The following command line program mariadb1.pl, displaying the count of cities in the "city" table of the "world" database seems different from
the one, that I used with MySQL, but, apart from the usage of port 3307, it's just another, equivalent syntax.
|
use strict; use warnings;
use DBI;
my $database = 'world'; my $host='localhost'; my $port = 3307;
my $username = 'nemo'; my $password = 'nemo';
my $dbh = DBI->connect("DBI:mysql:database=$database;host=$host;port=$port", $username, $password, {RaiseError => 1})
or die "Cannot connect to MariaDB server\n";
my $sql = "SELECT COUNT(*) FROM city";
my $sth = $dbh->prepare($sql);
$sth->execute();
my ($count) = $sth->fetchrow();
print "\nNumber of cities in the world.city table = $count\n\n";
$sth->finish();
$dbh->disconnect();
|
|
The screenshot shows two executions of the script in Command Prompt. For the first one (error message), MariaDB was stopped, for the second one (city number
display), it was running.
|
|
|
There actually is a DBD::MariaDB driver and I suppose that to fully profit of the features of MariaDB it is more accurate to use it
than to use the MySQL driver, and that for certain functionalities it may even be mandatory. But, if you create a new script mariadb2.pl, identical to mariadb1.pl,
except that you replace DBI:mysql by DBI:MariaDB and then run this script, you'll get an error message telling you that the MariaDB driver installation failed,
because DBD/MariaDB.pm could not be found. The reason for this is simple: Whereas the MySQL driver is part of the Strawberry Perl distribution, the driver for
MariaDB isn't. No real issue, because it can easily be installed from CPAN (cf. part 5 of this tutorial
for details concerning CPAN). I installed the MariaDB driver by entering the following commands in the x64 CPAN client:
i /mariadb/
install PALI/DBD-MariaDB-1.21.tar.gz
q
where i is used to search for a module, and q to quit the client.
|
|
Here is the final code of mariadb2.pl.
|
use strict; use warnings;
use DBI;
my $database = 'world'; my $port = 3307;
my $username = 'nemo'; my $password = 'nemo';
my $dbh = DBI->connect("DBI:MariaDB:database=$database;port=$port", $username, $password, {RaiseError => 1})
or die "Cannot connect to MariaDB server\n";
my $sql = "SELECT COUNT(*) FROM city";
my $sth = $dbh->prepare($sql);
$sth->execute();
my ($count) = $sth->fetchrow();
print "\nNumber of cities in the world.city table = $count\n\n";
$sth->finish();
$dbh->disconnect();
|
|
With the MariaDB driver installed, rerunning my original mariadb2.pl script (using the same syntax as with DBD::mysql) resulted in a new error, as shown on the
screenshot below. The reason is that the syntax for DBI->connect used with DBD::MariaDB is somewhat different from
from the one with DBD::mysql. Normally there is no problem, but in our case, with the necessity to indicate the port, we have to take these differences
into account. In fact, just don't indicate the host; localhost will anyway be taken as default.
|
|
|
|
Finally, with the correct syntax for DBI->connect (as shown in the code above), the script executes successfully, and the number
of cities in the "world" database is displayed.
|
|
|
|
And to be complete (and supposing Perl CGI is correctly configured on Apache), the code of mariadb.pl, a simple CGI script to display the number of cities
in the "cities" table of the "world" database:
|
use strict; use warnings;
use CGI qw(:standard);
use CGI::Carp qw(fatalsToBrowser);
use DBI;
my $database = 'world'; my $port = 3307;
my $username = 'nemo'; my $password = 'nemo';
print header;
my $dbh = DBI->connect("DBI:MariaDB:database=$database;port=$port", $username, $password, { AutoCommit => 1, RaiseError => 1 })
or die "Failed to connect to database: $DBI::errstr";
my $sql = "SELECT count(*) FROM city";
my ($count) = $dbh->selectrow_array($sql);
print "<html>";
print "<head><title>Perl-MariaDB test</title></head>";
print "<body><p>Number of cities in database 'world' = $count</p></body>";
print "</html>";
$dbh->disconnect();
|
|
| 7.2.7. |
Accessing MariaDB with Python scripts. |
| |
|
In part 6 of this tutorial, I introduced Python DB-API, the Python standard for
database interfaces. I also introduced PyMySQL, a Python Database API v2.0 connector for MySQL databases and showed in a simple example
(the same task as described here for PHP and Perl: displaying the number of records in the "city" table of the "world" database) how to use PyMySQL to access the MySQL server and read data from a MySQL database.
|
PyMySQL can be used to connect to a MariaDB database, too. Even better: You can use a Python script for MySQL with MariaDB without the
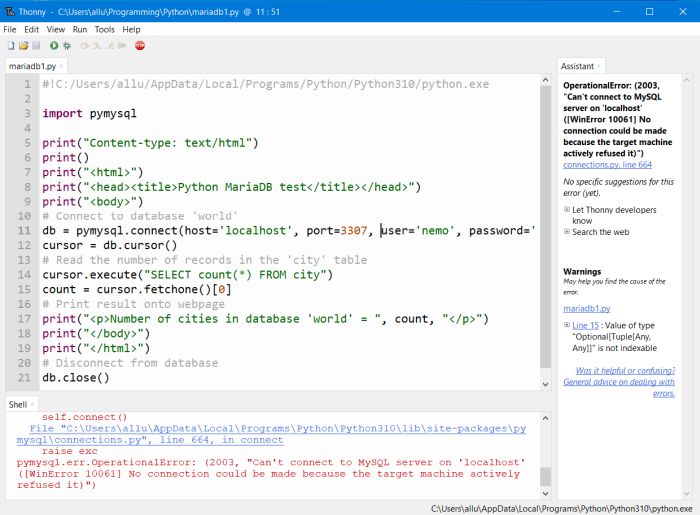
need of any changes! Thus, to display the number of world's cities in the web browser, we can simply use the script from part 6.7 of this tutorial. The script
and its execution in Thonny are shown in the screenshot below. If you have a closer look at the code, you'll see that the connection statement has been changed to
db = pymysql.connect(host='localhost', port=3307, user='nemo', password='nemo', db='world')
what has nothing to do with a difference between MySQL and MariaDB, but is simply due to the fact that, as my MySQL server listens on standard port 3306, I had
configured the MariaDB server to listen on port 3307. The second thing, you notice on the screenshot, is that the script aborts with an error message. What happened
here is that I tried to connect to MariaDB at a moment where the database server wasn't running. And, as the script doesn't contain any code to catch this error,
the script is terminated with an unrecoverable error condition.
|
|
|
|
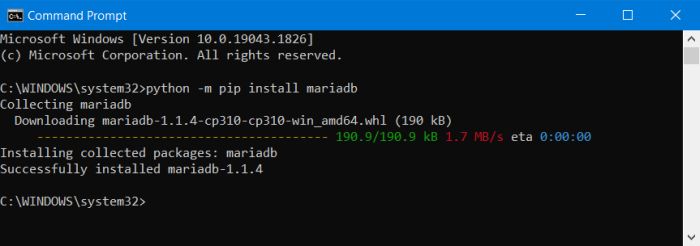
In June 2020, MariaDB made the first generally available release of MariaDB Connector/Python. This is a native MariaDB connector for
building Python applications on MariaDB. It is compliant with Python DB API 2.0 (PEP-249). It is written in Python and C and uses MariaDB Connector/C. MariaDB Connector/Python is available as a package called mariadb and may be installed using PIP.
|
|
|
|
The way to use the mariadb module is mostly the same as using the pymysql module and there isn't a lot
to change in our mysql.py script to create the mariadb.py script. However, I did some modifications: 1. I added code to catch the error that
occurs when the database server is down or when for another reason the connection fails. 2. I removed the index from the cursor.fetchone() method (what is not really correct in Python) and applied it to the "count" variable. Here's the code of my Python-MariaDB
CGI script:
|
import mariadb
import sys
print("Content-type: text/html")
print()
print("<html>")
print("<head><title>Python MariaDB test</title></head>")
print("<body>")
try:
db = mariadb.connect(host='localhost', port=3307, user='nemo', password='nemo', db='world')
except mariadb.Error as e:
print(f"Error connecting to 'world' database: {e}")
sys.exit(1)
cursor = db.cursor()
cursor.execute("SELECT count(*) FROM city")
count = cursor.fetchone()
print("<p>Number of cities in database 'world' = ", count[0], "</p>")
print("</body>")
print("</html>")
db.close()
|
|
Note: As I said in part 6, I never wrote a Python script in my whole life
and to write the code for the tutorial, I searched for examples on the web and modified those as needed. The script, that I used as a base for my Python-MariaDB
CGI script is in fact a command line script. And I'm all but not sure if to force the termination of the script in the case of a connection error by using the
statement sys.exit(1) may be used in a CGI environment (?).
|
|
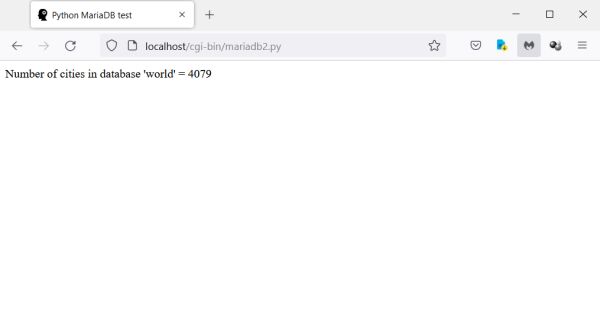
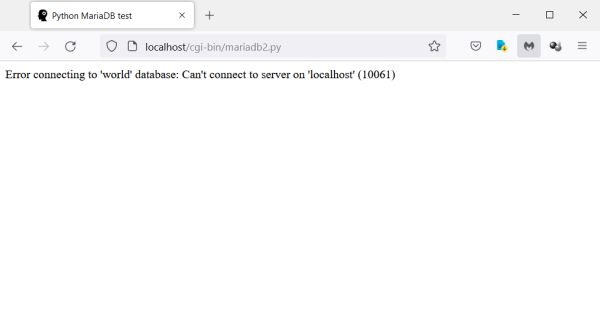
The following two screenshots show the resulting webpage: On the left the display of the number of cities (successful connection), on the right an error message
(MariaDB server not running).
|
|
|
|
| 7.2.8. |
Accessing MariaDB with Lazarus/Free Pascal. |
| |
|
| 7.2.9. |
MariaDB management with phpMyAdmin. |
| |
|
If you have installed HeidiSQL, you don't need phpMyAdmin and vice-versa. There is, however, no reason not to use both. Some tasks are easier or more
comfortable to realize in one or the other. Also note, that if you create a site with a webspace hosting service, you'll nearly always get phpMyAdmin
to manage your database server. phpMyAdmin with MySQL has been described in part 4 of this tutorial.
As it is nothing else than a collection of PHP scripts and as PHP works with MariaDB exactly the same way as it does with MySQL, all that has been said for
MySQL also applies to MariaDB. I'll nevertheless describe here the setup of phpMyAdmin 5.1.1 on my actual system, creating a server
entry for both MySQL and MariaDB.
|
|
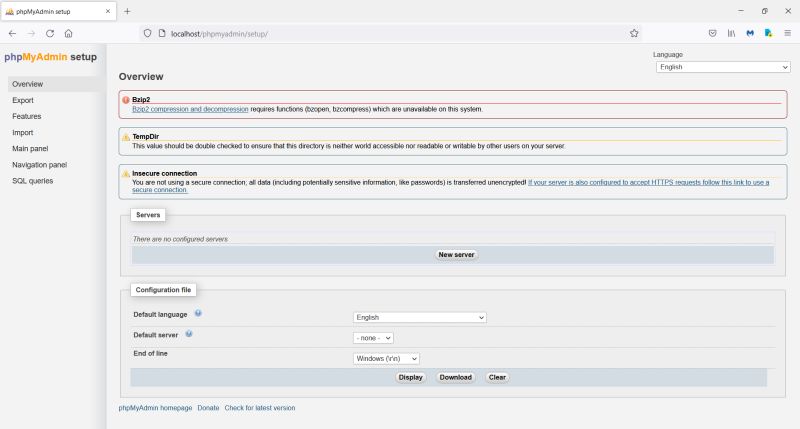
After having unzipped the phpMyAdmin download archive to the htdocs/phpmyadmin directory on Apache, run the installation script by typing localhost/phpmyadmin/setup/ in your web browser address field. Bzip2 compression is not installed on Windows platforms and not really
needed, thus the error message may be safely ignored. As our databases will only be accessed from the local computer itself, you can also ignore the warning
messages.
|
|
|
|
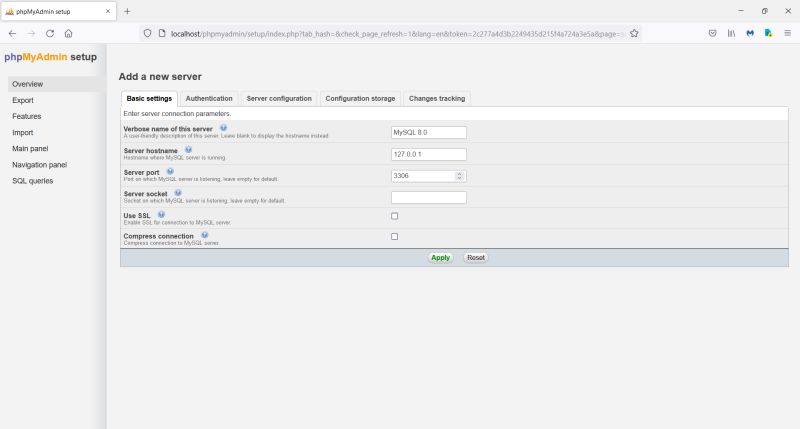
To create the server entry for MySQL, click the New server button in the main window of the setup script.
Lots of things may be configured here. I never took the time to look at the details, just entering the essential settings (letting all the rest as it is set
by default). In the Basic settings pane, set a user-friendly verbose name for the server (I called it "MySQL 8.0"). Set the server
hostname to 127.0.0.0 and the server port to 3306. Push the Apply button to
save the new settings.
|
|
|
|
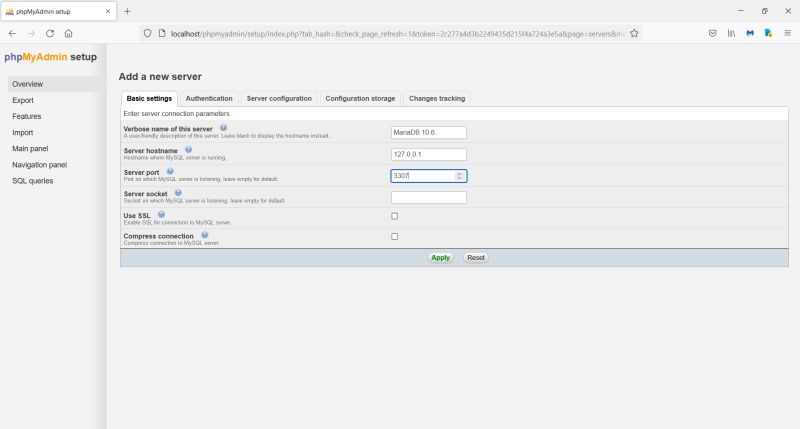
Back to the main page of the setup script, create the server entry for MariaDB by clicking the New server
button again. In the Basic settings pane, set a user-friendly verbose name for the server (I called it "MariaDB 10.6"). Set the server
hostname to 127.0.0.0 and the server port to 3307. Push the Apply button to
save the new settings.
|
|
|
|
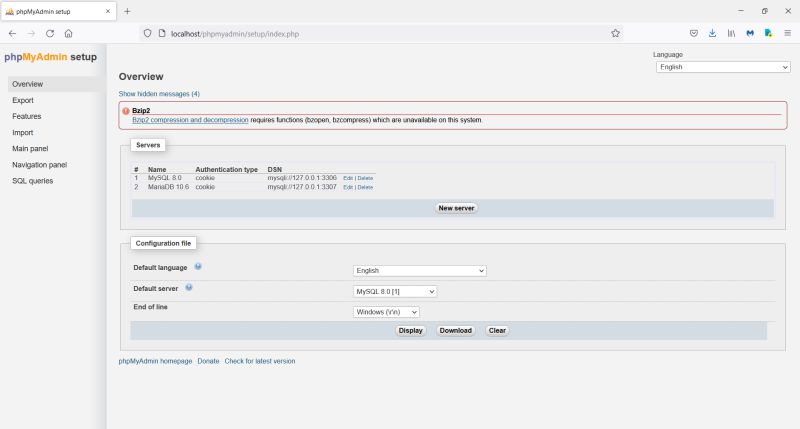
The two servers are now listed on the main page of the setup script. The authentication type has by default been set to cookie, that
is ok. The mysqli extension is used to make the connection to the server. The first server added (MySQL 8.0) has been set the default
server, that is fine, because I use MySQL with my "real" databases, and MariaDB for try-out purposes only. Running the setup script is in fact nothing else than
creating/editing a copy of the phpMyAdmin configuration file config.inc.php, located in the /phpMyAdmin/setup directory. Use the Download button in the script's main window to download the phpMyAdmin configuration file and move it to the main phpMyAdmin
directory. This is mandatory! If you don't do so, the phpMyAdmin application will not work!
|
|
|
|
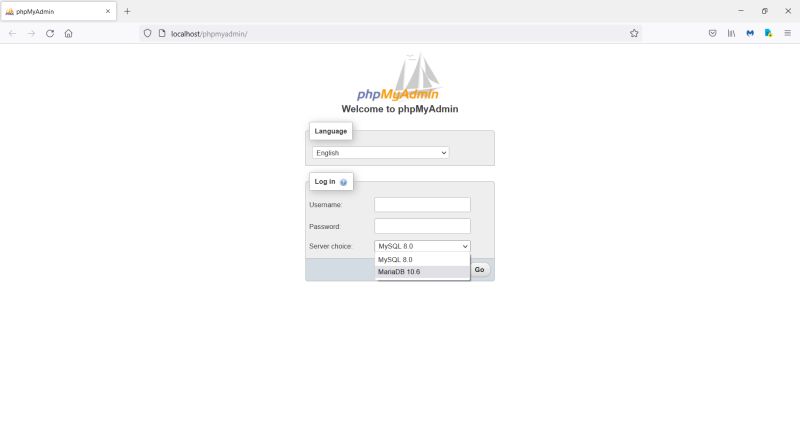
To connect to either of the two database servers, enter localhost/phpmyadmin/ in your web browser address field. A login dialog box is displayed. In the Server choice combo box, select if you want to connect to MySQL
or to MariaDB. As user, use root or any of the users, that have been created on the server chosen.
|
|
|
|
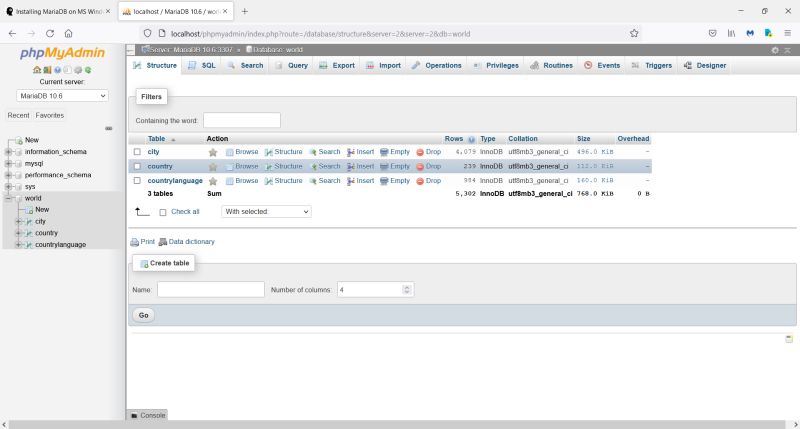
And, to terminate this tutorial, a look at the databases on the MariaDB server, using phpMyAdmin.
|
|
|
|
![HeidiSQL: Creating a new MariaDB session on localhost:3307 [1] HeidiSQL: Creating a new MariaDB session on localhost:3307 [1]](../screenshots/mariadb4a.jpg)
![HeidiSQL: Creating a new MariaDB session on localhost:3307 [2] HeidiSQL: Creating a new MariaDB session on localhost:3307 [2]](../screenshots/mariadb4b.jpg)
![MariaDB: Defining database specific user priviledges [1] MariaDB: Defining database specific user priviledges [1]](../screenshots/mariadb11a.jpg)
![MariaDB: Defining database specific user priviledges [2] MariaDB: Defining database specific user priviledges [2]](../screenshots/mariadb11b.jpg)
![MariaDB: Accessing the database with a Perl command line script [1] MariaDB: Accessing the database with a Perl command line script [1]](../screenshots/mariadb13a.jpg)
![MariaDB: Accessing the database with a Perl command line script [2] MariaDB: Accessing the database with a Perl command line script [2]](../screenshots/mariadb13b.jpg)
![MariaDB: Accessing the database with a Perl command line script [3] MariaDB: Accessing the database with a Perl command line script [3]](../screenshots/mariadb13c.jpg)
